
Page 1 of 49
6/26/2018
Audition
Quick Reference Guide
Created By:
Kyle Culpepper

Page 2 of 49
6/26/2018
Importing audio files and browsing media:
Steps
What You See
Open: Adobe Audition CS6
Note: Adobe Audition CS6 is licensed on
campus computers. The Adobe program is a
part of one of many available Adobe
applications. The primary focus of Audition is
the ability to edit and create audio tracks. This
is not the latest version of what you could
purchase. Some of this material will not be
available if you are using an older version of
Audition or the new CC version with the
Adobe Cloud.
Import File:
Select: File -> Import -> Audio
-Or-
Short Cut Command: Ctr+I
Browse: For your audio file
Supported Audio Formats:
“APE, AU, AVR, BWF, CAF (all
uncompressed and most compressed
versions), FLAC, HTK, IFF, M4A, MAT,
MPC, MP2, MP3 (Including MP3-surround
ifiles), OGA, OGG, PAF, PCM, PVF, RAW,
RF64, SD2, SF, SND, VOC, VOX, W64,
WAV (including files with up to 32
channels)”
Source: http://helpx.adobe.com/audition/using/supported-
file-formats.html
Adobe Audition Quick Reference Guide
Getting Started

Page 3 of 49
6/26/2018
After Import is completed your audio file will
be available in the Waveform workspace for
editing.
Note: Importing further audio files will only
make those files available in the Files panel.
Select the specific audio file in the Files panel
to work on it in the Waveform workspace.
Files Panel:
Steps
What You See
This panel is an alternative tool to help
maintain your imported media files
Select to open audio file to both be a
selection option in this panel and also have it
available immediately for edit in the
waveform workspace
Select to Import media. Function is
VERY SIMILAR to open file. Doing this will
only import file to Files panel
Select to create a blank slate for an audio
track
Select after highlighting audio file in the
File window to make a new Multi-track
session
Select after highlighting audio file in the
File window to delete item from File Window

Page 4 of 49
6/26/2018
Note: This will not remove audio file from
your computer, rather it removes the asset
from your File panel. Also, the files placed
here will disappear after closing out this
session of Audition. Use this panel as a means
to quickly work on multiple audio tracks at
once. Files with an asterisk in the title have
been altered in the workspace and will write
over the original file.
Files With Asterisk Need To Be Saved:
Altering Workspace:
Steps
What You See
The location for the various panels can be
altered by switching the “Workspace” option.
Change Workspace simply by:
Clicking: “Window” tab and “Workspace”
Select: The workspace layout you prefer
Note: We will be using the default workspace
throughout this guide.

Page 5 of 49
6/26/2018
Saving Audio File:
Steps
What You See
Click: File -> Save As
Note: Anything you do in the Waveform
workspace will create a permanent change to
the original file, thus it is important to “Save
As” to change file name and avoid writing
over the original copy.
Choose your desired “File Name”
Browse: Your computer for a safe location to
save your work
Select: From the “Format” dropdown window
what you want your file type to be saved as
Select: Your “Sample Type” and Format
Settings as you please
Click: “Ok”

Page 6 of 49
6/26/2018
Setting Up Audio Capture Settings:
Steps
What You See
Before the recording process begins, be
certain that your audio hardware is configured
and ready. Setting up audio can be done
through the Audio Hardware Preferences
menu system.
Click: Edit -> Preferences -> Audio
Hardware

Page 7 of 49
6/26/2018
Audio Hardware allows you the chance to
select:
Device Class: Based on audio card in
computer station. MME and ASIO are
common driver types found on Windows
machines. ASIO is superior since it is better at
reducing latency between input and output
sources.
Below Options Based on MME setup (Most
Commonly Used In Media Center):
Default Input: Recording device
Default Output: Playback speakers
Master Clock: You can choose which device
to have everything synchronized with
Latency: Delay between input and output
devices. Only change this setting if you hear
too much latency between your various input
devices. Lowering is idea, however too much
can produce audio dropouts or clicks in your
recording. The selection of 200 ms is typically
used in the Media Center, but experimentation
may be required to determine the best setting
for your setup.
Sample Rate: The rate at which your device
captures the wave form of audio coming in. It
cannot be a continuous wave when captured.
A higher sample rate signifies a better
appearance of a continuous wave form. More
samples or a larger discrete-time signal
represented in Hertz is best. 44KHz is
standard for recording.

Page 8 of 49
6/26/2018
Recording Audio:
Steps
What You See
Select: “Record” from the play options below
the Waveform workspace.
Note: When you select Record your recording
will start where the play head is at in the
timeline.
Doing this will write over the data following
that point, until you select stop.
Page 9 of 49
6/26/2018
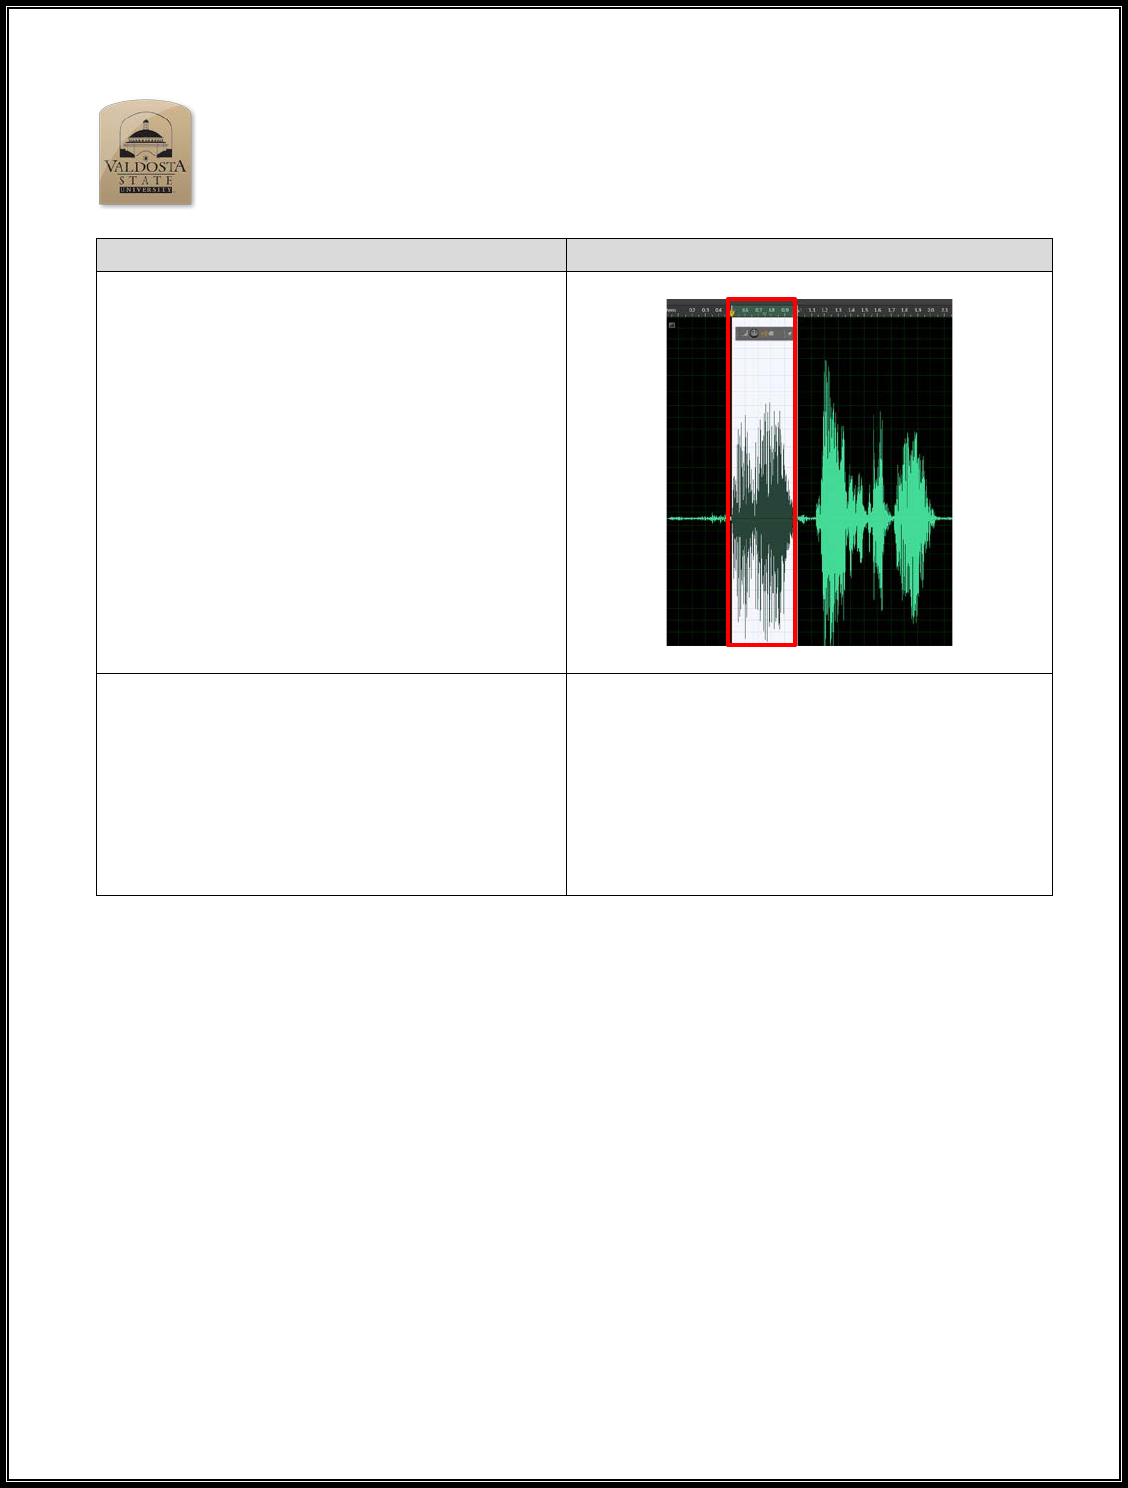
Basic Selections:
Steps
What You See
Selecting:
This is important when defining which
specific components in the timeline you wish
to edit.
Click & Drag: Your mouse over the time line
region to select, either by starting left and
going right or vice-versa
Note: Wave forms that are highlighted with a
white background are selected regions in your
workspace.
Time Selection:
Alternatively:
Click: The Start Point
Shift Click: The end point on the time line
Note: Beneficial if doing more exact
selections
Adobe Audition Quick Reference Guide
The Many Ways to Select & Zoom

Page 10 of 49
6/26/2018
Select All:
Double Click: Timeline to highlight whole
region
Keyboard Shortcut: Ctrl+a
In general only the waveform is shown. To
see other selections such as Spectral
Frequency and Pitch, simply click on the
icons shown to the right
Spectral Frequency View Tool: Select this
to view the spectral frequency beneath the
waveform
Spectral Pitch Display: Select this to view
the pitch beneath the waveform
Time Selection Tool: Automatically
selected for you. Displays the audio waveform
Spectral Frequency:
Pitch Display:

Page 11 of 49
6/26/2018
Selecting Stereo Right or Left:
Steps
What You See
When you are editing an audio file that has
two channels you can select the desired region
just like earlier, however, you have even more
freedom to select either right or left channel
segments when selecting an area to affect
Click: or to choose which channel
you intend to work on.
Note: The region grayed out will not be
influenced or altered until you click on the
related channel button L or R
Select L or R:
Adding Markers:
Steps
What You See
Markers can be handy tools when listening for
finite spots to remove or as a way to select a
specific audio range.
Markers will be added to the timeline play
head location.
Find the “Markers” panel in your workspace.
In general this is found in the panels section to
the left as the “Markers” tab.

Page 12 of 49
6/26/2018
Click: Cue marker
-Or-
Press: M on the keyboard each time you want
to place a marker in your timeline during play
back
Click: Merge Markers after highlighting
selected markers to combine into one merged
marker
To highlight multiple markers:
Ctrl + Click: to highlight each marker shown
in the Markers panel.
Note: When you merge markers you will have
a start and end time to work with.
Double Click: On the newly generated Merge
Marker icon located in the Markers
panel. Doing so will highlight the merged
region

Page 13 of 49
6/26/2018
Zooming In & Out:
Steps
What You See
When making a selection you may notice a
clicking or popping noise after you delete or
remove a specific selection. It may be best to
use the zoom function to clearly determine
where the sound start and end point reach the
zero line (Which is defined by the infinity
symbol) on the waveform
Note: The vertical axis represents the
amplitude of your sound wave, which is like
saying the loudness of the sound.
When zooming in we are changing the depth
of the x-axis that we see which is represented
by time in seconds. Where we are is
determined by the navigational bar at the top
of the wave form, which is shown below.
Whole timeline in view:
We are currently zoomed out completely
when the navigation bar is fully highlighted in
yellow.
Zoomed in region:
The region that is shown as a yellow
highlighted transparent box is the part that is
being viewed in the timeline. This transparent
selection in the navigation bar is something
that can be dragged (AKA: Scrubbed) to the
right or left to move to different parts of the
waveform.
A Zeroed Out Selection:
Amplitude of wave in dB

Page 14 of 49
6/26/2018
Zoom in or out along x-axis:
Click: The “zoom in at in point” tool
to zoom in to the start point of your selection
made
Shortcut Key: Alt+Home
-OR-
Click: The “zoom in at out point” tool
to zoom in to the end point of your selection
made
Shortcut Key: Alt+End
Note: Zooming in without making a selection
prior would make both zoom tools mentioned
above act the same and strictly as simple
zoom in functions for the x-axis
-OR-
Click: The “zoom in (time)” tool to
zoom in from the center of the time line
currently displayed
Shortcut Key: =
-OR-
Click: The “zoom out (time)” tool to
zoom out from the center of the time line
currently displayed
Shortcut Key: -
Zoomed in at in point:
Zoom in or out (time):
Increase zoom of current amplitude:
Be aware that zooming the amplitude is not
modifying the loudness of the sound, just the
scale being used to measure the sound wave
Zoom in amplitude to increase how
sensitive you want your workspace to be
Shortcut Key: Alt+=
-Or-
No Amplitude re-scale:
Zoomed in 10 times

Page 15 of 49
6/26/2018
Zoom out amplitude to decrease the
sensitivity scale
Shortcut Key: Alt+-
Zero Crossing:
Steps
What You See
As shown above when a sound wave reaches
the zero line no noise is detected. This can be
difficult to determine at times unless you
zoom in. However, you can use short cut keys
to quickly select the in and out points for this
Zero Crossing selection.
1
st
: Highlight the region you wish to work
with using any of the selection methods
described above.
2
nd
:Click: “Shift i” on the keyboard to
automatically set the end and start points to be
both at their respective zero crossings
Selection Tools for Frequency Spectrum:
Steps
What You See
The tools shown to the right are all selection
tools, which will only be accessible when you
have the frequency spectrum viewable
beneath the waveform.
Marquee tool is a way to box out a
section in the frequency spectrum.
Lasso tool is a way to generate your own
selection shape of the frequency spectrum to
alter.
Using Marquee tool:
Using Lasso tool:

Page 16 of 49
6/26/2018
Brush tool is a way to brush in the section
of the frequency spectrum you wish to alter.
Note: More will be shown as to why these
selection methods are important at a later time
Performing these selections is simple as
clicking and dragging across the region you
want to influence.
Manually Adjusting Audio Level:
Steps
What You See
Amplify your audio for the selected region.
This can be done by using the HUD (Heads-up
Display). If you don’t see the HUD simply use
the shortcut key to bring it into view: Shift +
U. You can use the same shortcut to remove
the HUD from view.
Click: the pin icon to keep the HUD unit
pinned in its current location on your display
or to unpin it.
Click & Drag: Over the digital analogue knob
to increase or decrease the overall amplitude
of your selection.
Adobe Audition Quick Reference Guide
Standard Waveform Audio Adjustment

Page 17 of 49
6/26/2018
Note: The number you see (in this case +15
dB) is the amount that you are amplifying the
region. Because it is in yellow, this is
something that you can manually adjust as
well.

Page 18 of 49
6/26/2018
To Manually Input Amplification:
Click: On the yellow number
Type: In the value you would like to increase
or decrease the amplitude too.
Ex: -15, 15, 20
Note: This is a dB range you are varying
When increasing the amplitude be sure not
to have the levels bar reach the red region. It
is best to aim for just around the lime and
yellow region at most.
When you see your audio reach the red zone
very obvious clipping will occur, knocking out
parts of your recordings peaks and troughs in
the waveform.
This is Over Amplified:
Normalizing Audio Level:
Steps
What You See
Normalizing audio is the process of raising or
lowering the amplitude of your audio file so
that its loudest points reach 0dB or as close
to 0dB as possible.
Note: As stated before when the audio
reaches above the red zone, your audio level
will experience clipping. This is because your
audio is above 0dB.
Normalizing will not fix clipping if it was
already present in your audio file.
Audio Levels Display Panel:

Page 19 of 49
6/26/2018
To Normalize Across Full Wave Form:
Click: Favorites tab and Normalize to -0.1 dB
The peaks that are reach maximum height
will reach the -0.1 dB point, while lower
peaks will average to a higher point but not
that -.1 dB range.
Note: Select and reduce the amplitude of the
largest peaks first and then run the -0.1 dB
tool
Before:
After:

Page 20 of 49
6/26/2018
Adding Fades:
Steps
What You See
On the sides are fade boxes. We will use
these to adjust the fade in and fade out effect
of our audio.
Note: Fading in or out will adjust the
amplitude of the start and end points. Our
sound wave only has two fade points.
Fade In: Fade Out:
Adjust Fade In:
Click & Drag: Fade in box
Note: Dragging the fade box to the right, in
this case, will affect all the audio that is in the
path line of your fade line envelope, Which is
represented by the yellow curved line
Moving your mouse up or down while
dragging the fade line will affect how fast the
amplitude of the fade will transition to the
original amplitude.
A positive Fade In Linear Value is going to
curve the fade line so that it is concave up.
Do this by moving right and up with your fade
In box. This will create a relatively fast fade in
effect.
Fade Line In Yellow:

Page 21 of 49
6/26/2018
The exact opposite is done when moving the
Fade In towards a negative value which is
shown as a concave down shape for your
fade line. Do this by moving the mouse down
and to the right.

Page 22 of 49
6/26/2018
You can adjust the fade effect line to be an S
curve (Cosine function curve) in nature
instead of Linear/Logarithmic line simply by:
Keyboard Shortcut: Ctrl+Shift+K
-OR-
By Clicking: Edit tab->Preferences->General
Now you are able to drag up and down to
obtain an S shape instead of the one curve
fade effect
Preferences Window: General Section
Even More Fade Effects!
Click: Effects -> Amplitude and Compression -
> Fade Envelope (Process)
Doing this will open a window to use to select
all the various preset options of fading out
your audio.

Page 23 of 49
6/26/2018
Select: From the preset options dropdown
menu to find the amplification that is to your
liking.
Note: With all selections you will be able to
adjust the yellow fade line as you wish.
Place Mouse: Cursor over yellow line before
start
Note: Cursor icon will change from time
selection tool icon to move tool icon
Click & Drag: Yellow line to desired decibel
range
Note: Each point you click and drag will make
a distinct dot along the envelope
Preview what you have done simply by
clicking the play button.
Click: Apply when satisfied or close to cancel
edit
Note: Fade effect will take place, further fade
applications will not erase the fade you just
created, but instead apply it to the most
current version of your audio file.
Again, doing this work is de-constructive. Be
sure to save-as if you want to make separate
copies of your work
Tremors Fade:
Close up of Effects: Fade Envelope Window
Page 24 of 49
6/26/2018
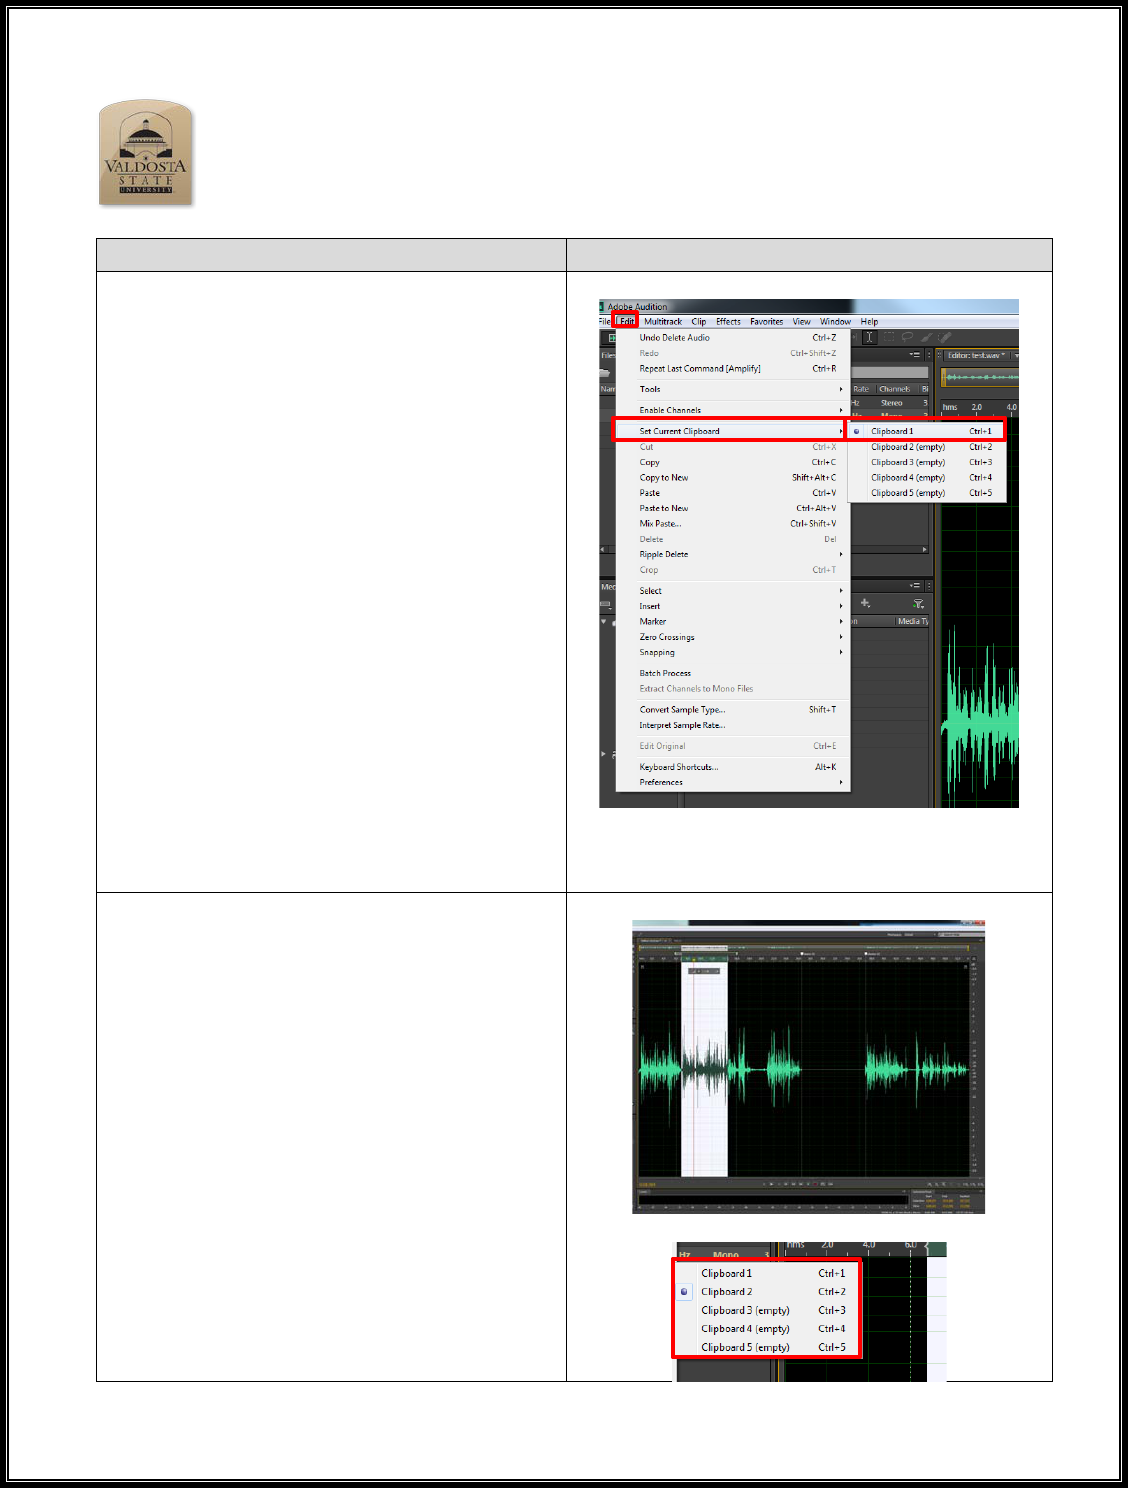
Using the Clipboard:
Steps
What You See
Copy and Paste are two commands that can
come in use, especially with a clipboard to
contain your copied selections for pasting at a
later time.
How To Alternate Clipboards:
Found in the Edit menu -> Set Current
Clipboard -> Clipboard #
Note: The clipboard item with the purple dot
next to it is the active copy position
Ctrl+#: To switch between one of the five
clipboard positions
Note: Currently Clipboard 1 contains a copied
selection I previously made, while the
alternate clipboards are empty.
Make A Selection:
Highlight: The region you wish to select
Enter: Ctrl+C to copy the highlighted region
to the current clipboard selected
Note: In this example Clipboard 2 got filled.
Adobe Audition Quick Reference Guide
Copy Paste Using the Clip Board
Page 25 of 49
6/26/2018
Paste Clipboard Selection:
Move the red play head to any section you
want to insert your copy
Press: Ctrl+V to paste in your clipboard copy.
Note: This will write over the section you are
at
You can repeat segments of a play list doing
the following:
Copy selection to clipboard as described
above.
Press: end on the keyboard to move the play
head to the very end of your audio clip
Press: Ctrl+# to select which clipboard option
to paste in
Press: Ctrl+V to paste in the audio segment
Press: g to remove the automatic highlighted
region and retain the play heads position
before pasting in your selection
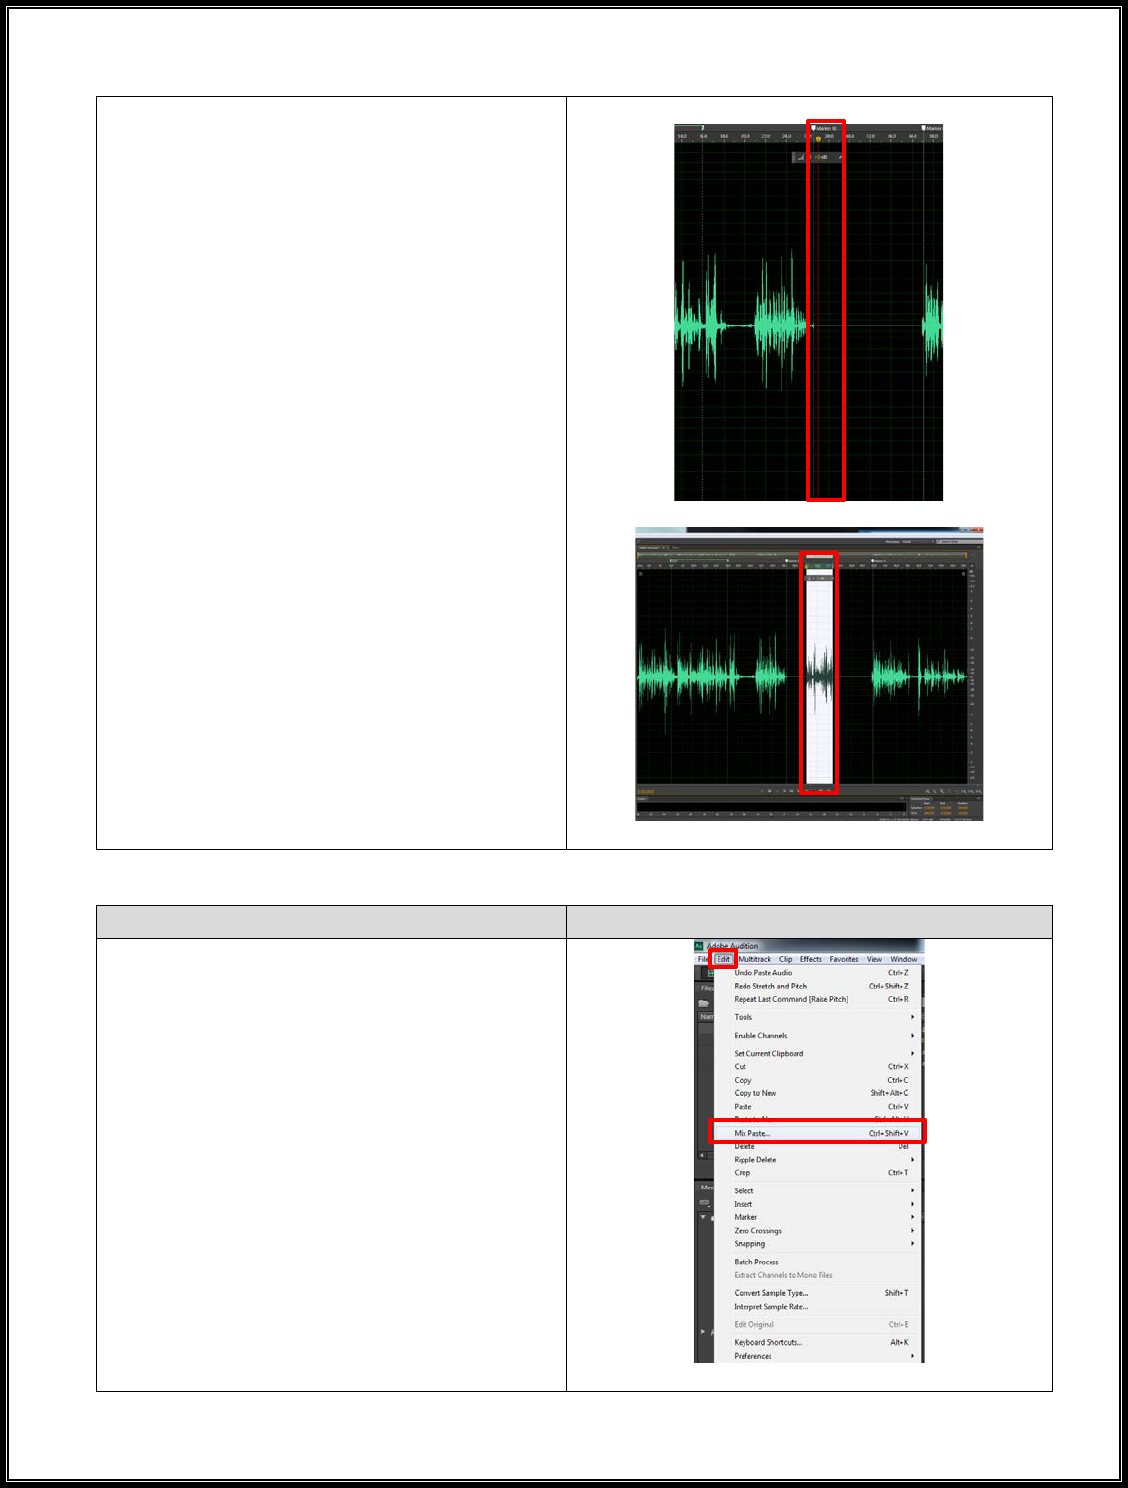
Using Mix Paste:
Steps
What You See
Mix Paste allows you to use the clipboard, or
copy paste function, to a broader sense of its
typical use, depending on what you choose in
the Mix Paste menu will control how your
audio files will combine.
Found Under: Edit -> Mix Paste…
-OR-
Short Cut Key: Ctrl+Shift+V

Page 26 of 49
6/26/2018
The audio clip you have stored in your
clipboard will be what is pasted in the area
your play head is located at in the time line.
Copied Audio/Existing Audio:
Adjust the scrubber bar to change the intensity
of the audio part you are blending in
• 100% will not decrease or increase the
audio segment
• An audio level of 50% is half the
original sound
• An audio level of 200% is double the
original sound
Invert Copied Audio: Reverses the phase of
the audio wave being inserted. This will
exaggerate or reduce phase cancellation if the
existing audio contains similar content.
Essentially, if the waveforms are similar
and are in phase (the waves crest and
troughs line up) then you won’t have much
cancelation occurring. If they don’t line up
initially and you hear a lot of cancelation
occurring attempt the invert copied audio
option.
Modulate: Multiplies the waveforms copied
and existing into one type.
Click: Ok to accept changes
Using the Effects Rack:
Steps
What You See
The effects rack is useful to test multiple
effects at once on the sound file shown in the
workspace before committing to the
modification.
Location: Left panel under Files panel in
Effects Rack tab
Adobe Audition Quick Reference Guide
Special Effects

Page 27 of 49
6/26/2018
Note: The effects rack can hold up to 16
effects at once. Applying the effects selected
is a de-constructive process. Again,
remember to use “Save As” to avoid writing
over the original audio file.
Adding Effects to Effects Panel:
Click: On the side arrow in the column you
wish to add the effect in.
Select: Effect from the list that appears
Repeat up to 16 times to try out multiple the
effects.
Listen to how new effects apply by pressing
space on your keyboard.
Note: Items in red imply that your computer
system may have a difficult time applying
those effects in real time. If you notice lag in
play back then remove these selections and
test them individually.
All items that have this symbol are
currently active in the Effects Rack.
De-activate simply by clicking on to turn
off this effect; press the space bar to listen
for the changes made in real time.
Adjust Input and Output: Both allow
amplification to the respective audio sources.
The input audio source is essentially the
original wave file; the output is what you will

Page 28 of 49
6/26/2018
be creating with the effects you choose to
apply.
The Wet and Dry scrubber bar:
Determines how much influence the effects
will create to your original sound when you
click apply.
Closer to Dry means less effect is applied to
your work.
Click: The switch at the bottom left of
this panel to turn off and on all effects at
once
Select: Apply when you are ready to commit
to these modifications
Note: Leaving the process as “selection only”
works the same as selecting the “entire file”
option unless you have a highlighted region in
your workspace that is less than the entire
timeline
Automatic Pitch Correction:
Steps
What You See
Ever want to fix the pitchy sections of a song?
Here is how:
Go to: Effects Rack->Empty Effects column-
>Time and Pitch -> Automatic Pitch
Correction

Page 29 of 49
6/26/2018
Here we reach the technicalities of our work.
We will not change the Preset value.
If you know the Scale and Key that you’re
audio should play in then select the right fit in
the scale and key drop down menu.
Attack: Determines how aggressive this effect
will be applied to the selected audio clip
Sensitivity: Is the level at which Audition can
detect how off the pitch is in the audio clip
Reference Channel: Is the channel you are
picking up the pitch from. Example: Stereo
will have a left and right channel.
FFT Size: Is a mathematical function that is
used to correct the audio segment sample
size.
• Human voice -> Choose either 4096 or
2048
• Low frequency input then go with the
higher sample size and vice versa.

Page 30 of 49
6/26/2018
Using The Spectral Frequency Display To Clean Up:
Steps
What You See
Using the Spectral Frequency Display helps
you pinpoint areas of noise interference in
your audio track. As described in an early
segment on this lesson the Spectral Frequency
can be brought up by clicking on the quick
launch tool at the top left.
What you may notice is that there are several
points in this file where a dot consistently
appears in the 3.5Khz frequency band
We can select each region using the marque
tool:
Select: The Marque tool
Click and Drag: Over the area to highlight
the region to remove
Click: Delete on your keyboard
Note: Audition will automatically smooth the
frequency around the perimeter of the
selection you deleted. This helps make the
noise removal less noticeable
Before:
After:
Adobe Audition Quick Reference Guide
Cleaning Up Audio

Page 31 of 49
6/26/2018
Adaptive Noise Reduction:
Steps
What You See
Adaptive noise is a tool that allows Audition
to work on the fly to identify frequencies that
should not be there vs. frequencies that should
be in your waveform based on 7 different
adjustments. Commonly this is used to
remove hiss, rumble, and wind from the
background.
Note: Doing the adaptive noise reduction
effect will require you to make a selection a
little before your desired start time on the
timeline. Hence the name ADAPTIVE noise
reduction. The modifications you choose are
all applied after a few seconds of running the
audio clip.
7 Different Factors In Adaptive Noise
Reduction:
1.) Reduce Noise By:
Specifies in decibels by how much the
selected region will reduce unwanted
noise.
2.) Noisiness:
Percentage of noise that is left in the
audio clip
3.) Fine Tune Noise Floor:
Adjusts the noise floor above or below
the automatically calculated floor
level.
• Noise Floor is the MIN.
amount of noise required for a
microphone to pick up audio.
In Audition, there is a pre-
calculated Noise Floor level.
4.) Signal Threshold:
Manually adjust the threshold to a
desired level above or below the pre-
calculated threshold rating.
• Threshold is the loudest level
your audio signal has to reach
before being compressed
• Compression is the process of
lowering the dynamic range of
the loudest and quietest parts.

Page 32 of 49
6/26/2018
5.) Spectral Decay Rate:
Determines how rapid noise
processing drops by 60 dB. Increasing
this effect will create a re-verb effect,
decreasing this will generate a bubbly
sound.
6.) Broadband Perspective:
Generates a start point in the
frequency bandwidth to start removing
unwanted noise. Frequencies below
say a selected value of 100Hz will not
be touched; however, frequencies
above will be altered.
7.) FFT Size:
Determines how many individual
frequency bands are analyzed. High
FFT setting will work best for artifacts
of long duration (squeaks, or
continuous hum noise). Low FFT
setting will work best for artifacts of
short duration (clicks, or pops).
Removing a Specific Noise:
Steps
What You See
Spot Healing Brush Tool:
This is a wonderful tool to help remove
unwanted sound when there are overlapping
frequencies in your bandwidth.
Spot heal brush is located on the top right
section with spectral frequency display.
Select: Spot healing brush
Click & Drag: Cursor over the spectral
frequency that appears to be the cause of
unwanted noise.
Audio Clip of Airport
Loud Ringing Noise

Page 33 of 49
6/26/2018
After you select your region Audition will
process the job and make the adjustment.
Selecting the unwanted audio

Page 34 of 49
6/26/2018
Starting a Multi-track:
Steps
What You See
Click: Multitrack, which is to the right of the
Waveform option
Note: Clicking on Waveform will bring you
back to the Waveform segment of Audition,
and clicking back on Multitrack will take you
back to your multi-track session. When
clicking on Multitrack without having a
Multitrack session already generated will
force you to create a Multitrack session.
Initial Multitrack Setup:
Session Name: Title of your Multitrack
Folder Location: Where you will be saving
your work at
Template: Allows for preset values for
Sample Rate, Bit Depth, and Master values
Note: If “None” is selected you will
need to manually enter in the values
below
Sample Rate: The number of samples of
audio carried per second, measured in Hz.
Note: The average maximum frequency a
human ear can perceive is 20,000 Hz. To
achieve this properly you will need at most
double the sample rate. This is why 48000 Hz
is automatically selected for you.
Bit Depth: The number of bits of information
making a waveform. This describes the
resolution of each sample. The more bits you
have the more sinusoidal a wave form appears
to match the true audio wave form.
Select Multitrack
Prompt Appears After Selecting Multitrack for
the first time during your session
Bit Depth:
“When the number of bits per sample is
increased, each sample can more accurately
represent the audio signal.”
From:
https://documentation.apple.com/en/finalcutpro/usermanual/ind
ex.html#chapter=52%26section=7%26tasks=true
Adobe Audition Quick Reference Guide
Multi-track Editing

Page 35 of 49
6/26/2018
Master: Determines how many outputs your
audio file will play from.
• Example: Stereo is good for when
making sound for two audio outputs
(Left and Right).
Click: Ok when you are satisfied with your
selections

Page 36 of 49
6/26/2018
Navigating Multi-track:
Steps
What You See
Welcome to the Multitrack view!
Currently we are looking at a trackless
Multitrack session. Don’t worry; we will go
over inserting tracks soon. First let’s go over
some of the panels in this new view.
Note: Any work done in Multitrack is
considered non-destructible. Meaning
altering audio in this mode does not change
the original audio file.
Note: All that will be described is when using
the Default Workspace settings in Audition.
Multitrack View:
Without Any Audio Files:
With Multiple Audio Files:
C.) Track:
This is where an audio file is added, resized, and modified. This highlighted region is among many
other tracks in the multi-track session.
B
B.) Track Controls:
Quick audio controls are found here to normalize, record, add key frame envelopes, all of which are
non-destructive edits to the original file.
A

Page 37 of 49
6/26/2018
With Two Audio Tracks:
C
A.) Zoom Navigator:
Adjust the zoom bar size by clicking, holding left click, and dragging the yellow end point towards
(Zoom in) the center or away from the center (Zoom out) of the zoom bar. This bar can also be
moved anywhere in the timeline (left or right) to view specific segments of all audio tracks.
D.) Scroll Bar:
Click and drag up or down on this bar to navigate up and down your track list.
D
E
E.) Play Head:
This is a movable bar that shows where in the timeline you are at. Finer adjustments can be done by
using the j,k,l key commands on your keyboard. J- Rewind, k- Pause, l-forward
Double tap or triple tap k or l commands to fast-forward or fast-rewind at different speeds.

Page 38 of 49
6/26/2018
Points of Interest:
Steps
What You See
Master Track:
The master track is designed to apply effects
and other sound adjustments across all tracks.
This track is at the very bottom of your track
list.
Note: When scrolling using your mouse
wheel you will have two separate effects.
1.) Scrolling with your mouse over Track
Controls will cause the track list to
grow in size or appear smaller
2.) Scrolling with your mouse over any
individual track will allow you to
scroll across the track list to find the
master track at the bottom of your
workspace
Master Track:
Zoomed in view:
Track Panel Vs. Mixer Panel:
The Multitrack session contains two ways to
view your tracks. All the prior information
above has described using strictly the
Multitrack session view. A separate tab next
to your track session is called “Mixer.”
This style of audio editing may be more
attractive to users accustomed to using an
analogue setup for mixing tracks.
Other Panels:
As described when discussing Waveform
view there are alternate panels available in the
Multitrack session.
All left hand panels shown in the Waveform
view are likewise available in the same
location in Multitrack view.

Page 39 of 49
6/26/2018
The Multi-track Tools:
Steps
What You See
While in Multitrack mode you will have
access to several tools that help make audio
compiling engaging and interesting. You will
work a lot with the individual track controls to
further adjust your audio tracks.
Depending on which of the four options you
have selected (Inputs/Outputs, Effects, Sends,
or EQ) you will be able to control what is
available for you from the track control
section.
Note: To view all options in the track controls
section use the scroll wheel on your mouse
while over the tracks control area to expand or
collapse the controls available to you by each
track.
EQ Selection:
Important controls to know:
Mute: Allows you to mute the audio of a
particular track
Solo: Mutes all other tracks except others
that are highlighted as solo too
Record: Allows you to record over a track
• Note: This item only enables the
ability to record to a specified track
Monitor Input button: Allows you to
listen to the track while you are recording to
it.
• Note: This button is unable to be
engaged unless the record button is
activated.
Track Controls:
Track Name:

Page 40 of 49
6/26/2018
You can alter the name of your track simply
by double clicking the track name, typing in a
new name, and pressing enter on the keyboard
Audio adjustment tool:
Allows the ability to increase or decrease the
sound level of your audio track
Note: Any text that is yellow is an adjustable
number or value
Pan tool:
This is what is used to change the intensity
from which speaker the individual track
appears to come from
Note: Holding down shift allows you to pan
quickly to either left or right stereo
When dealing with Stereo 5.1 tracks you will
have a more intensive pan option
At 0 your effect is applied to both right and
left outputs.

Page 41 of 49
6/26/2018
Sum to Mono:
This option allows for a dual track (right and
left stereo track) to be played back as a mono
track.
Controlling Inputs/Outputs:
Inputs: This controls which device you can
record with
Outputs: This controls whether the track is to
be mono, stereo, or 5.1 surround sound quality
• Note: You will not be able to identify
the difference of sound quality during
creation of an audio multi track unless
you have a device that can handle the
output selected
• If the output selection Stereo is being
heard from a mono speaker system
then you will not get the full benefit of
hearing the correct pan adjustments, it
will always sound as if it is in mono
setting
The input and output options are only
available while the Input/Outputs button is
selected.

Page 42 of 49
6/26/2018
Effects Rack:
This tool set acts just like the effects panel
discussed in the Special Effects section.
However, all effects shown in the effects rack
are track specific. Meaning that only the track
or bus you are adding effects to will be
effected.
Note: Some track effects can be labor
intensive. Be sure to use a machine that can
handle a lot of processes at once.
Track effects applied to either the master track
or the effects panel on the left will affect the
all audio tracks.
Sends:
Sends provide an ability to have audio tracks
sent to different monitors attached to your
computer.
• Note: Monitor devices can be stereo
headsets, Surround sound speakers,
mono speakers etc.
• Understanding the full scope and
applying sends is not a simple task
these tools go beyond the scope of this
guide, however, there are resources
available in atomic learning and other
areas online.
http://blog.infiniteskills.com/2012/07/a
dobe-audition-cs6-tutorial-how-to-
route-sends/
Page 43 of 49
6/26/2018
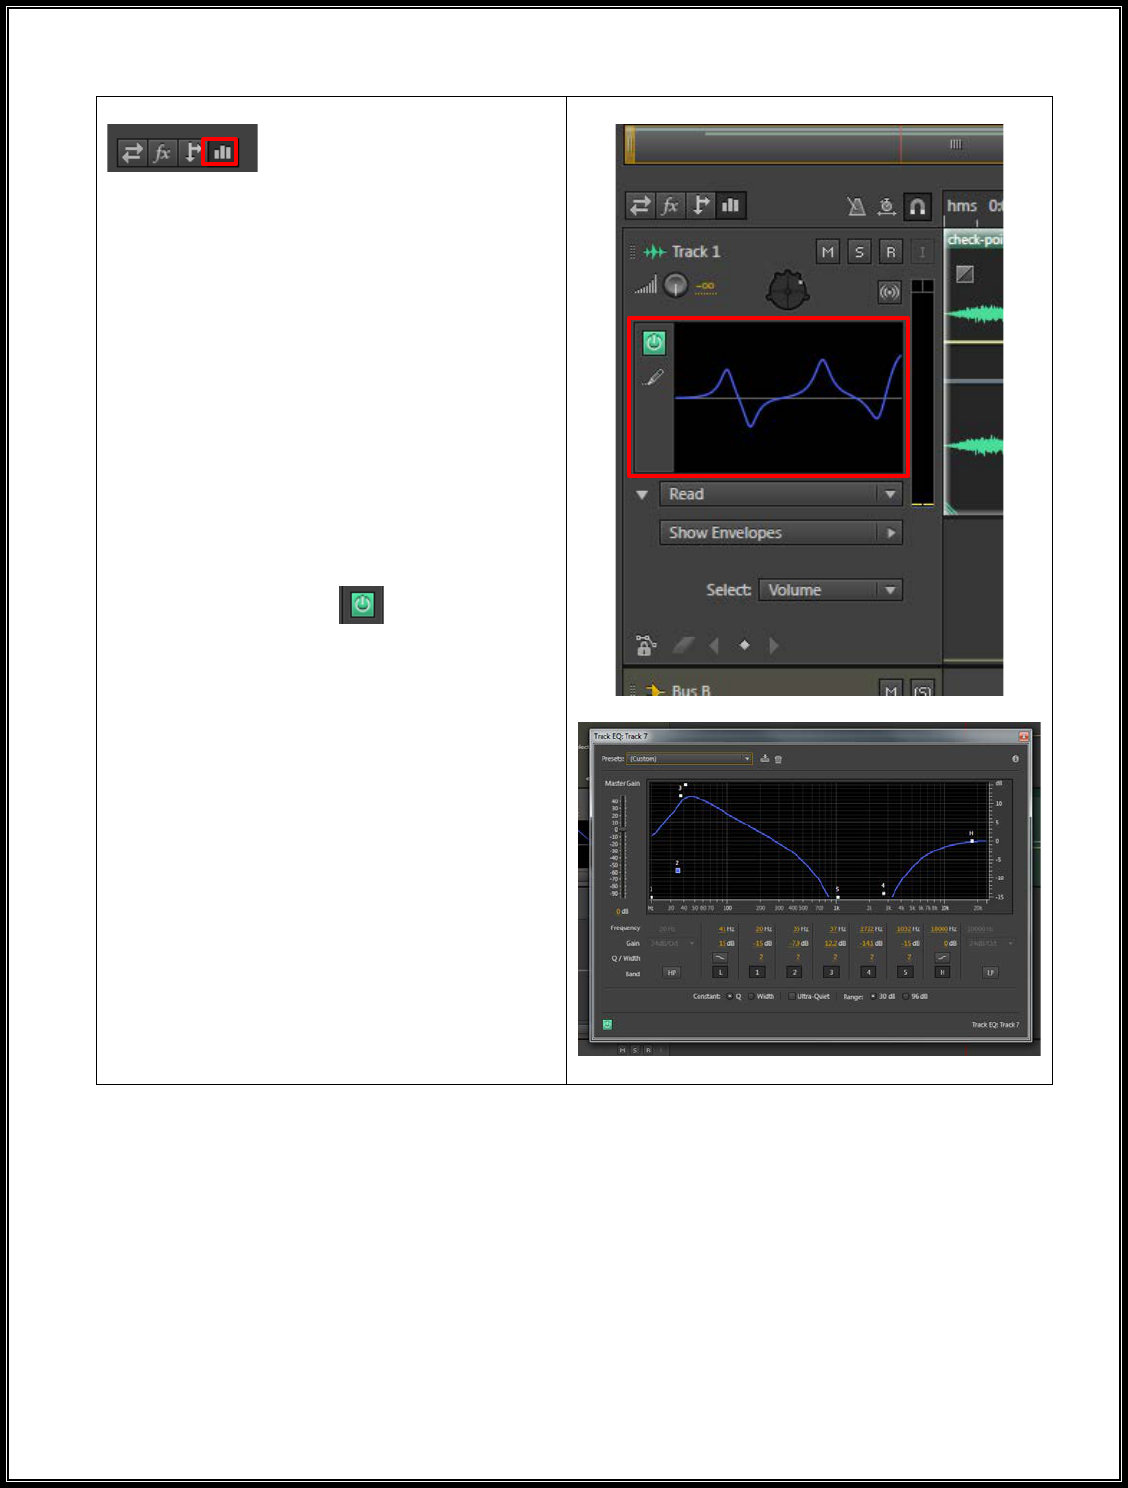
Equalizer (EQ):
This mode allows you to apply EQ on each
track. The blue line shown to the right is a
representation of how much gain (high or
low) in the y-axis is presented across the
different frequency bands of the x-axis.
Double Click: The graph to modify the
equalizer applied to the track
A pop-up window will appear for you to
adjust the EQ levels.
Note: Just like in the effects rack and panel,
you can turn on and off the EQ effect by
clicking the power icon to make it
highlighted in green (on) or grayed out (off).
Pop-up window

Page 44 of 49
6/26/2018
Working with keyframes:
Another tool that is hidden away, unless you
expand the tracks control section by scrolling
the mouse wheel while over the track controls
panel, is the ability to manipulate the volume,
pan, and other audio effects using keyframes.
Something new to CS6 is the ability to read,
write, latch, and touch your audio track using
whats called an automated envelope system.
Description of each mode:
Off: Turns off automation data associated
with the specified track
Read: Allows for playback of automation data
Write: Overwrites ALL Modified Track data
after playback modifications are made. (Use
with caution)
Latch: Overwrites only values you changed
during playback. When a change is made the
new value is “latched” on untill you make
further modifications or stop playback.
Touch: Like latch mode this will overwrite
only values you changed during playback.
The difference is that a gradual change will be
made to the parameter adjusted back to its
original value based on a modifiable
adjustment speed.
A deeper understanding of these modes will
only be benificial when working in
specialized scenarios. Further information will
go beyond the scope of this tutorial.
Before Expanding:
After Expanding:
Automation Mode Selections:

Page 45 of 49
6/26/2018
Saving Multitrack Using Mixdown:
Steps
What You See
How to save a Multitrack out as one track:
Note: Do this only when you are ready to
upload your compilation or burn your
compilation out as one file.
Click: File -> Export -> Multitrack Mixdown
-> Entire Session
Breakdown of Export Multitrack Mixdown
Window:
File Name: Name of the file you are creating
Location: Where on your computer you are
choosing to save your content
Format: This is the type of file you are
generating. See format type document for
more information on the different types of
formats.
Sample Type/ New Sample Type:
Remember 48000 Hz is the recommended
sample rate for burning to an audio disc. The
New Sample Type field displays what you
have chosen when changing the Sample Type
Format Settings: Affects your audio bit rate
Mixdown Options: Allows you to separate
source files by track and bus.
Adobe Audition Quick Reference Guide
Exporting Multitrack Session

Page 46 of 49
6/26/2018
More on Mixdown Options:
Click: Change next to Mixdown Options to
reach the window you see on the right
What each field means:
Selecting other options under the primary
field called Master will allow different types
of files to be exported out as Mono, Stereo,
and 5.1 surround sound, depending on what
you have checked. In this case, only Stereo is
selected, and thus, only a Stereo audio file
will be generated.
Individual tracks can be exported out:
You will want to select the appropriate track
or tracks by clicking the check box next to the
track you are interested in exporting out.
Doing so will create an isolated audio file for
the track you clicked on.
Note: An icon will appear next to “OK” this
notifies you that Audition will add the sources
name to the end of my filename that I chose
earlier.
Click: Ok when done selecting
Include Markers and other metadata:
This option if left checked will include
markers and other metadata that you have
added. This will not be a lot of extra space
added to your file being exported, but it may
or may not be necessary
Open files after export:
Leaving this option checked will
automatically open all files separately in
Audition for review. I often leave this option
unchecked.
Click: Ok to export project file

Page 47 of 49
6/26/2018
I have placed my exported multitrack files
to my desktop as their own audio
compilation.
The file titled “Test mixdown_Stereo” is a
master (encompasses all audio tracks)
audio compilation in stereo mode.
The file titled “Test mixdown_Tra..” is a
single track of the track 1 item I left
checked while in the Mixdown options
menu.
There are two separate wav files generated as
shown here. There are also two .pkf files,
which honestly aren’t needed.
Note:
The only purpose of having a .pkf file is
so that when you open the wav file in
Audition you won’t need to experience a load
wait period. When you insert an audio track
into audition it will generate automatically a
.pkf file somewhere in the adobe programs
folder to reduce the load wait time in the
future.
Also, it is important to note that the icons
representing these file types may be different
than what is showing on your computer. This
is because what programs are DEFAULTED
to your file type will take over how the file
appears on your computer. A wav file set as to
open as default with iTunes will have the
iTunes logo for its icon as shown in this
example to the right.

Page 48 of 49
6/26/2018
Exporting the Session:
Steps
What You See
Multitrack sessions are non-destructive,
meaning the files you work on in individual
tracks are not writing over the original file
brought in from a different location on your
computer.
The only drawback for having this scenario is
when transferring an incomplete job that
needs further editing between multiple
computers. Using the process described for
exporting a mixdown will prevent you from
making further edits to the master or the
individual track if opened in Audition.
To export your multitrack session as a usable
form so it can be opened on another computer
exactly as you saved it:
Click: File -> Export -> Session

Page 49 of 49
6/26/2018
Click: Ok after making desired modifications
Note: See earlier Breakdown of Export
Multitrack Mixdown Window to get more
information on individual sections
Be sure to check “Save copies of associated
files” before clicking ok
An SESX file, which is your project file, is
what will be opened on a different computer
for you to edit the session further.
Note: This file will require Adobe Audition
CS6 for further editing to be done
A separate folder associated with your SESX
file will also be made available if you checked
the “save copies of associated files” check
box from the previous prompt shown earlier
Note: This folder contains all media
associated with your SESX file. If you don’t
keep these items together you will not be able
to edit your session further on a separate
machine.
