

2
Table of Contents
Getting Started ........................................................................................................................................4
Introduction ..................................................................................................................................................... 4
Motors Application Plugin ........................................................................................................................5
Installation of the plugin ................................................................................................................................. 5
Motors Application Plugin Settings ................................................................................................................. 6
Global Settings ............................................................................................................................................ 6
Main Page.................................................................................................................................................... 7
Add a Car ..................................................................................................................................................... 8
AdMob......................................................................................................................................................... 8
Inventory ..................................................................................................................................................... 9
Translations ............................................................................................................................................... 12
Mobile Application Build ........................................................................................................................ 13
Prerequisites and Environment ..................................................................................................................... 13
Step 1 – Open the app folder .................................................................................................................... 13
Step 2 – Install Node.js and NPM .............................................................................................................. 14
Step 3 – Run npm install commands ......................................................................................................... 15
Step 4 – Run react-native commands ....................................................................................................... 16
Step 5 – Put your site link ......................................................................................................................... 18
Step 6 – Upload your logo ......................................................................................................................... 18
Google AdMob integration ............................................................................................................................ 19
Push Notification Setup ................................................................................................................................. 21
Android Application Build.............................................................................................................................. 22
Step 1 – Set up environment .................................................................................................................... 22
Step 2 – Application Name ........................................................................................................................ 24
Step 3 – Upload app icon .......................................................................................................................... 25
Step 4 – Change package name ................................................................................................................ 26
Step 5 – Change “import” name ............................................................................................................... 29
Step 6 – Edit build.gradle file .................................................................................................................... 30
Step 7 – Edit AndroidManifest file ............................................................................................................ 30
Android App Release ..................................................................................................................................... 32
Step 1 – Test your app .............................................................................................................................. 32
Step 2 – Generate Android App Bundle .................................................................................................... 35
Step 2.1 – Generate APK ........................................................................................................................... 40
IOS App Build ................................................................................................................................................. 41
Prerequisites ............................................................................................................................................. 41
3
Step 1 – App Registration on App Store Connect ..................................................................................... 41
Step 2 – Register a Bundle ID .................................................................................................................... 41
Step 3 – Create an app .............................................................................................................................. 44
Step 4 – Prepare for app distribution ....................................................................................................... 44
Step 5 – Setting up the project ................................................................................................................. 44
Step 6 – Add an App Icon .......................................................................................................................... 47
iOS App Release ............................................................................................................................................. 49
Step 1 – Create a build archive ................................................................................................................. 49
Step 2 – Upload an app to App Store Connect ......................................................................................... 51

Mobile App for Android & iOS User Manual
Introduction
4
Getting Started
Introduction
Motors mobile app is a new extension to Motors WordPress theme. It is the next step on vehicles
classified advertisement. This application is built on React Native and that makes it so resilient and
cross-platform.
Motors app contains a vast amount of marvelous features to buy and sell cars.
• Add listings - no need to add a car from inside the web. Submit all the needed information
and create vehicles ad page instantly.
• Simple car search - keep a car search simple to make the process fast and smooth. In Motors
App it’s easy to search for cars by make or model.
• Simple Authentication - WP users can easily sign in to Motors App with WP credentials. And
new users can register right in the app and later authorize on WP website.
• Integration plugin - Motors app comes with a special WordPress plugin that you will have to
install and activate in order to make changes to your application from one place inside
WordPress
• Your Personal Pocket Business - You can create an unlimited number of apps for a different
type of clients

Mobile App for Android & iOS User Manual
Installation of the plugin
5
Motors Application Plugin
Installation of the plugin
The Mobile App extension comes with the special Motors Application plugin. The plugin needs to
customize the mobile app features such as color scheme, Google Services API keys, placeholder
image, Inventory settings, and Add Car options.
To install the Motors Application plugin:
1. Click on the Dashboard > Plugins > Add New section of WordPress menu.
2. Click on the Upload Plugin button and upload the zipped plugin file you have received from
ThemeForest.

Mobile App for Android & iOS User Manual
Motors Application Plugin Settings
6
Motors Application Plugin Settings
After installation of the Motors Application plugin, the new Motors App Settings section appears in
WordPress dashboard menu. The plugin allows to change color scheme of the mobile app, set up
Google Services, inventory layout and much more.
Global Settings
Global settings allow you set up the general styling of the mobile application visually. Here you can
customize the appearance of the mobile app with the following options:
Set Application according to
the theme layout
Choose the main and
secondary colors
Put Google API Keys for
Android & IOS
Upload a default placeholder
image of listings

Mobile App for Android & iOS User Manual
Motors Application Plugin Settings
7
• Application Type: You can select the application type according to the active layout of the
theme;
• Main & Secondary Color: You can choose the main and secondary color of the application;
• Google Services: You can put API keys of Google Services for Android & IOS;
• Placeholder: You can upload a default placeholder image for listings without images.
Tip: For detailed overview of getting Google API key, see the Get an API Key for
Android and iOS guides
Main Page
This section includes features for setting up a number of listings per page in Recommended Posts
and Recently Added Posts modules. Also, you can select the view type of the Recently Added Posts
module. Those modules appear on main page of your mobile app.
Set a number of recommended
listings per page
Set a number of recently
added listings per page
Choose a view type of the
recently added listings (List/Grid)

Mobile App for Android & iOS User Manual
Motors Application Plugin Settings
8
Add a Car
The Add a Car section allows to set up steps of the add listing process in mobile application. You can
select the options which will be displayed in the certain steps of the Add a Car page.
AdMob
The AdMob section incorporates settings for using the Google AdMob platform. Google AdMob is
an easy way to monetize mobile apps with targeted, in-app advertising. As the AdMob is a part of
the Firebase service, you need to sign up on Firebase.
Select options which will be displayed
in the step One, Two, and Three
respectively

Mobile App for Android & iOS User Manual
Motors Application Plugin Settings
9
There are following options in the AdMob section:
• Show Ads – allows enabling/disabling ads in app;
• Ads Type – you can select ads type Banner or Interstitial;
• Banner position – you can set a position of ads;
• iOS & Android Banner ID – fields for adding special IDs from Google AdMob platform.
For detailed overview on how to find banner IDs, please have a look at the AdMob user guide. For
interstitial IDs, you can follow instructions in this manual.
Inventory
The Inventory section contains global settings to set up the appearance of Inventory and single list.
You can set up the layout of your inventory and single listing pages in the Motors App Settings ->
Inventory section.
General:
• Select Inventory View: You can select a view type of the Inventory page;
• Use for Inventory Filter: You can choose your taxonomies for displaying them as the filter
parameters on Inventory.

Mobile App for Android & iOS User Manual
Motors Application Plugin Settings
10
Grid View:
• Select Grid View: You can select a default design of the grid view type of your Inventory;
• Set listing categories which will be displayed on the frontend.
Choose a default grid view design
Set listing categories
Choose the inventory filter
options
Select the inventory view type

Mobile App for Android & iOS User Manual
Motors Application Plugin Settings
11
List View:
• Set up listing categories which will be displayed on the frontend;
• Define positions of listing categories – top, middle-left, middle-right, bottom-left,
and bottom-right.
Single Listing Details:
• Define listing options which will display as Title, Subtitle, and in the Info section;

Mobile App for Android & iOS User Manual
Motors Application Plugin Settings
12
Translations
The Translations section contains a list of used static strings in the app where you can translate or replace
with another text.

Mobile App for Android & iOS User Manual
Prerequisites and Environment
13
Mobile Application Build
Once you have installed and set up the Motors Application plugin on your website, you can proceed
to build your mobile application for Android and IOS. Before starting, you need to download and
install some prerequisite development environments and packages which make app building
process much easier.
Prerequisites and Environment
Step 1 – Open the app folder
You need to unzip the motors-app.zip file which comes in the Motors Application plugin package to
your desktop or another location/folder. After, you need to run Terminal in macOS or CMD
(Command Prompt) in Windows and go to motors-app/ folder.
Tip: All commands are identical in both Terminal and Command Prompt
To open the folder, go in to your Terminal/CMD and run this command:
In case you unzipped the file to another place, run command like:
cd Desktop/motors-app/
cd folder-name/motors-app/

Mobile App for Android & iOS User Manual
Prerequisites and Environment
14
Terminal/CMD outcome:
Step 2 – Install Node.js and NPM
You need to download the Node.js pre-built installer and install it to your computer. You can get the
latest version of the Node.js here - https://nodejs.org/en/download/. NPM is distributed with
Node.js - which means that when you download Node.js, you automatically get NPM installed on
your computer.
To check if you have Node.js installed, run this command in your Terminal/CMD:
To confirm that you have npm installed you can run this command in your Terminal/CMD:
node -v
npm -v

Mobile App for Android & iOS User Manual
Prerequisites and Environment
15
Terminal/CMD outcome:
Step 3 – Run npm install commands
After installing the Node.js package, you need to run the following command in Terminal/CMD:
Terminal/CMD outcome:
npm install

Mobile App for Android & iOS User Manual
Prerequisites and Environment
16
When the installation process is done, you need to run this command in Terminal/CMD:
Terminal/CMD outcome:
Note. If you get error such as “Error: EACCES: permission denied …”, you need to run
this command: sudo npm install -g react-native-cli
Step 4 – Run react-native commands
Now you need link native dependencies with the following command:
npm install -g react-native-cli
react-native link

Mobile App for Android & iOS User Manual
Prerequisites and Environment
17
Terminal/CMD outcome:
Finally, you need to run this command:
Terminal/CMD outcome:
npm run start

Mobile App for Android & iOS User Manual
Prerequisites and Environment
18
Step 5 – Put your site link
You need to edit this “/motors-app/src/helpers/settings.json” file and put your site link. You can
use any text editor which you familiar with and the file.
Step 6 – Upload your logo
The last but not the least step is uploading your logo files. You need rename your logo files to logo-
white.png and logo-dark.png. After, upload them to this “/motors-app/src/assets/img/” folder and
confirm the replacement.
Finally, all the needed dependencies have been installed and set up. Now you can proceed directly
to Android and IOS application building process.

Mobile App for Android & iOS User Manual
Google AdMob integration
19
Google AdMob integration
You need to copy your App ID from the Google AdMod account to integrate AdMob features in your
app. You can find your App ID by following instructions in this article.
You need to copy your App IDs (Android/IOS) and paste them to the Motors App templates.
For Android:
You need paste your Android App Id in “/motors-
app/android/app/src/main/AndroidManifest.xml” line 46

Mobile App for Android & iOS User Manual
Google AdMob integration
20
and “/motors-
app/android/app/src/main/java/com/stylemixthemes/motors/MainApplication.java” files line
83.
For iOS:
You need to paste your iOS App ID to “/motors-app/ios/motorsReactApp/Info.plist” file line 28.

Mobile App for Android & iOS User Manual
Push Notification Setup
21
Push Notification Setup
Push notification feature is integrated with Google Firebase service. You need to sign up on the
Firebase website and create a new project. Then, add your app to your Firebase project to register
app. For the detailed overview, please have a look at this manual.
After the app registration is done, you need to upload Firebase configuration file to the Motors App.
For Android: it needs to replace the “google-services.json” file in this folder “…/motors-
app/android/app”.
For iOS: it needs to replace the “GoogleService-Info.plist” file in this folder “…/motors-
app/ios/motorsReactApp/”.
You can download Firebase configuration files for your apps by following instructions in this user
guide.

Mobile App for Android & iOS User Manual
Android Application Build
22
Android Application Build
Step 1 – Set up environment
You need to download and install Android Studio in order to build your android application. You can
download it here - https://developer.android.com/studio.
After, run the Android Studio and select the “Open an existing Android Studio project” option. In
the popup window, you need to select the “motors-app/android/” folder.
Note. You should select the “android” folder in order to open the Android Studio
project
After, you need to install Android SDK platform package to your Android Studio. To install Android
SDK platform, click on the SDK Manager icon in the top-right toolbar.
Click to open the
motors-app/android folder
Click on SDK Manager icon

Mobile App for Android & iOS User Manual
Android Application Build
23
In the next window, enable Show Package Details option and select the packages under Android
9.0 (Pie), then click on Ok button.
After, click on the Ok button of the Confirm Change window in order to start the download process.
After the installation is completed, you can proceed to the next step.
Select the packages from the list
under Android 9.0 (Pie)
Enable Show Package Details to
display all the packages

Mobile App for Android & iOS User Manual
Android Application Build
24
Note: If you did not install the SDK Packages on the SDK Tools tab, please download
them, and then install them in order to work without error in the next steps.
Step 2 – Application Name
You can set a name of your application by editing this “/app/res/values/strings.xml” file in Android
Studio editor. Press cmd+S/ctrl+S buttons on a keyboard in order to save your changes.
Replace with your app name

Mobile App for Android & iOS User Manual
Android Application Build
25
Step 3 – Upload app icon
To upload your application icon, click right mouse button on this folder “/app/res” > New > Image
Asset.
When you click on the Image Asset, Asset Studio window appears where you can configure your
application icon.
Tip: For detailed overview of the Asset Studio, have a look at the Asset Studio user
guide.
Click on Image Asset
Click on New
Click right mouse button
on the folder

Mobile App for Android & iOS User Manual
Android Application Build
26
Step 4 – Change package name
You need to disable the “Compact Middle Packages” option in the Options Menu in order to
display sub-folders of the project.
Select your application icon

Mobile App for Android & iOS User Manual
Android Application Build
27
After, go to this “app/java/com/” folder and click right mouse button on folder “/com” > Refactor >
Rename option.
Click on Options Menu
Disable Compact Middle
Packages option
Click right mouse button
on the folder
Click on Refactor
Click on Rename…

Mobile App for Android & iOS User Manual
Android Application Build
28
Click on Rename current button in the Warning popup window.
Replace “com” with your website domain name and click on Refactor button.
You need to do the same actions for “/stylemixthemes/” and “/motors/” folders and replace them
with your domain name.
Tip: You need to enter a reverse-domain name. I.E., folders name “com >
stylemixthemes > motors” can be renamed to “biz > stylemix > themes” or “com >
yourcompanyname”.

Mobile App for Android & iOS User Manual
Android Application Build
29
Outcome:
Step 5 – Change “import” name
Now you need to rename package name in the “app > java > com > yourdomain >
MainApplication.java” file.
Press cmd+S/ctrl+S buttons on a keyboard in order to save your changes.
Replace with your
package name

Mobile App for Android & iOS User Manual
Android Application Build
30
Step 6 – Edit build.gradle file
You need to add your package name in the “Android > Gradle Scripts > build.gradle (Module: app)”
file, then press cmd+S/ctrl+S buttons on a keyboard in order to save your changes.
Step 7 – Edit AndroidManifest file
You need to edit this “App > manifests > AndroidManifest.xml” file and change the package name
with yours. Then press cmd+S/ctrl+S buttons on a keyboard in order to save your changes. After,
click on the Sync Now link at the top-right corner.
Replace with your
package name

Mobile App for Android & iOS User Manual
Android Application Build
31
Finally, the android application building process is completed. Now you can start to test your app in
Android Emulator and release your app.
Replace with your
package name
Click on Sync Now link

Mobile App for Android & iOS User Manual
Android App Release
32
Android App Release
Step 1 – Test your app
You can test your app via running emulator in Android Studio. To run the emulator click on Run App
icon in the tool bar.
Note. In order to use virtual device emulator you need to install the Java SDK 8u211
package.
Click on “Create New Virtual Device” button in the appeared popup window.
Click on Run App icon
Click on the button and
create a new device

Mobile App for Android & iOS User Manual
Android App Release
33
After selecting the needed device, click on Next button and select a Pie system image.
Click a Pie system image

Mobile App for Android & iOS User Manual
Android App Release
34
Click on Next button and verify your device configurations. After, click on Finish button to add your
virtual device.
Select your virtual device and click on OK button to run the emulator.
Selected the created
virtual device

Mobile App for Android & iOS User Manual
Android App Release
35
Android Virtual Device outcome:
Step 2 – Generate Android App Bundle
After testing your app in emulator, you can generate signed APK file for uploading to Google Play.
To generate APK, on the top menu click on Build > Generate Signed Bundle / APK option.
Select Generate Signed
Bundle option

Mobile App for Android & iOS User Manual
Android App Release
36
In the appeared window, select Android App Bundle option and click on Next button.
In the next window, you can either create a new Certificate in (*.jsk) format or use your existing
certificate.
Choose Android App
Bundle option
Click on Create new button

Mobile App for Android & iOS User Manual
Android App Release
37
Click on Create new… button and put appropriate data to fields in the New Key Store window. You
need to write name of your certificate with (.jks) format.
Type a name of your
certificate with .jks format
Create a password
Create certificate alias
Add information about
your organization

Mobile App for Android & iOS User Manual
Android App Release
38
After, click on OK button and go to next step by clicking on Next button.
Select “Release” option in the next window and click on Finish button.
Select “release” and click
on Finish button

Mobile App for Android & iOS User Manual
Android App Release
39
After Android Studio finishes the generating Android Signed Bundle, it displays the success message
in Event Log section.
You can click on “locate” link in order to get your APK file. The file is located in “motors-
app/android/app/release” folder.
Tip: The generated file format is (*.aab). An Android App Bundle is a new upload
format that includes all your app’s compiled code and recourses, but defers APK
generation and signing to Google Play. For a detailed overview, see the Android App
Bundles user guide.
Click on “locate” to get
your file

Mobile App for Android & iOS User Manual
Android App Release
40
Step 2.1 – Generate APK
In case you need to generate a signed APK file in (*.apk) format to test your app in your android
devices without uploading to Google Play, you need to click on Build > Generate Signed Bundle /
APK option on the top menu.
After, select APK option in the window and perform next step as described in the Step 2 –
Generate Android App Bundle.
Select APK option to
generate .apk format file

Mobile App for Android & iOS User Manual
IOS App Build
41
IOS App Build
This manual provides a step-by-step demonstration of releasing a Motors app to the App Store and
TestFlight.
Prerequisites
You need to enroll in the Apple Developer Program in order to publish your app to the App Store.
You can read more about developer program and its options here.
Step 1 – App Registration on App Store Connect
App Store Connect is a web-based tools kit for controlling apps sold on the App Store. As a member
of the Apple Developer Program, you will set up your app name, description, screenshots, submit
and manage apps, invite users to test with TestFlight, monitor sales reports, and more.
Tip: You can review the App Store Connect tutorial for more detailed overview.
Step 2 – Register a Bundle ID
Bundle ID is a required identifier for IOS apps registered with Apple. It consists of strings which
supplied by you during development, usually in form of com.your-company-domain.app-name.
To register a Bundle ID open your developer account on Apple’s developer website. Click on
Certificates, IDs & Profiles section.
Select Certificates, IDs & Profiles

Mobile App for Android & iOS User Manual
IOS App Build
42
From the left menu, select App IDs in Identifiers section.
Click on the “+” button in order to create a new Bundle ID.
Select App IDs
Click on plus icon to create a new
Bundle ID

Mobile App for Android & iOS User Manual
IOS App Build
43
Enter all the required information - write an app name, select Explicit App ID in App ID Suffix, enter
Bundle ID and click on Continue button.
Tip: Enter a reverse-domian name in Bundle ID field (i.e., com.your-company-
domain-name.appname), as Apple suggests.
After, confirm your App settings and click on Submit button to complete the registration of your
App ID.
Enter a name of your app
Select Explicit App ID
Enter a reverse-domain name

Mobile App for Android & iOS User Manual
IOS App Build
44
Step 3 – Create an app
Now you need to register your app on App Store Connect. Before you can upload a build of your
app to App Store Connect, you must first create it in your App Store Connect account.
Tip: For detailed instructions of registering your app, have a look at the Add an app
to your account tutorial.
Step 4 – Prepare for app distribution
To prepare your IOS app for distribution on the App Store, you’ll need to set app icons, update the
build string, verify build settings etc. You can review the step by step guidelines here.
Step 5 – Setting up the project
In order to set display name, Bundle identifier, version, build, etc. of your app, you need to install
the Xcode tool. You can download the Xcode here.
After, run the Xcode and click on “Open another project…” option in the welcome window.
Click on Open another project

Mobile App for Android & iOS User Manual
IOS App Build
45
In the popup window, select and open the “motors-app/iOS” folder.
Next, you need to enter display name, bundle identifier, version, and build in the Identity section.
Open the iOS folder

Mobile App for Android & iOS User Manual
IOS App Build
46
• Display Name – the name of your app which will be displayed on the home
screen/elsewhere;
• Bundle Identifier – the Bundle ID registered on App Store Connect
(com.yourcompanydomain.appname);
• Version – the current version of your app;
• Build – the build version of your app.
In the Signing section, you need to select your team which connected to your Apple Developer
account.
Note. Automatically manage signing option is active by default. This option allows
Xcode automatically managing app signing and supplying.
Tip: For detailed overview of app signing, have a look at the Create, export, and
delete signing certificates.
Enter your app display name
Enter Bundle ID of your app
Enter current version and build
version of your app
Select your team connected to
Apple Developer account

Mobile App for Android & iOS User Manual
IOS App Build
47
The next section is the Deployment Info section where you need to set the minimum iOS version
your app will support. Flutter supports iOS 8.0 and later.
Step 6 – Add an App Icon
You can add icons to your app in the App Icons and Launch Images section of the Xcode General
panel. To add icons click on the arrow icon and open the asset catalog.
Tip: Follow the Human Interface Guidelines when creating the app icon. You can use
the App Icon Generator tool.
Click on the arrow icon to open
the asset catalog

Mobile App for Android & iOS User Manual
IOS App Build
48
In the Finder, drag variations of your app icon to the wells in the detail area match their resolutions.
Alternatively, select the asset catalog containing your app icon set in the Project navigator and drag
variations to the wells.
Finally, review the icon set has been applied by running your app using Xcode device simulator.
Tip: For detailed overview of using simulator, see the Run your app in Simulator from
Xcode.

Mobile App for Android & iOS User Manual
iOS App Release
49
iOS App Release
Step 1 – Create a build archive
You need to create a build archive in order to upload your build to App Store Connect. The current
build is a debug build for building, debugging, and testing. When you are ready to publish your app
on the App Store or TestFlight.
In the Editor area, select the motorReactApp project.
Next, choose a project target from the Scheme toolbar menu.
Click on the motorsAppReact
Choose a project target

Mobile App for Android & iOS User Manual
iOS App Release
50
Select the Generic iOS Device option from the list.
Finally, create a build archive by selecting Product > Archive from the Menu bar.
If the archive builds successfully, it appears in the Archives organizer.
Select Generic iOS Devices
Click on Archive option

Mobile App for Android & iOS User Manual
iOS App Release
51
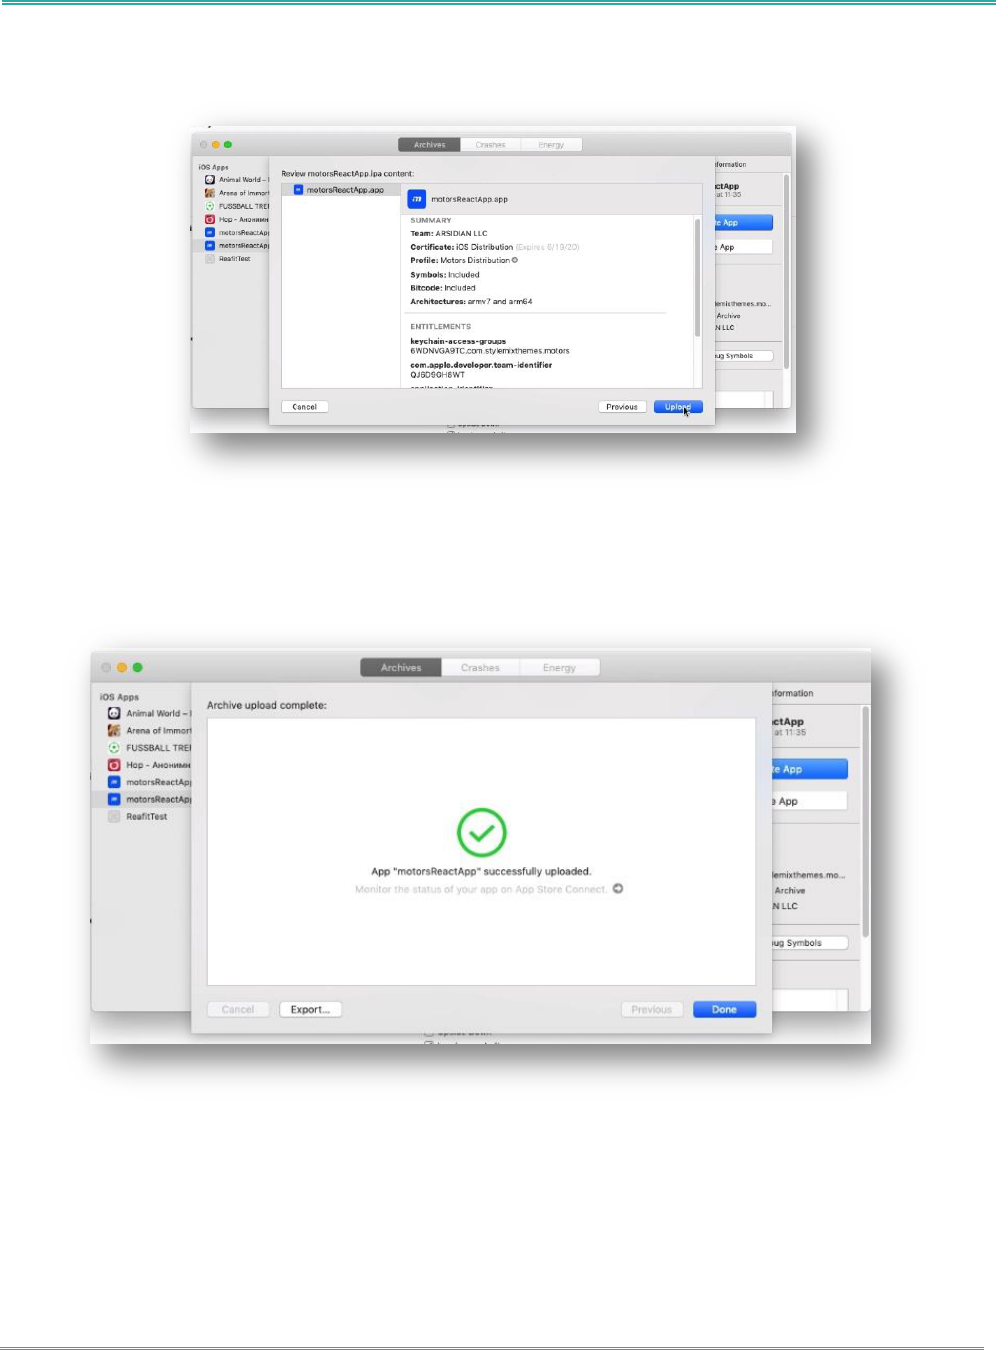
Step 2 – Upload an app to App Store Connect
In the Archives organizer, select the created archive and click Distribute App button.
In the next window, select App Store as the distribution method, then click Next button.
Select the needed archive
Click Distribute App button
Select iOS App Store

Mobile App for Android & iOS User Manual
iOS App Release
52
In the next sheet, select Upload and click Next button.
Alternatively, to export the app before uploading it, click Export, then click Next. Select a location
for the files, then click Export. A folder containing the archive export files appears in Finder.
In the next sheet that appears, choose distribution options, then click Next.
Tip: For detailed overview of the distribution options, see the Distribution options
guide.
Select Upload

Mobile App for Android & iOS User Manual
iOS App Release
53
In the next sheet, choose a signing option, then click Next.
Tip: For detailed overview of the signing options, have a look at the Distribution
signing options guide.
Tip: If you select “Manually manage signing” option, follow alternate steps of the
Manually manage distribution signing tutorial.
Mobile App for Android & iOS User Manual
iOS App Release
54
Review your app content – signing certificates, provisioning profiles, and entitlements in the next
sheet.
Click Upload to run uploading process of your app to the App Store.
