
VQ4100
TROUBLESHOOTING GUIDE
11200 Hampshire Avenue South, Bloomington, MN 55438
PH 952.922.6889 || FAX 952.922.8424 || kingconnect.com
VQ4100 KING Quest HDTV System
TM

Page 1
TABLE OF CONTENTS
Section Contents Page
1. INTRODUCTION ........................................................2
2. WARRANTY INFORMATION ...............................................3
3. KING QUEST WITH POWER INJECTOR .................................. 4-12
3.1 Connections .........................................4
3.2 Operation .........................................5-6
3.3 Second Receiver Operation .............................6
3.4 SWM Only Receiver Connections.........................7
3.5 Troubleshooting Flowchart ...........................8-11
3.6 Troubleshooting......................................12
4. KING QUEST WITH UC1000 CONTROLLER .............................. 13-42
4.1 Connections ........................................14
4.2 AntennaConguration ................................15
4.3 ReceiverConguration-DISH
®
and Bell TV™ ...........16-17
4.4 Operation ..........................................18
4.5 Second Receiver Operation - DISH and Bell TV..........20-21
4.6 Tailgater
®
Mode ...................................22-28
4.7 AlarmConguration ..................................29
4.8 Troubleshooting Flowchart ..........................30-33
4.9 Troubleshooting Flowchart (Tailgater Mode).............34-37
4.10 Troubleshooting (Tailgater Mode) . . . . . . . . . . . . . . . . . . . . . 38-41
4.11 Troubleshooting......................................42
5. BLOCK TIMES .........................................................44
6. REPLACE ELEVATION MOTOR ...........................................45
7. REPLACE AZIMUTH MOTOR AND POT ASSEMBLY........................ 46-47
8. REPLACE MAIN AND TILT CIRCUIT BOARDS............................. 48-49
9. DEFINITION OF TERMS .................................................50
WARRANTY CONSIDERATION FORM......................................51
IMPORTANT
NEVER USE THE POWER INJECTOR AND UC1000 CONTROLLER IN COMBINATION WITH EACH OTHER!
The KING Quest may be connected to the power injector or the UC1000 controller.
For power injector connections, use section 3.
For UC1000 controller connections, use section 4.
NOTE: For installation information, refer to the VQ4100 Owner’s Manual available at www.kingconnect.com.
! !

Page 2
Section 1 INTRODUCTION
The KING Service Department is dedicated
to providing its dealers and customers
with the highest possible level of satisfaction and service.
IMPORTANT!
For warranty reimbursement, you must call KING for a
Service Order Number
BEFORE performing any work: (952) 922-6889.
Please have serial number and model of unit available when calling.
The satellite TV market is expanding and changing. The KING Service Department stays up to date
with the latest information to assist you in keeping troubleshooting and repair time to a minimum.
When calling our service department, a KING technician will issue a Customer ID Number (or Case
Number)andthenclearlydenethepropercourseofactiontofollow.Ifanyworkistobeperformed
or parts replaced, a Service Order Number will also be issued. Additionally, the KING technician will
create a call log to aid in properly documenting the warranty claim.

Page 3
Every VQ4100 Satellite System is covered by a TWO YEAR PARTS AND ONE YEAR LABOR limited warranty from
the date of original purchase. This warranty does not cover installation and external wiring, or refurbished units. This
warranty also does not apply where:
• The product has been abused, misused, improperly installed or improperly maintained.
•RepairshavebeenmadeorattemptedbyothersthatarenotcertiedbyKINGtodosuchrepairs.
• Repairs are required because of normal wear and tear.
• Alterations have been made to the product.
• The top enclosure has been removed without authorization.
•Suppliedgreasenotusedintheexternalcoaxconnectionsasspeciedintheinstructions.
• Damage has been caused by power washing.
• Circumstances beyond the control of KING cause the product to no longer operate correctly.
• Customer is not the original owner.
PROCESSING A WARRANTY CLAIM
1) Technicianmustrstdetermineiftheunitisunderwarrantybyverifyingoriginalowneranddateoforiginal
purchase. Dealer must provide one of the following when submitting a warranty claim:
• copy of original purchase receipt, or
•ifunitwasinstalledbyanOEM,vericationofin-servicedate
2) Technician must call KING to get a Service Order Number (952) 922-6889.
Technician must not proceed without a Service Order Number.
• A KING technician will issue a Service Order Number and advise technician on how to proceed.
3) After repairs are completed, the following must be sent to KING:
• Defective Part (Warranty Labor Claim will not be processed until part is returned.)
• Warranty Consideration Form
• Copy of Work Order
• Proof of Purchase
KEY POINTS
1) For units in service longer than one year, the customer is responsible for labor time.
2) Installation parts (for example coax cables) are not covered.
3) Replacement parts (including domes) are sent directly from KING. DO NOT USE NEW PRODUCT FOR
WARRANTY REPLACEMENT WITHOUT WRITTEN AUTHORIZATION FROM KING.
4) Technician must call KING before performing any work for which warranty labor reimbursement will be submitted
to KING. A KING technician will issue a Service Order Number and specify the allotted time for the repair. If
repairs will take longer than the allotted time, and the servicing dealer wishes to receive proper reimbursement, the
technician must receive prior authorization to exceed the allotted time.
5) Warranty claims must include: proof of purchase, Warranty Consideration Form with Service Order Number, and
copy of work order with labor time which matches that allotted by KING.
6) KING shall reimburse the servicing dealer for warranty work at their published labor rates.
7) Enclose paperwork with defective part. Clearly mark the Service Order Number on outside of box.
IMPORTANT! Only KING certied dealers are authorized to perform warranty evaluations and repairs.
Section 2 WARRANTY INFORMATION

Page 4
Section 3 KING QUEST WITH POWER INJECTOR
3.1 Connections
If the KING Quest is connected with a power injector, use this section.
(If connected with a controller, use section 4.)
Power Injector
Switch and dish type settings for DIRECTV
®
receivers:
DIRECTV SD
Switch Type: 02:Multiswitch • Dish Type: 01: 18” Round
DIRECTV SD with Locals
Switch Type: 02:Multiswitch • Dish Type: 02: 3-LNB (18 x 20”)
If your receiver does not offer one of these settings,
call KING at (952) 922-6889 ext. 173 for assistance.
Older receivers: choose round dish-1 satellite
Older receivers: choose oval dish-2 satellites
The KING Quest will not work with SWM only receivers.
For receiver compatibility, visit www.kingconnect.com/support.

Page 5
3.2 Operation
Power Injector
IMPORTANT!
Plug in power supply last.
Do not move antenna unit after
plugging in power supply as the
antenna has begun scanning.
PLEASE BE PATIENT!
The antenna unit may lock on the satellite in as little as 2 minutes,
but may occasionally take up to 10-15 minutes.
IMPORTANT!
Place power injector in
an accessible location.
IMPORTANT!
Any tall objects can block
the signal from reaching
the antenna.
Do not over tighten the coax connections.
Do not route the coax cable where it can be tripped on or run over by a vehicle.
Do not put sharp bends or kinks in the coax cable.
Place the antenna unit in a position with a clear view of
the southern sky to scan for the DIRECTV 101 satellite.
Make connections 1-3 in the order shown.
Place the KING Quest on a stable and reasonably level surface with a clear view of the southern sky.
When placing the KING Quest in position, be sure surface is dry and free of loose dirt or sand.
When all connections are made, the antenna will scan for the DIRECTV 101 satellite.
When the satellite is found, your programming will appear. Enjoy!
The KING Quest is not programmed to lock on the 119 satellite, so you will not receive your local channels if they
are broadcast from the 119. If you wish to receive programming from the 119 as well as the 101, you can replace
the power injector with the KING UC1000 Controller (sold separately - see your dealer or our website
www.kingconnect.com for details).

Page 6
You can connect a second receiver and TV to the AUX port on the antenna unit.
Secondreceivermustbeconguredthesameas
the main receiver (see section 3.1, page 4).
Second receiver must not be a SWM only receiver.
If your main receiver has a second “satellite in” port and built in DVR, you can connect this input to the AUX
port to record programs on a different channel than the one you are watching.
All components sold
separately.
If you wish to start a new scan (for example, the unit gets moved and you lose reception):
Pressing the power injector’s RESET button is the preferred method to start a new scan, but there are two
alternate methods as well:
• Disconnect and reconnect the coax from the MAIN port on the antenna unit.
• Press the RESET button on the receiver (this option works for select receivers only, such as
models D12, H24 and HR24).
Power Injector
3.3 Second Receiver Operation

Page 7
Power Injector
3.4 SWM Only Receiver Connections

Page 8
Power Injector
3.5 Troubleshooting Flowchart

Page 9
Power Injector

Page 10
Power Injector

Page 11
Power Injector

Page 12
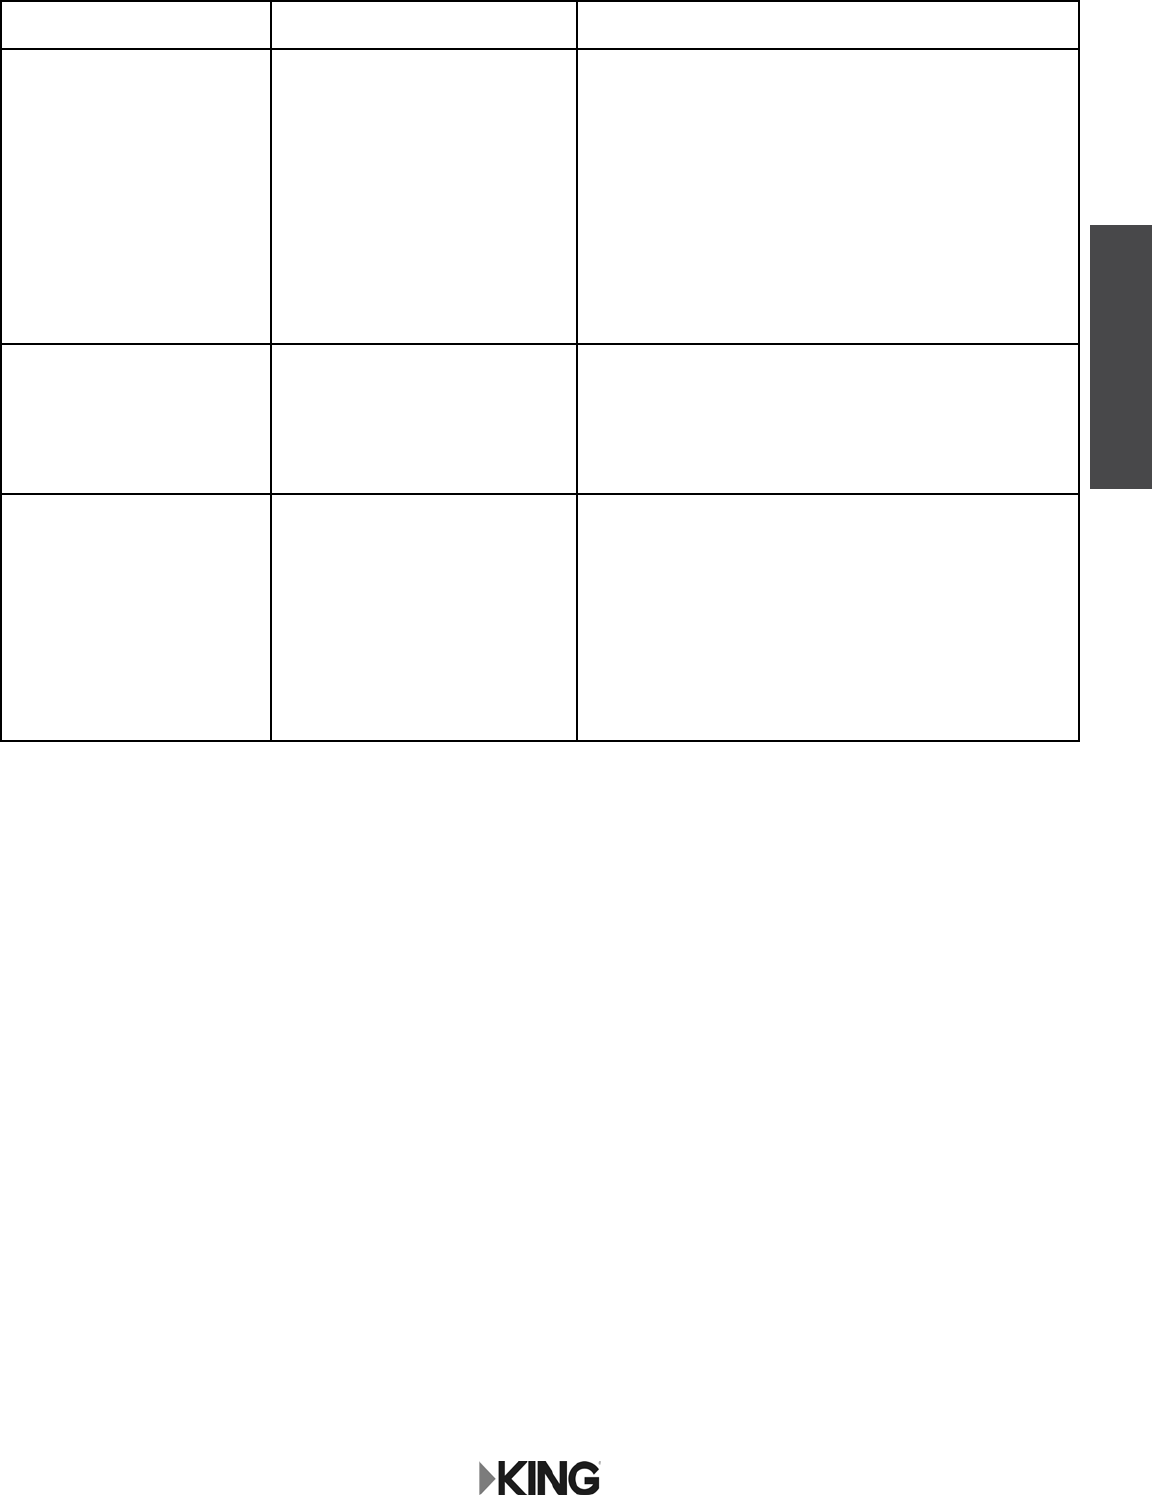
SYMPTOM POSSIBLE CAUSE COURSE OF ACTION
Antenna unit does not scan
for satellites.
No power to antenna unit.
Antenna unit needs to be reset.
Make sure antenna unit is connected to power
injector.
Make sure power injector is powered (LED will be lit).
Press RESET on power injector.
Antenna unit scans but no
picture on TV.
Improper connections made. Make sure antenna unit is connected to power
injector, and power injector is plugged in.
Make sure powered receiver is connected to power
injector and TV.
Antenna unit scans but does
notndsatellite.
Line of sight obstruction. Move antenna unit to have a clear view of the
southern sky. Press RESET on power injector to start
a new scan.
Picture on TV goes in and out. Temporary obstruction of signal. Heavy rain or snow may cause loss of signal.
Reception will improve as weather clears.
Make sure nothing is temporarily blocking view to the
southern sky (like tree branches blowing in the wind).
3.6 Troubleshooting
Power Injector
Page 13
Section 4 KING QUEST WITH UC1000 CONTROLLER
UC1000 Controller
If the KING Quest is connected with the UC1000 controller,
use this section. (If connected with a power injector, use section 3.)
TheKINGQuestcanbeconguredtoworkwithDIRECTV,DISH,orBellTV(eachservicerequires
paid programming subscription).
Usesection4.2toverify,orchange,thedesiredserviceconguration.
DIRECTV: Choose your desired DIRECTV service option, then go to section 4.4 Operation.
DISH:ChooseyourdesiredDISHserviceoption,thengotosection4.3receiverconguration.
After performing the check switch test, use the operating instructions in section 4.4.
Bell TV:ChooseyourdesiredBellserviceoption,thengotosection4.3receiverconguration.
After performing the check switch test, use the operating instructions in section 4.4.
IMPORTANT! DISH CUSTOMERS ONLY!
If you have a DISH model ViP
®
211z, ViP211k, ViP211 or 411 single tuner HD receiver, you can use the
simpliedKINGTailgateruserinterfaceonyourreceiver.
Insection4.2,AntennaConguration,chooseTailgaterMode.
Turn on your TV, receiver and controller, and then go to section 4.6, Tailgater Mode (skip sections 4.3 and 4.4).
Switch and dish type settings for DIRECTV receivers:
DIRECTV SD
Switch Type: 02:Multiswitch • Dish Type: 01: 18” Round
DIRECTV SD with Locals
Switch Type: 02:Multiswitch • Dish Type: 02: 3-LNB (18 x 20”)
If your receiver does not offer one of these settings,
call KING at (952) 922-6889 ext. 173 for assistance.
The KING Quest will not work with SWM only receivers.
Older receivers: choose round dish-1 satellite
Older receivers: choose oval dish-2 satellites

Page 14
UC1000 Controller
4.1 Connections
IMPORTANT!
When using DIRECTV service,
receiver(s) must not be SWM only receivers
and must be congured as follows:
Dish Type: 01: 18” Round
Switch Type: 02: Multiswitch
Do this in the receiver’s satellite setup menu screens.

Page 15
UC1000 Controller
4.2 Antenna Conguration
TO CHECK THE CURRENTLY PROGRAMMED SERVICE:
1. Press POWER to turn on controller.
• The COAX CONNECTIONlightwillashforapproximately10secondsandthenremainon.
• SCAN PROGRESSlightswillash3timestoindicatetheselectedserviceconguration.
See chart below to determine currently programmed service indicated by the lights that
ashed.
TO PROGRAM A DIFFERENT SERVICE:
1. With controller on, press and hold SCANforveseconds.
The COAX CONNECTION light and the SCAN PROGRESS lights that indicate the currently
selectedservicewillbeginashing.
2. Press SCAN repeatedly to scroll thru the available service options.
3. Whenthecorrectlightsturnontoshowthedesiredsatelliteconguration,pressandhold
SCANforvesecondstosaveinmemory.
All lights will turn off except for the COAX CONNECTION light.
4. Turn off controller.
NOTE: The order of the lights corresponds to the order of the satellites listed.
EXAMPLE: DISH SD: Light 1 = satellite 110, Light 3 = satellite 119.

Page 16
1. Turn on the TV and satellite receiver.
2. Turn on controller and wait for the COAX CONNECTIONlighttostopashingandremainon.
Press SCAN.
The antenna will locate all of the appropriate satellites before completing the search process.
After the antenna acquisition process is complete, specic SCAN PROGRESS lights will
turn on to indicate which satellites have been found (see chart on page 18).
If you congured the antenna for DISH HD and SD and the antenna cannot acquire the
110, 119, and 129 satellites, you may need to congure the antenna for DISH HD and
SD Alternate (page 15).
3. On the receiver remote, press MENU, 6, 1, 1.
4. Highlight “Check Switch.”
Press SELECT on the remote.
NOTE: Some receivers may prompt you to select
“Check Switch” a second time to initiate
the test.
5. Make sure “SuperDISH” and “Alternate” boxes
are NOT selected.
NOTE: Not all receivers will display a screen with
options that include “SuperDISH” and
“Alternate” boxes.
6. Highlight “Test.”
Press SELECT on the remote.
The receiver will perform a check switch test, during which time the antenna will periodically
move back and forth between satellites. This process will take several minutes.
Screen graphics may vary.
UC1000 Controller
4.3 Receiver Conguration - DISH and Bell TV

Page 17
DISH SD
MUST SHOW
“SW21”
NO “X”s
Bell TV SD Bell TV HD and SD
8. When the installation summary shows the successful check switch test results, save the
settings, exit to the main menu screen and wait for programming to download.
9. DISH HD and SD and DISH HD and SD Alternate only: Verify saved settings show desired
satellite trio: 61.5, 110, 119 or 110, 119, 129.
DISH HD and SD AlternateDISH HD and SD
NO “X”s
MUST SHOW
“SW64”
7. Whentestiscomplete,ascreensimilartoonebelowshouldappear.Afterscreenverication,
continue with check switch test procedure at bottom of page.
NOTE: Screen graphics may vary.
UC1000 Controller
“None”
NO “X”s
MUST SHOW “SW21”

Page 18
4.4 Operation
UC1000 Controller
1. Make sure your TV and receiver are turned on.
2. Press POWERtoturnonthecontroller.WaitforthelightstostopashingandfortheCOAX
CONNECTION light to remain on.
3. Press SCAN.
• The antenna will scan for the selected satellites. The four SCAN PROGRESS lights will cycle
on and off to indicate a scan is in progress.
• As satellites are located, the corresponding SCAN PROGRESS lights will turn on (see below).
• When scan is complete, the appropriate lights will be on to show which satellites were found.
• Wait for the program guide to download and then select your desired channel. Enjoy!
If you move the vehicle, you will have to reacquire the satellites by repeating the scan process. The KING Quest will
go into “sleep mode” after 15 minutes and the COAX CONNECTION light will dim.
To turn the unit off at any time, press POWER for 5 seconds.
Use this chart to determine which satellites have been found.
NOTE: The order of the lights corresponds to the order of the satellites listed.
Example for DISH SD: The 110 satellite corresponds to Light 1, and the 119
satellite corresponds to light 2.

Page 19
This page intentionally left blank.
UC1000 Controller

Page 20
UC1000 Controller
4.5 Second Receiver Operation
INITIAL SETUP FOR SECOND RECEIVER
1. With the antenna locked on the satellite
and the second receiver connected to the
antenna unit’s AUX port coax, use your
DISH remote control and press MENU, 6, 1, 1 to
display the Point Dish screen.
2. Use the arrow buttons on the remote
to highlight “Check Switch.”
Press SELECT on your remote.
See the next page for downloading programming to the second receiver.
3. Verify “SuperDISH” and “Alternate”
are not selected.
Verify “Test” is highlighted.
Press SELECT on your remote.
4. When test is complete, highlight “Save.”
Press SELECT on your remote.
Antenna locked on
and
receiver connected!
Receiver sold separately.

Page 21
UC1000 Controller
DOWNLOADING PROGRAMMING TO THE SECOND RECEIVER
1. After completing the steps on the previous page, reset the second receiver by pressing the
POWER button on the front panel for 10 seconds. The TV picture will go away and should
reappear within two minutes.
The receiver will then download the program guide to show only the channels available on the
current satellite as determined by the channel selected on the main receiver. Downloading the
newprogramguidecantakeuptoveminutestocomplete.
The channels available on the second receiver are determined by the channel/satellite selected on
the main receiver. For example, if you select a channel on the main receiver that is broadcast from
the 119 satellite, then the second receiver will be able to view any channel broadcast from the 119
satellite.
If you switch channels on the main receiver to one that is broadcast from a different satellite, (i.e. your
channel was broadcast from satellite 119 but your new channel is broadcast from the 110 or 129),
the antenna will automatically switch to the new satellite and programming will be lost on the second
receiver until you either:
• Select a channel on the main receiver that is broadcast from the previous satellite (satellite 119
in this example).
(or)
• Reset the second receiver to download the program guide for the newly selected satellite
(satellite 110 or 129 in this example).
If you choose a channel on the main TV that causes the antenna to switch satellites, you may have to run a check
switch on the second receiver.

Page 22
4.6 Tailgater Mode
1. Point your receiver’s remote at the front of
the receiver and press SAT.
Press RECORD.
When a number appears in the box,
verify “Continue” is highlighted.
Press SELECT on your remote.
The Portable Antenna Setup screen
will display.
IF YOU ARE USING A NEW RECEIVER WITH THE KING QUEST, YOU MUST FOLLOW
THE FIRST TIME SETUP PROCEDURE STARTING BELOW.
AFTER THIS FIRST TIME PROCEDURE, YOU CAN USE “STANDARD OPERATION
WITH DISH RECEIVER” STARTING ON PAGE 26.
FIRST TIME OPERATION WITH NEW DISH RECEIVER
Go to kingconnect.com/receivers for a list of compatible DISH receivers.
MAKE SURE TO INSTALL THE BATTERIES IN THE RECEIVER’S REMOTE
CONTROL (INCLUDED WITH REMOTE CONTROL).
UC1000 Controller

Page 23
IN STEPS 2-6, DO NOT BLOCK THE ANTENNA’S
LINE OF SIGHT TO THE SATELLITES IN THE
SOUTHERN SKY AT ANY TIME!
2. Use the arrow buttons on your remote to
highlightthelettergroupthatincludestherst
letter of the state you are currently in.
Press SELECT.
3. Highlight the state you are currently in
from the state menu.
Press SELECT.
4. Verify “Scan” is highlighted.
Press SELECT.
The scan will begin and may take up to
several minutes to complete.
IMPORTANT!
If you move the antenna unit any
time during or after the scan,
you will have to repeat steps 2-6.
UC1000 Controller

Page 24
The receiver will download software
for the Custom User Interface.
This step may take 20-25 minutes.
5. The receiver will reset and the
Mobile Antenna Setup Screen will appear.
Repeat steps 2-4 to start a second scan.
The unit will scan a second time.
UC1000 Controller

Page 25
When the scan is complete, the
Acquiring Signal message will display.
Acquiring the signal may take up to 5 minutes
to complete.
6. After your receiver has acquired the signal, it
is ready to be activated. To activate service
call 1-800-963-DISH (3474).
After your receiver is activated,
the electronic program guide will download.
This may take up to 10 minutes to complete
(potentially longer if an external hard drive
is connected).
This completes the setup for new receivers. You may now use
STANDARD OPERATION WITH DISH RECEIVER starting on the next page for subsequent use.
UC1000 Controller

Page 26
1. Use the arrow buttons on your remote to
highlight the letter group that includes the
rstletterofthestateyouarecurrentlyin.
Press SELECT on your remote.
After connecting and turning on your equipment, the Mobile Antenna Setup screen will display.
(It may take up to two minutes to display.)
Note: If the Mobile Antenna Setup screen does not display, press MENU, 6, 1, 1 on your
remote. Highlight the “Check Switch” button then press SELECT on your remote.
STANDARD OPERATION WITH DISH RECEIVER
IN STEPS 1-5, DO NOT BLOCK THE ANTENNA’S
LINE OF SIGHT TO THE SATELLITES IN THE
SOUTHERN SKY AT ANY TIME!
IMPORTANT!
If you move the antenna unit any
time during or after the scan,
you will have to repeat steps 1-5.
IF YOUR RECEIVER IS NEW AND UNACTIVATED, YOU MUST COMPLETE
THE STEPS ON PAGES 22-25 FIRST!
UC1000 Controller

Page 27
2. Highlight the state you are currently in
from the state menu.
Press SELECT.
3. Verify “Scan” is highlighted.
Press SELECT.
The scan will begin and may take up to
several minutes to complete.
This screen will display during the scan.
4. When the scan is complete, the
Acquiring Signal message will display.
Acquiring the signal may take up to
5 minutes to complete.
UC1000 Controller

Page 28
OPERATING NOTES:
When in the northeastern United States, television programming from the 129 satellite may not be
available (programming from the 110 and 119 should still be available.)
If your system is inactive for an extended period of time, you may have to call DISH Customer Service
at 1-800-333-DISH (3474) to reauthorize your receiver.
5. After your receiver has acquired the signal,
the electronic program guide will download.
This may take up to 10 minutes to complete
(potentially longer if an external hard drive
is connected).
If your receiver has not been used for awhile the 013 error message may appear.
Call 1-800-333-DISH (3474) and follow the prompts to reauthorize your receiver.
Note that if channel 101 appears, scroll channel up or down to make sure 013
error message does not appear.
You can view your programming when your receiver has been authorized and the
guide has nished downloading.
IF YOU MOVE THE KING QUEST, YOU WILL HAVE TO REPEAT STEPS 1-5 TO
REACQUIRE THE SATELLITES AND RESTORE PROGRAMMING.
UC1000 Controller

Page 29
UC1000 Controller
4.7 Alarm Conguration
1. Press POWERtoturnonthecontroller.WaitforthelightstostopashingandfortheCOAX
CONNECTION light to remain on.
2. Simultaneously press and hold POWER and SCANforveseconds.Controllerbeginsbeeping.
• Single Beep (beep...beep...beep) Alarm is OFF.
• Double Beep (beep beep...beep beep) Alarm is ON.
3. Press and release SCAN to toggle between the on and off conditions.
Beep pattern will change to indicate new condition.
4. When alarm is in desired condition, press and hold SCAN for 5 seconds to save in memory.
COAX CONNECTION light will turn solid and SCAN PROGRESS lights will stay off.
5. Press POWER to turn off the controller.
ALARM OPERATION
If the coax cable is disconnected from the antenna unit or the controller while the system is turned on or in standby
mode, the controller will sound an audible alarm.
To turn off the alarm when it is sounding, press POWER until the controller turns off.
You can change the alarm condition at anytime by following the steps above.

Page 30
4.8 Troubleshooting Flowchart
UC1000 Controller

Page 31
UC1000 Controller

Page 32
UC1000 Controller

Page 33
UC1000 Controller

Page 34
4.9 Troubleshooting Flowchart (Tailgater Mode)
UC1000 Controller

Page 35
UC1000 Controller

Page 36
UC1000 Controller

Page 37
UC1000 Controller

Page 38
Symptom/Message Possible Cause Troubleshooting
Complete Signal Loss - 015 Obstructions to the antenna’s
view of the southern sky, such
as tree branches, severe rain,
etc.
Coax cable not connected
properly between your receiver
and the antenna unit.
You have selected a local
channel but are outside of its
spot beam area.
1) Make sure nothing is blocking the antenna’s view
of the southern sky, such as tree branches, severe
rain, or other obstructions.
2) Check that the coax cable between your receiver
and the antenna unit is connected properly.
3) Unplug the power cord of your receiver for 10
seconds and plug it back in. It may take up to 5
minutes for your receiver to power back on.
4) Verify you have selected a nationally broadcast
channel (CNN, ESPN, etc.).
No Satellites Found - 151 Obstructions to the antenna’s
view of the southern sky, such
as tree branches, severe rain,
etc.
Coax cable not connected
properly between your receiver
and the antenna unit.
1) Make sure nothing is blocking the antenna’s view
of the southern sky, such as tree branches, severe
rain, or other obstructions.
2) Check that the coax cable between your receiver
and the antenna unit is connected properly.
3) Unplug the power cord of your receiver for 10
seconds and plug it back in. It may take up to 5
minutes for your receiver to power back on.
Partial Signal Loss - 002 Obstructions to the antenna’s
view of the southern sky, such
as tree branches, severe rain,
etc.
1) Make sure nothing is blocking the antenna’s view
of the southern sky, such as tree branches, severe
rain, or other obstructions.
2) Check that the coax cable between your receiver
and the antenna unit is connected properly.
3) Unplug the power cord of your receiver for 10
seconds and plug it back in. It may take up to 5
minutes for your receiver to power back on.
My remote is not working. Your remote is not currently
paired with your receiver.
1) Check to make sure the batteries are properly
inserted in your remote.
2) Set up your remote control:
• Press the “SYSTEM INFO” button on the front
panel of your receiver. The “System Info” screen
displays.
• Press and release the SAT button on your remote
control.
• Press and release the RECORD button. You may
see the remote address change on the screen.
• Press and release the SELECT button on your
remote to continue.
4.10 Troubleshooting (Tailgater Mode)
UC1000 Controller

Page 39
Symptom/Message Possible Cause Troubleshooting
Channel Signal Loss - 004 Antenna has not tracked to the
appropriate orbital slot upon
channel change.
1) Unplug the power cord of your receiver for 10
seconds and plug it back in. It may take up to 5
minutes for your receiver to power back on.
2) On the Portable Antenna Setup Screen:
• Verify the correct state is selected.
• Highlight “Scan” then press SELECT.
• Once your system has found its satellites, it may
take a few minutes to download the electronic
program guide and acquire signal before live TV
appears.
No Program Guide - 023 Your receiver has not yet
acquired signal required to allow
access to the electronic program
guide.
1) Unplug the power cord of your receiver for 10
seconds and plug it back in. It may take up to 5
minutes for your receiver to power back on.
2) On the Portable Antenna Setup Screen:
• Verify the correct state is selected.
• Highlight “Scan” then press SELECT.
• Once your system has found its satellites, it may
take a few minutes to download the electronic
program guide and acquire signal before live TV
appears.
All Satellites Not Found -
150
Obstructions to the antenna’s
view of the southern sky, such
as tree branches, severe rain,
etc.
Your physical location may
be outside the footprint of the
desired orbital slot.
1) Make sure nothing is blocking the antenna’s view
of the southern sky, such as tree branches, severe
rain, or other obstructions.
2) Unplug the power cord of your receiver for 10
seconds and plug it back in. It may take up to 5
minutes for your receiver to power back on.
Sporting Event Blackout -
744
Blackout patterns are applied
based on the physical address
on your account. Events outside
the area surrounding your
physical address may not be
available.
N/A
Programming Not
Authorized - 005/013/014
You may not be subscribed to
the channels you are trying to
view.
Your receiver has been
unplugged or not connected to
signalforasignicantperiodof
time.
1)Conrmthatyousubscribetothischannelbyusing
dish.com/mychannels.
2) Unplug the power cord of your receiver for 10
seconds and plug it back in. It may take up to 5
minutes for your receiver to power back on.
3) Call 800-333-DISH (3474) and select TECH. When
prompted by the audio menu, enter the error
number using your phone keypad and an activation
command will be sent to your receiver.
UC1000 Controller

Page 40
Symptom/Message Possible Cause Troubleshooting
Over-the-Air Antenna
Channels Missing - Error
739
The quality of reception and
number of over-the-air (OTA)
channels available depends on,
among other things, the type
and positioning of your OTA
antenna.
Obstructions such as trees,
buildings, mountains, and
weather conditions may interfere
with OTA signal reception.
1) Check that the wiring between your DISH receiver
andyourover-the-airantennaiscongured
properly.
2) Unplug the power cord of your receiver for 10
seconds and plug it back in. It may take up to 5
minutes for your receiver to power back on.
3) Rescan over-the-air antenna channels to your
receiver:
• Using the DISH remote, press MENU then 6-8 to
access the local channels screen.
• Select “Scan Locals.”
Outside of Viewing Area
- 120
Local channels may not be
available if your receiver is not
physically located at or near the
address listed on your DISH
account.
N/A
Local Channels Interrupted
- 536
Local channels may not be
available if your receiver is not
physically located at or near the
address listed on your DISH
account.
N/A
Missing Channels The electronic program
guide may not be set to “My
Channels.”
You may not have the orbital
slots required to view the
missing television programming.
1) Press the GUIDE button on your remote twice to
display the “Favorites List Options” menu. Select
“My Channels” using the arrow buttons on your
remote.
2)Conrmthatyousubscribetothemissingchannel
by using dish.com/mychannels.
3) Perform a check switch test:
• Using your DISH remote, press MENU then
6-1-1. Highlight the “Check Switch” Button then
press SELECT.
• Highlight “Scan” then press SELECT.
• Once your system has found its satellites, it may
take a few minutes to download the electronic
program guide and acquire signal before live TV
appears.
4) Unplug the power cord of your receiver for 10
seconds and plug it back in. It may take up to 5
minutes for your receiver to power back on.
Local Channels Missing Local channels may not be
available if your receiver is not
physically located at or near the
address listed on your DISH
account.
N/A
UC1000 Controller
Page 41
Symptom/Message Possible Cause Troubleshooting
Guide Information Not
Available
Your receiver was not powered
off at night to receive the nightly
electronic program guide
updates.
Your receiver has not yet
acquired signal needed to gain
access to the electronic program
guide.
1) Unplug the power cord of your receiver for 10
seconds and plug it back in. It may take up to 5
minutes for your receiver to power back on.
2) On the Portable Antenna Setup Screen:
• Verify the correct state is selected.
• Highlight “Scan” then press SELECT.
• Once your system has found its satellites, it may
take a few minutes to download the electronic
program guide and acquire signal before live TV
appears.
Guide Time is Incorrect The guide time may be incorrect
if your receiver is not physically
located at the address listed on
your DISH account.
N/A
Video Pixels / Audio Pops Obstructions to the antenna’s
view of the southern sky, such
as tree branches, severe rain,
etc.
Your receiver’s signal is low.
1) Make sure nothing is blocking the antenna’s view
of the southern sky, such as tree branches, severe
rain, or other obstructions.
2) Unplug the power cord of your receiver for 10
seconds and plug it back in. It may take up to 5
minutes for your receiver to power back on.
3) Check that the coax cable between your receiver
and the antenna unit is connected properly.
UC1000 Controller

Page 42
SYMPTOM POSSIBLE CAUSE COURSE OF ACTION
Antenna unit does not scan
for satellites.
No power to antenna unit. Make sure antenna unit is connected to controller.
Make sure controller is powered.
Antenna unit scans but no
picture on TV.
Improper connections made. Make sure antenna unit is connected to controller,
and controller is plugged in.
Make sure powered receiver is connected to
controller and TV.
Antenna unit scans but does
notndsatellite.
Line of sight obstruction. Move antenna unit to have a clear view of the
southern sky. Press SCAN to start a new scan.
Picture on TV goes in and out. Temporary obstruction of signal. Heavy rain or snow may cause loss of signal.
Reception will improve as weather clears.
Make sure nothing is temporarily blocking view to
the southern sky (even tree branches swaying in the
wind may cause temporary interruptions of signal).
4.11 Troubleshooting
UC1000 Controller

Page 43
This page intentionally left blank.

Page 44
Section 5 BLOCK TIMES
REPLACEMENT PROCEDURE TIME IN MINUTES
Actuator Unit 30
LNB 30
Elevation Motor
*
30
Azimuth Motor / Potentiometer
*
30
Main Circuit Board / Tilt Board* 30
*NOTE: See sections 6-8 for detailed instructions.

Page 45
Section 6 REPLACE ELEVATION MOTOR

Page 46
Section 7 REPLACE AZIMUTH MOTOR AND POT ASSEMBLY

Page 47

Page 48
Section 8 REPLACE MAIN AND TILT CIRCUIT BOARDS

Page 49

Page 50
Section 9 DEFINITION OF TERMS
SIGNAL STRENGTH: Intensity of signal received from the satellite.
ELEVATION:
Angle in degrees measured from a level plane.
AZIMUTH:
Circular rotation around the vehicle.
Using the clock as a reference, the front of the
vehicle is 12:00 and the rear is 6:00.
“DIRECT LINE OF SIGHT”
An unobstructed path from the satellite to
the antenna. Any tall objects such as poles,
trees, buildings, mountains, even people
standing close to the antenna unit, can
block the signal from reaching the dish.

Page 51

Page 52
NOTES:
BellTVisanofcialtrademarkofBellCanada.
DIRECTV is a registered trademark of DIRECTV L.L.C.
DISH and Tailgater are registered trademarks of DISH Network L.L.C.
KING is a registered trademark of Electronic Controlled Systems, Inc.
KING Quest and Simply better, by design. are trademarks of Electronic Controlled Systems, Inc.

© 2016 KING
22332 Rev A, VQ4100 KING Quest Troubleshooting Guide
11200 Hampshire Avenue South, Bloomington, MN 55438
PH 952.922.6889 || FAX 952.922.8424 || kingconnect.com
Simply better, by design.
™
