
Webex Calling User Guide
Mobile for iPhone
Feature Overview
By adding Webex Calling Mobile to an iOS platform, you can leverage a convenient and intuitive
interface for mobile calling services.
•
Calls look just like a call made from your business desk phone.
•
Receive calls on your mobile phone as if it was your desk phone
•
One-button business voice mail access
•
Access your business enterprise directory from your smartphone.
The following table lists the communication features for Standard and Premier users:
Premier
User
Standard User
Desktop Client
(a la carte)
Mobile Client
(a la carte)
Unified
Communications
(a la carte)
Desktop Client
X
X
Mobile Client
X
X
Enterprise Directory
X
X
X
User Feature Config
X
X
X
Call History
X
X
X
IM & Presence
X
X
Desktop Sharing
X
X
File Sharing
X
X
My Room (Web RTC &
Guest Client)
X
X
Outlook Client
X
X
Lync Integration
X
X
iOS & Android Tablet
Clients
X
X
Webex Calling
User Guide: Mobile for iPhone
2
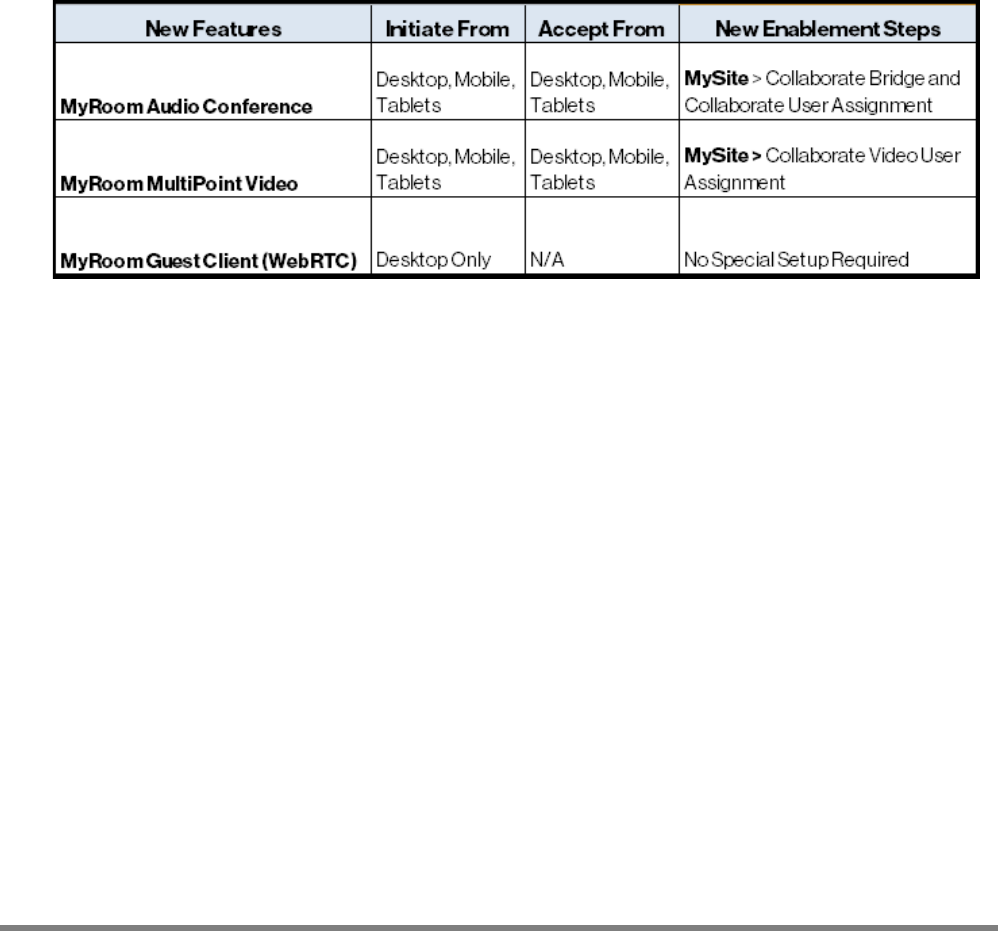
My Room/Web RTC
MyRoom - Audio Conferencing
Enables usage of an assigned UC Collaborate audio bridge, which is assigned to a user allowing instant
bridges for up to 15 participants.
MyRoom – MultiPoint Video
Enables MyRoom Multi-Point Video.
MyRoom – Guest Client (WebRTC)
Enables you to join a full My Room session with a web browser using the Guest Client. This feature is
especially intended for users outside of your company. Generate separate invitations for guest users.

Webex Calling
User Guide: Mobile for iPhone
3
Download Webex Calling Mobile
You can download the mobile app from the
My Phone
dashboard or Google Play.
From the My Phone Dashboard
1.
Log in to the
My Phone
dashboard.
2.
Click My Features on the toolbar at the top of the screen.
3.
Click Mobile App on the menu on the left. The
Business Communicator Downloads
screen
appears.
Figure 1 Download Mobile App
4.
Click Download in the
Business Communicator for iPhone
box. The Apple App Store opens to
the Webex Calling app.

Webex Calling
User Guide: Mobile for iPhone
4
Sign In
5.
Go to your apps on your phone and open the
Webex Calling app. The Terms and
Conditions appear if this is the first time you
are signing in.
6.
Read and accept the Terms and Conditions.
The sign in screen appears.
7.
Enter your user name on the sign in screen
(phonenumber@domain). If you do not know
your user name, it is displayed on the
Mobile
App
screen on the
My Features
tab (see
Figure 3 on page 3). This field is
automatically populated after initial login.
8.
Enter your password. It is the same as your
My Phone
password.
9.
Select Show password to unmask your
password, if applicable.
10.
Select Remember password if you do not
want to enter your password every time you
sign in.
11.
Select Sign in automatically to
automatically sign in to the mobile app
when launched.
12.
Tap Sign in.
Note: If you change your password on the
My
Phone
dashboard, you must also change it in
Webex Calling Mobile.
Figure 2 Sign In

Webex Calling
User Guide: Mobile for iPhone
5
Tabs
Figure 5 Tabs
The Contacts tab enables searching the Enterprise Directory and your
personal contacts.
The
Chat
tab displays the chat history.
The Call tab displays the dial pad where you can call a number. A long press
on 1 on the numeric pad dials your voice mail.
The Call History tab contains a log of all activity to and from your number
including those from your desk phone, mobile app, and/or desktop softphone.
At the bottom of the screen are filters to view activity for All, Missed,
Received, or Placed calls.
The
MyRoom
tab is an always available and permanent room you can use to
chat with anyone that joins.

Webex Calling
User Guide: Mobile for iPhone
6
Settings
Select Settings to browse and apply different settings to the Mobile App.
Figure 6 Call Settings
•
Call Settings
•
Sign in
•
Credentials
•
General
o
Language
o
About
o
Help
o
Local Address Book Search

Webex Calling
User Guide: Mobile for iPhone
7
Call Settings
Webex Calling Mobile supports the following service management features.
•
Dialing Service - when
making calls, you can
choose whether you want
to make an outbound
Voice over IP call using
the cellular data network
or a Call Through initiated
over the cellular voice
network. Call Through is
the default setting.
•
My Telephone Number -
displays your phone
number.
•
Call Forwarding –
configure call forwarding
settings for
No Answer
,
Always
,
Not Reachable
,
and
Busy
.
o
No Answer - enter
a number to
forward
unanswered calls.
Options apply to
the mobile device and/or any other
My Phone dashboard.
Figure 7 Call Settings
stations on the
o
Always - enter a number to forward all calls. Options apply to the mobile device and/or
any other stations on the My Phone dashboard.
o
Business Continuity - if your phone is not connected to the network due to a power
outage, failed Internet connection, wiring problem, etc., your calls can be forwarded to
the number specified.
o
Busy - enter a number to forward calls when the line is busy. Options apply to the
mobile device and/or any other stations on the My Phone dashboard.
•
Do Not Disturb (DND) - when activated, all communication is blocked by the server to the
mobile device and any other stations on the Dashboard. Enable the Ring Splash to receive a
distinctive ring reminding you that DND is enabled.
•
Hide Number (caller ID) - you can hide or display your number when calling or communicating
with other parties or contacts.

Webex Calling
User Guide: Mobile for iPhone
8
Mobility
Mobile capabilities extend features transparently to the mobile network, allowing you to make and
receive business calls from your mobile phone. Calls placed to your business identity can ring the
desk phone, mobile phone, or both. Calls placed from the mobile phone display your business identity
and allow call control functions (call pull, etc.).
Figure 8 Mobility
1.
Select Active or Inactive to enable/disable Mobility on your phone.
2.
Enter the phone number of the mobile device you want to ring.
3.
Select the phone to ring for inbound calls – desk phone, mobile phone, or both (default).
4.
Enable/disable Answer Confirmation. Enabling requires you to press OK to accept an
incoming call. If your device is turned off or without cell coverage, unanswered calls are not
placed in your mobile voice mail.

Webex Calling
User Guide: Mobile for iPhone
9
Search the Enterprise Directory
You can search both the enterprise directory and local contacts. The search field opens the key pad
to type a search string.
The examples below show the search field in use. Typing a character initiates filtering through
contacts in both the local address book and the enterprise directory. Press Back to minimize the
keyboard, hide the search bar, and empty search results.
Figure 9 Enterprise Directory

Webex Calling
User Guide: Mobile for iPhone
10
Contacts
When you start the-Mobile App for the first time, the
Contacts
list is empty. Use the search field to
find people and add them to your
Contacts
list. Contacts can also be added manually by tapping the
Add button. The contacts in
Contact
list can contain two different types:
•
Presence-enabled contacts
•
Non presence-enabled contacts
Any contact can be marked as a favorite and appears at the top of the
Contacts
list in the
Favorites
section. Presence-enabled contacts are users with an Extensible Messaging and Presence Protocol
(XMPP) address. These can be other Mobile App users. Non presence-enabled contacts can be
phone or conference numbers.
The
Contacts
list contains:
•
Contact (Buddy) list
•
Directory contacts
•
Local contacts
Add a Contact
By default, your presence information is always shared with a new contact if an XMPP address is
provided.
•
Tap the Add icon on the status bar to add a presence-enabled contact and/or conference
number.
•
Use the directory search to add a contact and/or conference number.
•
Tap the Add icon to add a conference number.
•
Tap Add Local Contact to add a local contact.
A conference contact is a special contact used for conference bridges to avoid having to remember a
PIN code and a conference number, for example, in recurring conferences. If you receive a buddy
request invitation, you can ignore or accept it. If you ignore a buddy request, then you can always
share your presence information later by selecting Subscribe from the buddy’s contact card. Note:
The contact must accept your subscription request for you to successfully establish a presence
relationship.
Edit a Contact
Open a contact to perform the following functions:
•
Unsubscribe - removes the presence relationship between you and that contact. You will not
see the contact’s presence information, and the contact does not see yours. An unsubscribed
contact remains in the
Contacts
list and is always shown as “offline”. Select Subscribe to re-
establish a presence relationship.
•
Remove – removes the contact from your
Contacts
list.
•
Edit – opens the contact’s information. You can add, edit, or remove information for presence-
enabled and non-presence-enabled contacts.

Webex Calling
User Guide: Mobile for iPhone
11
Presence
For each contact to which you have subscribed, you can see their presence. Similarly, your contacts
can see your presence on their
Contacts
list. Presence means that your friends are able to see
whether you are available, for example, “I’m available” or “I’m busy”.
You can set your own presence by tapping the Presence icon on the status bar in all tabs view. You
can change your avatar, personal message, and presence status. Your avatar is the picture that
represents you in your friends
Contacts
list and chat screens. Tapping on an avatar opens a screen
with options to select an existing image, take a new one with your phone camera, or to clear your
avatar.
You can enter a status message in the area next to the avatar. This status text is shown in your
friends
Contacts
list.
If you see the error message, “Chat Unavailable”, under any tab, it means that the XMPP connectivity
has been lost for chat and presence; however, you can still make calls.
The presence update is only triggered by appointments and meetings that are either accepted by you
or made by you. Note: all day meetings do not trigger a presence change to
Busy – In Meeting
.
Icon
Description
User is online and ready for communication.
User is online but has been idle or away from their computer for more than ten
minutes.
User is busy and does not want to be disturbed.
User is offline and the only available contact method is calling or chatting.
A subscription is pending and the contact has not yet approved sharing their
presence.
Contact is busy on a call. This is an automated presence status.
Contact is busy in a meeting. This is an automated presence status. The Busy – In
Call status overrides the Busy – In Meeting status so this one is only seen if there is
a meeting but no call.

Webex Calling
User Guide: Mobile for iPhone
12
Audio/Video Calls
Place a Call
The
Call
tab displays a dial pad and a text field to enter numbers. There are two buttons below the
dial pad: call and a dial pad menu.
The 1 button has a voice mail icon. A long press on the 1 connects you with your voice mailbox. The
icon is grey if you have no messages.
The dial pad menu contains two options: Pull Call and Retrieve Call. The Pull button retrieves a call in
progress on your desk phone to the mobile app. The Retrieve Call button is used to retrieve a call
parked at your extension.
Figure 10 Place a Call
You can make an audio or video calls using one of the following methods:
•
Tap a contact in the
Contacts
list. Select to make an audio call, or to make a video
call.
•
Open the dial pad, enter a phone number, and tap the or .
•
Select a call entry in the Call History list. Select to make an audio call, or to make a
video call.
•
On the
Chat
screen, select to make an audio call, or to make a video call.

Webex Calling
User Guide: Mobile for iPhone
13
Answer a Call
An incoming call is indicated with a ringtone. There are two options on the incoming call screen:
Accept and Decline. If you decline the call, it causes the line to sound busy at the caller’s end and they
know that you rejected the call.
In Call Actions
Figure 11 In Call Actions
The following call control actions are available during a call:
End a Call Transfer a call – Unattended
Mute the microphone Start a conference
Place a call on hold Park Call
Adjust the volume
Conference
Escalate from audio to video call
and downgrade from video to
audio call
Transfer a call to circuit-switched call
Open the dial pad
Add more participants (conference call
only)
Make a new call Merge two separate calls
Transfer a call - Attended Swap two separate calls

Webex Calling
User Guide: Mobile for iPhone
14
Message Waiting Indicator/Voice Mail Access
If you have pending voice mails (VM), the notification bar displays an icon and text, “You have XX
pending voice mail messages”. Select the voice mail notification to dial the voice mail access number
directly and listen to your messages. You can also press and hold
1
on the dial pad to access voice
mail.
All notifications (missed calls, new messages, etc.) are handled through the notification bar.
Figure 12 Message Waiting Indicator

Webex Calling
User Guide: Mobile for iPhone
15
Business Line Call Through
You can originate a call using your business line identity using the basic callback feature. Callback
rings the mobile device, desk phone, or both and then places the outbound call when answered by
you. Basic Callback is only available if you have Mobility enabled, providing the option to make calls
using the Callback feature.
Call Through is available if the Mobility service is assigned to your profile. When a call is placed in this
mode, the app communicates transparently connecting your directly to the destination identifying
the call with your business line identity.
Call Transfer
You can transfer VoIP calls to another party. Select Transfer and dial a number. You have two
transfer options:
•
Attended Transfer - select Talk First and a second call is placed with the selected contact. If
the call is successfully established, the lower right button is replaced by the Complete button.
You can talk with the third party privately before completing the transfer. The first party is on
hold until the transfer is completed.
•
Unattended/Blind Transfer - select Transfer and the second party is transferred to the
selected contact. The current user is dropped from the call.

Webex Calling
User Guide: Mobile for iPhone
16
Figure 13 Call Transfer

Webex Calling
User Guide: Mobile for iPhone
17
Call Waiting (Swap Calls)
When there is more than one active call, you have a Swap option that allows you to switch between
the calls. Note: Call Waiting requires the use of the Phone App for a call in progress and incoming
calls.
Figure 14 Call Swap

Webex Calling
User Guide: Mobile for iPhone
18
Merge Calls
When there are active calls at the same time, you can merge the calls to bring them into a
conference.
Figure 13 Merge Calls

Webex Calling
User Guide: Mobile for iPhone
19
Conferencing
You can conference up to five additional lines simultaneously. While on a call, select the Conference
button and dial a number by searching the directory or entering it on the dial pad. The first call is
temporarily placed on hold while the second/successive calls are connected. Once the conference
recipient answers the call, all lines are joined into the conference. To add additional calls, select Add
participant.
Figure 14 Conference

Webex Calling
User Guide: Mobile for iPhone
20
Pull a Call
You can use Call Pull where you have two endpoints, e.g., a VoIP desk phone and a mobile phone with
the mobile app. If you have an active call on the desk phone, you can transfer it seamlessly to the
mobile phone. There is no interruption to the voice call.
1.
Select the call menu. A pop-up appears to pull or retrieve the call.
2.
Select Pull Call.
Park a Call
Call Park is used to place a call in a hold status, which can be retrieved by another phone by dialing
the feature access code or through the command button.
Figure 15 Park Call
1.
While on an active call, select the call menu. A pop-up appears allowing you to conference or
park the call.
2.
Select Park Call. You are prompted to enter a phone number.
3.
Enter the phone number and press #.
-OR-
Just press # to park against your station.

Webex Calling
User Guide: Mobile for iPhone
21
Retrieve a Call
Call Retrieve is used to pick up a call that was parked.
1.
Select the call menu. A pop-up appears allowing you to pull or retrieve the call.
2.
Select Retrieve Call. You are prompted to enter the number where the call is parked.
3.
Enter the number and press #.
-OR-
Just press # if it is parked against your extension.
Call History
Call history can be accessed from the
History
tab. Call history for placed, received, and missed calls
is saved from any device. You can redial and call back when you miss a call or when you want to dial a
contact with whom you have recently spoken.
Figure 16 Call History

Webex Calling
User Guide: Mobile for iPhone
22
Chat
The
Chat
tab shows a list of recent chats since you last logged in. If User A chats with User B multiple
times, their discussions appear as one item in the list. Chats are listed so that newest one is always
on top.
Tap the name to opens the chat view. Tap to start a chat. Tap to add people to the chat to
make it a group chat.
New incoming messages are indicated with a notification badge to the right of the name. A long press
on a contact opens the context menu with an open chat and contact details (this is the same for the
Buddies list).
The status bar in the
Chat
tab displays icons for: Add Participants , Presence Status , and the
Overflow menu
.
The
Overflow
menu displays the following options: Start group chart, Mark all as “Read”, About,
Settings, and Sign out.
Tap the presence status icon
to update your status or location and enter text.
Figure 19 Chat and Status

Webex Calling
User Guide: Mobile for iPhone
23
My Room
My Room
is a permanent room that is always available that you can use to chat with anyone that
joins.
Tap on the action bar on the Chat tab.
Tap to add more participants, or they can join your room from your contact card. Once
participants join the chat room, they can tap to automatically join the conference.
My Room
uses your permanent chat room, permanent collaboration room, and a conference bridge
(audio or video).

Webex Calling
User Guide: Mobile for iPhone
24
Sign Out
Select Menu > Sign out to sign out of Webex Calling Mobile.
Troubleshooting
Initial attempts to troubleshoot an issue with the app involve isolating the source of the problem by
following these steps:
1.
Log out and close the Mobile
App.
2.
Verify data/Internet connection
is available by testing the
browser.
3.
Re-Install the application. If there
is a potential iOS or hardware
issue, verify that the issue
persists after Webex Calling
Mobile is removed from your
phone
(e.g., phone reboots, freezes, or
other).
If you are still experiencing a problem
and called the service support desk, you
may be asked to email log files.
Figure 20 Troubleshooting

Webex Calling
User Guide: Mobile for iPhone
Additional Help and Resources
Getting Started with Your Service
To learn how to manage your User Account Settings and Site Service features, go to:
https://webexcallingvztraining.verizon.com/.
Returning Equipment
Should you require replacement equipment, please refer to the Return Merchandise Authorization
(RMA) quick reference guide located at
https://webexcallingvztraining.verizon.com/.
Contact Us
Webex Calling Support: 800–287–6235
Or visit
https://webexcallingvztraining.verizon.com/
For questions on other Verizon products: 800–230–9800
© 2017 Verizon. All Rights Reserved. The Verizon name and logo and all other names, logos, and slogans
identifying Verizon’s products and services are trademarks and service marks or registered trademarks and
service marks of Verizon Trademark Services LLC or its affiliates in the United States and/or other countries.
All other trademarks and service marks are the property of their respective owners.
Version 1.17 October 2017
