
1
ACCESS & SECURITY MANAGER | ADD AN AUTHORIZED USER
ACCESS & SECURITY MANAGER
With Access & Security Manager,
1
the system administrator can give authorized users the ability to see
account information, set up transactions and/or approve transactions other users have scheduled (including
the system administrator). The system administrator also can register authorized Internet Protocol (IP)
addresses with us, which helps stop access from unauthorized Internet connections.
ADD AN AUTHORIZED USER
Before you add an authorized user, please have the following information handy:
•Yournewuser’srstandlastname,emailaddressandphonenumber.
•Ausernameforyournewuser.
•IPaddress(es)ifIPSecurityisactivated. If it’s active at the company level, determine if you need to add
a new IP address. If it’s active at the user level, determine if you want IP Security on or o for this user, or
if you need to add additional authorized IP addresses. We’ll prompt you to provide us with authorized IP
addresses during enrollment, but you can always return later to adjust your IP Security settings.

2
ACCESS & SECURITY MANAGER | ADD AN AUTHORIZED USER
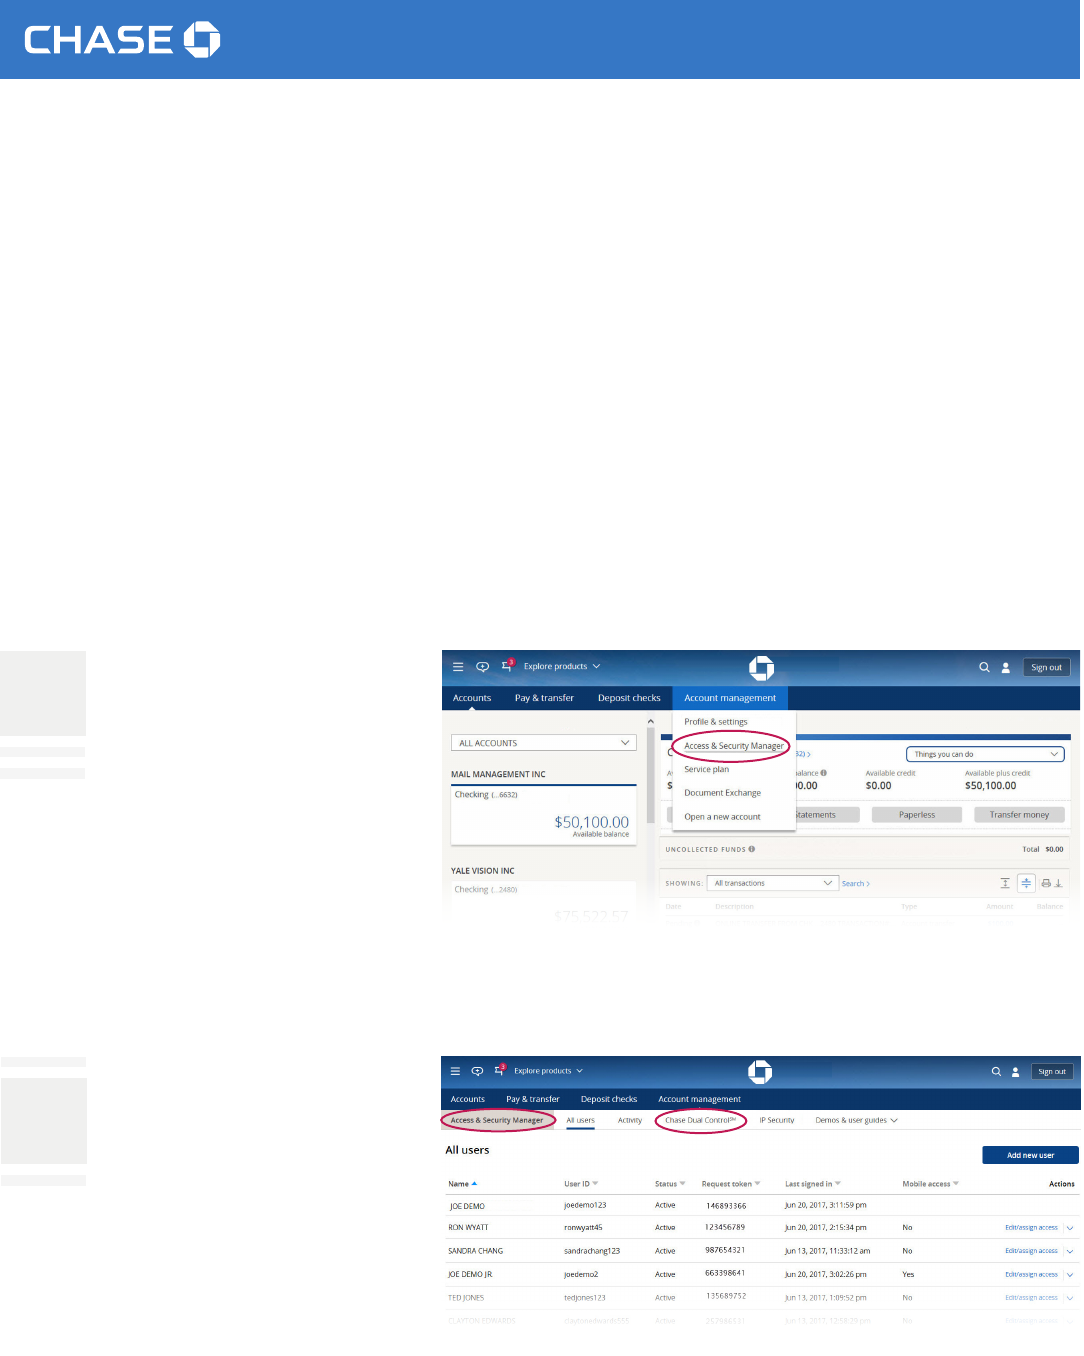
1
Choose Account management
from the navigation bar
and nd Access & Security
Manager.
2
Choose Add new user.
3
Business users can
request an activation code
online, while Commercial
users need to enter their
password and token code.

3
ACCESS & SECURITY MANAGER | ADD AN AUTHORIZED USER
4
Fill in the required information
for your new user. If you’d like
the user to have mobile access
through the Chase Mobile
SM
app, you can check that box.
After you’ve conrmed all the
information is correct, click Next.
We’ll ask you to verify the
information you’ve told us, and
then you’ll receive a message
conrming that you’ve added
an authorized user. Commercial
users: We’ll ship an RSA SecurID
®
token to your mailing address.
Please give that token and the
username you created to your
new authorized user.
Your new user will receive an
email from us detailing how to
sign on for the rst time. He or
she will need the username you
created, the token (if applicable)
and the temporary password we
include in the email.

4
ACCESS & SECURITY MANAGER | ASSIGN ENTITLEMENTS
ASSIGN ENTITLEMENTS
After you’ve added an authorized user, you’ll assign entitlements for every account and transaction type in
your online prole. If you have existing users and want your new user to have the same entitlements, you can
copy one user’s settings to your new user.
1
We’ll list every account in
your prole, and you’ll assign
access for each one.
If you already have existing
users, you can use their
settings and copy them
for your new user. Simply
choose Copy access level
from another user from the
drop-down list and pick the
user whose settings you’d
like to copy. Or you can add
entitlements individually for
each user.

5
ACCESS & SECURITY MANAGER | ASSIGN ENTITLEMENTS
2
When you click Assign access,
you’ll choose the entitlements
for each account:
•Noaccess. Leave the
drop-down list alone. Your
authorized user won’t have
access to this account. Every
account is automatically at this
level until you assign one of the
other options.
•Seeactivityonly.Your
authorized user can see
account information but can’t
initiate transactions. In addition
to online activity, you can allow
this user to see statements,
view check images and/or
approve transactions initiated
by other users.
•Transactonly.Your authorized
user can initiate transactions
but can’t see any account
activity. You can also allow this
user to approve transactions
initiated by other users.
•Seeactivityandtransact.
Your authorized user can
see account activity and
initiate transactions. You can
also allow this user to see
statements, view check images
and/or approve transactions
initiated by other users.

6
ACCESS & SECURITY MANAGER | ASSIGN ENTITLEMENTS
3
If you’ve chosen an option in
which your user can see account
activity, choose some, all or none
of the optional boxes to allow
your user to see check images,
view statements and/or approve
transactions. If you’ve chosen
Transact only, that user will
be able to initiate transactions
but can approve transactions
only if you check the Approve
transactions box.
4
If your user has the ability to
initiate transactions, you’ll choose
which types of transactions the
user can initiate, the total daily
dollar limit for each service and
whether the user’s transactions
need approval. This approval
setting is in addition to the
approval required for Chase Dual
Control
SM
. You can also specify a
certain dollar limit above which a
user’s transaction needs approval.
When you’ve nished choosing all
the services, limits and approvals
for your authorized user, click Save.
5
Repeat this process for each
account in your prole if you
want your authorized user to see
and/or transact on that account.
Pleasenote: If you’ve activated
Chase Dual Control, all
transactions automatically will
require approval except for
transfers between your Chase
accounts, loan advances and
loan payments.

7
ACCESS & SECURITY MANAGER | UPDATE AUTHORIZED USERS
UPDATE AUTHORIZED USERS
1
Choose Account management
from the navigation bar
and nd Access & Security
Manager.
2
Open the drop-down list at the far
right for the user you’d like to edit.
From here, you can edit a user’s
prole, send a new temporary
password, suspend a user’s access
or delete a user from the system.
3
Update any eligible eld for your
user. If your user needs a new
password, you can choose the email
address where we’ll send it.
You also can suspend a user’s
access temporarily (if a user is going
on vacation, for instance) or activate
a suspended user. You can also
delete the user entirely by choosing
that button. Delete users when they
have left the company or no longer
need online access.
CommercialUsers: When you
delete a user, please dispose of your
user’s token in accordance with all local
codes and regulations for products
containing lithium batteries. Contact
your local environmental control or
disposal agency for further details.
After you’ve nished, you’ll receive an
on-screen conrmation of your updates.
8
ACCESS & SECURITY MANAGER | APPROVALS
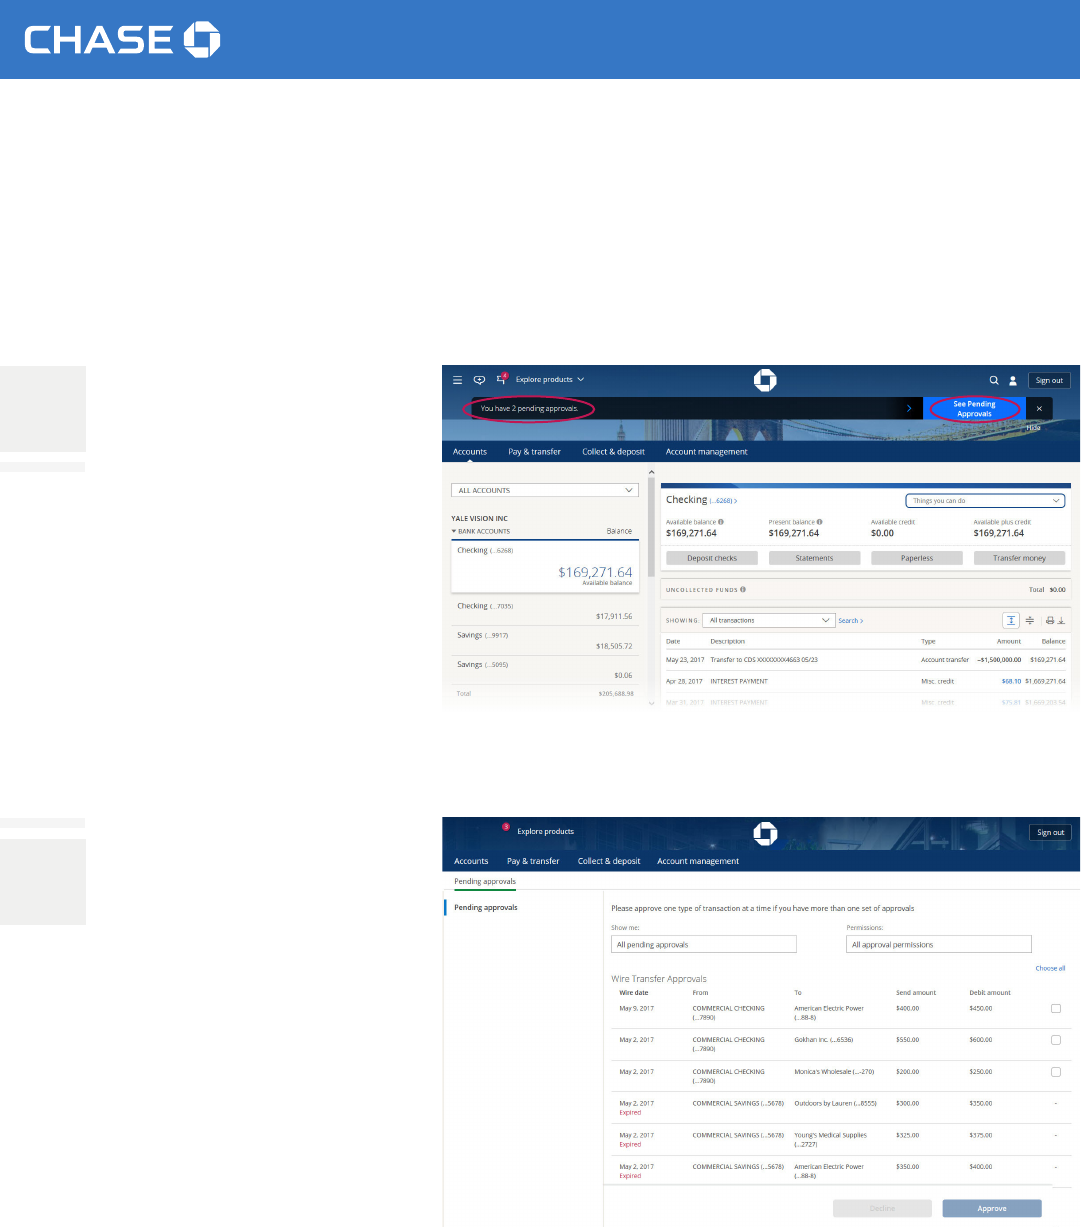
APPROVALS
The system administrator or authorized users who have been entitled can approve transactions from one page.
1
When there are pending
approvals for a system
administrator or authorized
user, we’ll list them at the top
of the screen as soon as you
sign in. If you choose that
message, you’ll see a button
that will take you to See
Pending Approvals.
2
We’ll list all of the approvals
separated by transaction type.
You can only approve or decline
one type of transaction at a time,
although you can act on all of the
transactions within a category at
once. After you’ve chosen at least
one transaction, the approve
and decline buttons will activate
and list how many transactions
you’ve chosen.
Please be aware that approvals
have to be made by the cuto time
for us to process the transaction
that day. We’ll delete any
transactions in pending approval
status 30 days after the scheduled
payment or send-on date.
9
ACCESS & SECURITY MANAGER | CHASE DUAL CONTROL
CHASE DUAL CONTROL
Chase Dual Control is an administrative procedure we recommend to help you keep your online prole secure.
It can improve your internal controls, reduce the likelihood of mistakes and could help protect your company
from fraud. Chase Dual Control requires an approver for every transaction using these services: ACH services,
ACH collections, bill pay, external account transfers and wire transfers.
Here’s how it works: When you activate Chase Dual Control, any transaction one person initiates has to be
approved by someone else who’s authorized to approve it. Every transaction in each of the services listed
needs approval; you’re unable to choose which services apply and which don’t.
1
Choose Account management
from the navigation bar
and nd Access & Security
Manager.
2
From the Access & Security
Manager submenu, choose
Chase Dual Control.

10
ACCESS & SECURITY MANAGER | CHASE DUAL CONTROL
3
Please open and read the
important things to know.
After reviewing the information,
if you’d still like to use Chase
Dual Control, click the button
to turn it on. You’ll receive an
on-screen conrmation that
you’ve activated Chase Dual
Control.
Please be sure that you want
Chase Dual Control before
you activate it, because you
can’t deactivate it online. If
you decide later on that you
no longer want Chase Dual
Control, please contact your
client service professional or
customer service.

11
IP SECURITY
IP SECURITY
IP Security is an administrative procedure we recommend to help keep your company’s online prole secure.
It helps restrict access from IP addresses the system administrator hasn’t authorized.
Here’s how it works: An IP address is a numerical label assigned to a location that accesses the Internet. For
example, your workplace will have an IP address that is dierent from the coee shop down the street, even if
both companies use the same Internet service provider and you use the same device (e.g., computer).
There are two ways a system administrator can set up IP security.
• Companylevel: Users must sign in from a device, including a computer, tablet or smartphone, at a
registered IP address. Access from all other IP addresses is restricted.
•Userlevel:The system administrator can turn IP security on or o for each user. If it’s on, that user can only
sign in from a device at registered IP addresses specic to that user.
Keep in mind that even if a user has successfully signed in with a device, if that device is used again but from
an unregistered IP address, we’ll deny access. This is especially true with mobile devices, which often use
dierent IP addresses through the mobile carrier or Wi-Fi hotspots. We suggest adding IP addresses only
from secure Wi-Fi connections.
IP Security doesn’t support IPv6.

12
IP SECURITY | FIND YOUR IP ADDRESS
FIND YOUR IP ADDRESS
We’ll help you nd your IP address. Depending on the level of security you’d like, you might want each
employee to nd his or her IP address as well, because the system administrator will need to add each IP
address you’d like to authorize.
If your company uses dynamic IP addresses that change each time a device connects to the Internet or an
IP range, please ask your IT department for more information.
1
From the person icon near the
top right of the screen, choose
More settings from the drop-
down list.
2
From the side menu, choose
IP Address.
3
To see your current IP address,
choose Show IP address.
You can also nd your IP
address without signing into
your online prole by visiting
www.chase.com/whatsmyip.

13
IP SECURITY | FIND YOUR IP ADDRESS
4
We’ll show you the IP address for
this computer. Be sure to write
it down, because you’ll need it
when you register for IP Security.
Please contact your company’s
IT department to nd out if
your company has multiple IP
addresses or an IP range.
The IP address we show is for
informational purposes only and
is intended to help you set up
and maintain IP Security.

14
IP SECURITY | ACTIVATE IP SECURITY
ACTIVATE IP SECURITY
The system administrator can activate IP Security through Access & Security Manager. Please have the IP
address(es) ready that you’d like to authorize.
1
Choose Account management
from the navigation bar
and nd Access & Security
Manager.
2
From the Access & Security
Manager submenu, choose
IP Security.
3
Business users can request
an activation code online,
while Commercial users can
use their token.

15
IP SECURITY | ACTIVATE IP SECURITY
4
Choose the IP Security level that
works best for your company.
• Userlevel customizes IP
addresses for each user.
• Companylevel applies IP
addresses for all authorized
users within your company.
5a
Userlevel: You can either turn
on IP Security for every user
in the company’s prole or you
can turn on IP Security for each
individual user.
We automatically ll in
the IP address the system
administrator is currently using
into the company prole. For
individual users, please tell us
each authorized IP address for
each user. After you’ve typed
in one user’s IP addresses, you
can copy them to another user if
applicable.

16
IP SECURITY | ACTIVATE IP SECURITY
6a
Userlevel: If your company uses
static IP addresses, use the rst
eld to tell us the authorized
IP addresses. If your company
uses dynamic IP addresses, use
the last eld to tell us the range.
(Examples: 10.1.10.20 is a static
address. 10.1.10.15 - 180 is a
dynamic address that would
authorize all IP addresses in the
range from 15 to 180 for the
fourth number.) You can tell us
up to 10 IP addresses or ranges
per user.
When you’re nished entering IP
addresses for each user, click Save.
We recommend you choose user-
level IP Security if anyone in your
company plans to access your
company’s online prole from a
mobile device.

17
IP SECURITY | ACTIVATE IP SECURITY
5b
Companylevel:Give us up
to 30 IP addresses or ranges
for the company’s prole. If
your company uses static IP
addresses, use the main eld
to tell us the authorized IP
addresses. If your company
uses dynamic IP addresses,
use the last eld to indicate
the range of authorized IP
addresses. (Example: 10.1.10.20
or 10.1.10.15 - 180)
When you’re nished, click Save.

18
IP SECURITY | MANAGING IP SECURITY
MANAGING IP SECURITY
Using Access & Security Manager, the system administrator can add, edit or delete IP addresses, copy IP
addresses from one user to another or turn IP Security on or o for a user (user level only).
1a
Userlevel:Navigate to the
Access & Security Manager
page and choose IP Security
from the menu.
2a
Userlevel:From here, you can
do several things:
• Switch from user-level to
company-level IP Security
• Turn o IP Security for all users
• Turn IP Security on or o for
individual users
• Copy IP addresses from
another user
• Add, edit or delete IP addresses
for individual users.

19
IP SECURITY | MANAGING IP SECURITY
1a
Companylevel:Navigate to the
Access & Security Manager
page and choose IP Security
from the menu.
2a
Companylevel:We’ll list all of
the companies in your prole.
Choose See IP addresses to
continue.
3a
Companylevel:We’ll list all of
the IP addresses authorized for
the company. From here, you
have the option to:
• Switch from company-level to
user-level IP Security
• Turn o IP Security for the
company
• Add, edit or delete IP addresses
for the company
When you’re nished, click Save.
Keepinmind: At the company
level, IP Security is on for every
user, and you aren’t able to
customize by user.

20
IP SECURITY | IP ADDRESS HISTORY
IP ADDRESS HISTORY
You can search to see when authorized users have accessed their prole.
1
From the Access & Security
Manager submenu, choose
IP Security.
2
Choose See history near
the top of the page.
3
You can choose the date range
and authorized user you’d like
to search, or you can get the
history for all users. We’ll let you
know how often they’ve signed in
during that date range and from
which IP address.

21
ACCESS & SECURITY MANAGER | FAQ
FREQUENTLY ASKED QUESTIONS
What is Access & Security Manager?
Access & Security Manager is the entitlements feature a system administrator uses to add and allow authorized users to
transact on and/or see certain accounts. It also has Chase Dual Control and IP Security, which are administrative procedures we
recommend. Chase Dual Control requires secondary approvals before transactions are released, and IP Security allows access to
the prole from authorized IP addresses.
What does “See activity only” mean?
“See activity only” is one of the options a system administrator has to entitle account access to an authorized user. A see-activity-
only user can see balances and account history but can’t initiate or approve transactions.
What does “transact only” mean?
“Transact only” is one of the options a system administrator has to entitle account access to an authorized user. A transact-only
user can submit transactions for approval but can’t see balances or account history.
How do I see reports?
Choose “Activity” from the Access & Security Manager home page menu.
How can I see a user’s activity?
To see an authorized user’s activity, choose “Activity” from the Access & Security Manager home page menu.
Does the reporting function allow me to save the information?
The system administrator can save information by choosing “Export transactions” from the “See reports” page.
How do I add users?
To set up a new user, choose “Add new user” from the Access & Security Manager overview page, and then follow these steps:
• Create a username, temporary password and decide if you want mobile access for your authorized user.
• For each account, choose the level of access (no access, see activity only, transact only or see activity and transact) for the user.
If the user is allowed to transact, you’ll also choose the transaction types, dollar limits and whether another individual must
approve the user’s transaction.
• For each account, indicate if the user is authorized to approve transactions that others have initiated.
• When you’re nished, give the username and temporary password to the authorized user.
Commercial users: We’ll send the new user’s token to the system administrator. Expect to receive it in approximately two
business days. Please give the token to the new authorized user.
How do I adjust my user settings?
The system administrator can edit settings from the Access & Security Manager home page by using the “Edit/assign access” link
or the drop-down list next to that link for each individual user.
How do I reset a user’s password?
The system administrator can reset a password for an authorized user from the Access & Security Manager home page by
opening the drop-down list at the far-right and choosing “Send temporary password.”

22
ACCESS & SECURITY MANAGER | FAQ
How do I manage permissions?
The system administrator can manage permissions from the Access & Security Manager home page by using the “Edit/assign
access” link or the drop-down list next to that link for each individual user.
How do I manage entitlements?
The system administrator can manage entitlements from the Access & Security Manager home page by using the “Edit/assign
access” link for each individual user.
What is Chase Dual Control?
Chase Dual Control is an administrative procedure we recommend that requires a user to approve a transaction initiated by
another user before we process the transaction. Chase Dual Control can help prevent internal errors and potentially fraudulent
transactions.
Why should I sign up for Chase Dual Control?
Since transactions require two people to process instead of one, Chase Dual Control can help prevent internal errors and reduce
the risk of fraudulent activity on your account.
How do I sign up for Chase Dual Control?
To sign up for Chase Dual Control, the system administrator should go to the Access & Security Manager home page and choose
“Chase Dual Control” from the menu. From there, the system administrator can turn on the service.
How do I set up my users for Chase Dual Control?
To set up a user for Chase Dual Control, the system administrator should go to the Access & Security Manager home page,
choose “Add new user” and entitle the user to approve transactions. If you already have authorized users, choose “Edit/assign
access” to customize each user’s abilities. Authorized users aren’t able to add other users or change others’ settings.
What if I have Chase Dual Control activated but there aren’t any authorized users to approve a transaction?
The transaction will remain pending until the system administrator adds an authorized user to approve the transaction. The
system administrator is automatically considered an authorized approver for transactions initiated by authorized users.
How are transactions approved?
The system administrator and authorized users with approval rights will receive a message when they rst sign in that there are
transactions to approve. Clicking on that message takes you to the pending approvals page, where you can approve or decline
transactions individually or in groups based on transaction type. Although we list all pending approvals, you’ll only be able to
approve or decline the transactions you’re allowed to decision (for instance, you won’t be allowed to approve a transaction you
initiated).
What are the limits for transactions?
Although we set a cumulative daily limit for each transaction type (wires, bill payments, ACH services, etc.), the system
administrator can decrease the limit automatically or ask us to increase the limit for certain transaction types by choosing
“Manage transaction limits” from the menu in the upper-left corner. System administrators can also assign daily limits to
authorized users below the cumulative daily limit for the online prole.

23
IP SECURITY | FAQ
What is IP Security?
IP Security is an administrative procedure we recommend that gives your company an extra layer of security. By registering
the IP addresses associated with your company as a whole or for individual users who work for your company, you can restrict
online banking access from unregistered IP addresses.
How do I nd my IP address?
You can nd your IP address on the Prole and Settings page. Choose the person icon at the top right of the page and go to your
prole. Then, choose “Find my IP address” from the menu.
We’ll take you to a page that shows the public IP address of the computer or mobile device you’re using. (You can’t use your
mobile device for IP Security, but we’ll still show you its IP address.) If your company uses dynamic IP addresses, please contact
your IT representative or Internet service provider to get the range of IP addresses.
What is the dierence between company level and user level?
When you use IP Security, you can choose to set it up at the company level or at the user level.
If you choose company level:
• You can tell us up to 30 IP addresses
• No one can sign in unless they are using a computer with a registered IP address
If you choose user level:
• You can turn on IP Security for every user in your company
• You can tell us up to 10 IP addresses per user
• A user must sign in from a computer using a registered IP address for that user
• Users who aren’t registered for IP Security can sign in from any computer
What are the types of IP addresses?
There are two types of IP addresses, static and dynamic. Static IP addresses consist of numbers that don’t change. Dynamic IP
addresses also consist of four numbers, the dierence being the nal number changes. Contact your IT resource or your Internet
service provider to nd out if your company uses dynamic IP addresses.
When do I enter an IP address range?
You’ll only enter an IP address range if your company uses dynamic IP addresses. You’ll tell us the range of numbers (anywhere
from 0 to 255) in the last two elds. Contact your IT resource or Internet service provider to nd out if your company uses
dynamic IP addresses.
How do I enter IP addresses?
Please tell us your IP addresses in the rst eld we provide (e.g., 123.33.33.200). If you have a dynamic IP address and the last
eld of your IP address changes each time you sign in, tell us the range of numbers by lling in the last eld (e.g., 123.33.33.20-
195). Potential ranges go from 0 to 255. Ask your IT resource or Internet service provider if you need help determining your
range of IP addresses.
How do I copy a user’s IP address?
To copy one user’s IP address to another user within IP Security, click the “Copy IP address” drop-down list and choose the user
whose settings you’d like to copy.

24
IP SECURITY | FAQ
How do I turn IP Security on or o?
To turn on IP Security, rst choose if you’d like to set it up at the company level or user level.
• Choose “Company” if authorized users will always use the same computers to sign in. You’ll tell us up to 30 IP addresses for
your company, and no one will be allowed to sign in unless that IP address is registered.
• Choose “User” to turn on IP Security for all users or some users. Check the box “Turn on IP Security for all users” if you’d like
IP Security applied to everyone, or toggle it on or o for each user directly underneath his or her name. Please note that if IP
Security is o for an individual user, that user can sign in from any computer.
To turn o IP Security from either the company or user level, choose “Turn o IP Security,” or at the user level, you can toggle
each individual user o. We’ll ask you to conrm that you actually want to stop using IP Security and that we’ll delete all of the
existing IP information if you continue. Choose “Turn o” to conrm that you no longer want IP Security.
How do I see or change IP addresses for IP Security?
The system administrator is the only person allowed to see or change IP addresses within IP Security. First, go to the Access &
Security Manager home page and choose “IP Security” from the menu.
If you have user-level access, you can:
• Edit IP addresses
• Add IP addresses (up to 10 total for each user)
• Delete IP addresses
• Copy IP addresses from one user to another
• Turn IP Security on or o for an individual user or for everyone
If you have company-level access, you can:
• Edit IP addresses
• Add IP addresses (up to 30 for the company)
• Delete IP addresses
• Turn o IP Security for the company
1
Fees, terms, conditions and limitations apply as described in the legal agreement that applies to your online service.
RSA SecurID
®
is a registered trademark of RSA Security, LLC.
© 2017 JPMorgan Chase Bank, N.A. Member FDIC. Equal Opportunity Employer. “Chase” is a marketing name for certain businesses of JPMorgan Chase & Co. and its subsidiaries, including, without limitation, JPMorgan Chase Bank, N.A. 309539
