
Adobe
®
Experience Cloud
Adobe Recommendations Classic

Contents
Adobe Recommendations Classic.........................................................................5
Contact and Legal Information...............................................................................6
Release Notes..........................................................................................................7
Getting Started.......................................................................................................19
Prerequisites and Integrations...............................................................................................19
Preparing Your Website for Recommendations.....................................................................19
Downloading the mbox.js Library File......................................................................................................20
Validating the mbox.js Download.............................................................................................................20
Referencing the mbox.js File on Your Web Pages....................................................................................21
Implementing Display Data Mboxes.........................................................................................................22
Implementing an Order-Confirmation Details Mbox.................................................................................25
Placing Mboxes to Display Recommendations........................................................................................25
Adding an Opt-Out Link............................................................................................................................26
Starting Recommendations...................................................................................................26
Recommendations Functions................................................................................................27
Managing Your Recommendations......................................................................29
Viewing a Recommendation in the Recommendations Manager..........................................29
Recommendations Cards.........................................................................................................................29
Searching and Filtering the Recommendations List.................................................................................31
Reporting Recommendation Results.......................................................................................................31
Viewing the History..................................................................................................................................35
Setting Up and Deleting a Recommendation........................................................................35
Creating or Editing a Recommendation...................................................................................................35
Using a Backup Recommendation...........................................................................................................53
Previewing a Recommendation................................................................................................................54
Using Preview Options to Change the Page View....................................................................................55
Adobe Recommendations ClassicLast updated 12/19/2018

Deleting a Recommendation....................................................................................................................56
Starting a Recommendation..................................................................................................56
Knowing When to Launch a Recommendation........................................................................................56
Activating a Recommendation..................................................................................................................57
Deactivating a Recommendation.............................................................................................................57
Creating a Custom Algorithm................................................................................................58
Naming a Custom Algorithm....................................................................................................................58
Uploading Custom Algorithm Data...........................................................................................................59
Deleting a Custom Algorithm...................................................................................................................60
Localized Recommendations Based on Geography................................................................................60
Advanced Recommendations Options.....................................................................................................62
Creating Catalogs....................................................................................................................................64
Searching Catalogs..................................................................................................................................64
Troubleshooting Recommendations.........................................................................................................65
Managing Templates.............................................................................................................65
Using the Template Manager...................................................................................................................65
Creating or Editing an HTML Template....................................................................................................66
Customizing a Template...........................................................................................................................67
Copying a Template..................................................................................................................................69
Deleting a Template..................................................................................................................................70
Template FAQ...........................................................................................................................................70
Managing Recommendations Settings.................................................................................70
Creating Global Exclusions......................................................................................................................71
Dynamically Excluding an Entity..............................................................................................................72
Uploading Entities to Recommendations.................................................................................................72
Using Entity Feeds...................................................................................................................................74
Managing Mboxes.................................................................................................................76
Using an Mbox on Your Web Site.............................................................................................................77
Preparing for the Mbox.............................................................................................................................77
Creating the Mbox....................................................................................................................................78
Troubleshooting Mboxes...........................................................................................................................82
Sending Sales Data Values......................................................................................................................83
Using the Recommendations Download API........................................................................84
Deleting an Item From the System........................................................................................84
Adobe Recommendations ClassicLast updated 12/19/2018
Contents

Deleting All Items From the System......................................................................................85
Integrating Recommendations with Email.............................................................................85
Backfilling Environments with Production Data.....................................................................86
Recommendations FAQ........................................................................................................87
Adobe Recommendations ClassicLast updated 12/19/2018

Adobe Recommendations Classic
December 19, 2018
Popular TopicsNews and Announcements
Getting StartedRelease Notes
Implementing Display Data MboxesOther Information
Preparing Your Website for RecommendationsTraining Videos
Managing Your RecommendationsClaflin Medical Equipment success story
Using Entity FeedsRecommendations Not Showing Troubleshooting
Workflow (PDF)
Deleting All Items From the System
Selecting an Algorithm
Integrating Recommendations with Email
Advanced Recommendations Options
5Adobe Recommendations Classic

Contact and Legal Information
Information to help you contact Adobe and to understand the legal issues concerning your use of this product and
documentation.
Help & Technical Support
The Adobe Marketing Cloud Customer Care team is here to assist you and provides a number of mechanisms by
which they can be engaged:
• Check the Marketing Cloud help pages for advice, tips, and FAQs
• Ask us a quick question on Twitter @AdobeMktgCare
• Log an incident in our customer portal
• Contact the Customer Care team directly
• Check availability and status of Marketing Cloud Solutions
Recommendations Client Care
To contact Recommendations Client Care by telephone, call 1-800-497-0335. When asked to select an option for
your product, press 2 to go to conversion products, then 3 to contact the correct product team.
E-mail Client Care at tt-suppor[email protected].
Service, Capability & Billing
Dependent on your solution configuration, some options described in this documentation might not be available to
you. As each account is unique, please refer to your contract for pricing, due dates, terms, and conditions. If you
would like to add to or otherwise change your service level, or if you have questions regarding your current service,
please contact your Account Manager.
Feedback
We welcome any suggestions or feedback regarding this solution. Enhancement ideas and suggestions for the
Analytics suite can be added to our Customer Idea Exchange.
Legal
©
2019 Adobe
All rights reserved.
Published by Adobe Systems Inc.
Terms of Use | Privacy Center
A trademark symbol (
®
,
™
, etc.) denotes an Adobe trademark.
All third-party trademarks are the property of their respective owners. Updated Information/Additional Third Party
Code Information available at http://www.adobe.com/go/thirdparty.
6Contact and Legal Information

Release Notes
This document lists the new features and bug fixes for recent releases.
To receive advance notifications about upcoming product enhancements, sign up for the Adobe Priority Product
Update:
https://campaign.adobe.com/webApp/adbePriorityProductSubscribe
Adobe Recommendations Classic 17.8.1 (August 16, 2017)
This release includes the following feature update:
DescriptionFeature
The following variables are available as Velocity arrays.
As such, they can be iterated over or referenced via
index.
Customizing a Template
• entities
• entityN.categoriesList
Adobe Recommendations Classic 16.10.1 (October 25, 2016)
This release does not include any new customer-facing features or enhancements.
Adobe Recommendations Classic 16.9.1 (September 20, 2016)
This release does not include any new customer-facing features or enhancements.
Adobe Recommendations Classic 16.8.1 (August 16, 2016)
This release does not include any new customer-facing features or enhancements.
Adobe Recommendations Classic 16.7.1 (July 20, 2016)
This release includes the following feature update:
DescriptionFeature
All custom Recommendations attributes can now contain
multiple entity values.
Multi-valued Recommendations attributes
Adobe Recommendations Classic 16.6.1 (June 14, 2016)
This release doesn't include any customer-facing enhancements.
Adobe Recommendations Classic 16.5.1 (May 18, 2016)
This release includes the following enhancement:
7Release Notes

DescriptionEnhancement
CSV downloads now have a line for all environments,
including those that do not have entity recommendations
(for example: # environment: 1724).
Recommendations CSV download
Adobe Recommendations Classic 16.4.1 (April 14, 2016)
This release includes the following enhancement:
DescriptionEnhancement
When backup recommendations are enabled, you can
select an option to apply inclusion rules to backup
Inclusion rules can be enabled for backup
recommendations.
recommendations. For more information, see Content
Serve Settings.
Previously, inclusion rules were applied by default if
backup recommendations were enabled.
This release includes the following change:
DescriptionFeature
The Honeybee API custom criteria replaces the .xml file
format of the legacy custom algorithm with .csv, which
Custom criteria support added to Honeybee API.
is more compact and easier to generate, and supports a
larger number of recommendations.
For API documentation, see
https://www.adobe.io/products/target/docs/reference/recommendations.
8Release Notes

DescriptionFeature
Access to Recommendations Classic can now be found
in the Tools menu of the Analytics solution on
https://my.omniture.com.
Recommendations Classic access enabled via Analytics
Tools menu.
Adobe Recommendations Classic 16.3.1 (March 16, 2016)
This release includes the following enhancements:
DescriptionEnhancement
It is now possible to create collections/exclusions using
valueIsPresent and valueIsNotPresent operands in
catalog search.
Catalog search collection/exclusion enhancement
This release includes the following fixes:
• Fixed issue that caused dynamic filtering to fail when attribute names include the underscore (_) character.
Adobe Recommendations Classic 16.2.1 (February 18, 2016)
This release includes the following enhancements:
DescriptionEnhancement
Download recommendations can now be activated so
the algorithm will continue to run past 21 days.
Download-only activities now run beyond 21 days.
Adobe Recommendations Classic 16.1.1 (January 19, 2016)
This release includes the following enhancements:
9Release Notes

DescriptionEnhancement
The "&" character is now supported in category values.
Previously, the "&" character caused recommendations
to display incorrectly.
Support for "&" character added in category values
You can now use post for the Custom algorithm API.
Custom algorithm limits increased
For GET and POST custom algorithm upload the 1000
key limit has been removed. Depending on your data
around 1000 entity keys can be used for Get and about
25K keys with POST . However, no single key can have
more than 500 values.
To manually specify a mbox for your recommendation,
use the following workaround:
Onsite links have been deprecated from the
Recommendations Classic interface
On the Recommendations Edit page in your browser URL
append &mbox=NAME_OF_MBOX and press Enter.
This populates the mbox name in the mbox dropdown.
Feed names can now contain 250 characters.The
previous limit was 64.
Maximum characters allowed in feed name increased
Adobe Recommendations Classic 15.8.1 (August 18, 2015)
This release includes the following enhancements:
DescriptionEnhancement
Google Product XML feeds now support both RSS2
version and ATOM 1.0 version.
Google Product XML feeds improvements
Adobe Recommendations Classic 15.7.1 (July 23, 2015)
There are currently no customer-facing features scheduled for release this month.
This release includes the following fixes:
• The limit on the number of custom algorithms that can be uploaded has been increased.
• Intermittent Recommendations mbox refresh and host group loading issues have been addressed.
Recommendations Classic 15.2.2 (February 10, 2015)
This release includes the following enhancements:
DescriptionEnhancement
Some past-behavior algorithms have been renamed.
Also, options have been added to past-behavior
Past-behavior algorithms now provide more than only
the last-viewed items.
10Release Notes

DescriptionEnhancement
algorithms that allow you to key off of more than the
last-viewed item.
• Last Purchased Item
Renamed: nth last purchased entity
• Last Viewed Item
Renamed: nth last viewed entity
• Most Viewed item
Renamed: nth most viewed entity
• Favorite Category
Renamed: nth most favorite category
In addition, you can choose from three Cascading options
when using these keys, to determine how your
Recommendations template is filled based on the
selected key.
For more information, see Basing the Recommendation
on a Recommendation Key.
Catalogs and exclusion rules are now applied to recently
viewed items.
Improved recently viewed items.
RSS2.0 feeds are now supported.Feed enhancement.
This release includes the following fixes:
• Fixed an issue where "Include Only When" filters were not applied to backup recommendations.
Recommendations 15.1.1
This release includes the following enhancements:
DescriptionEnhancement
Allow for past behavior algorithms to serve more than
just the last viewed item.
Improved past behavior algorithms
Exclusion rules are now applied to recently viewed items.
Improved exclusion rules
This release includes the following fixes:
• Fixed an issue that prevented navigating directly to product search result pages having more than 3 digits.
• Fixed a bug where the most viewed algorithm wasn't ranking products as expected.
11Release Notes

Recommendations 14.9.x
This release includes the following enhancements:
DescriptionEnhancement
Previously, if the number of recommended items was
less than the number of "slots" defined in a template, the
Added the option to disable "partial rendering" template
building behavior at the algorithm level.
template was not transformed to html.This partial
rendering behavior can now be set at the algorithm level.
A checkbox has been added to the Content Serve
Settings on the Recommendations Edit tab, as well as a
modification to the existing Recommendation
create/update API to enable the rendering of a partial
template.
If partial template rendering is not enabled, the old
functionality will exist; if there aren't enough
recommended entities to fill all the slots, the entire
template will not be rendered.
If partial template rendering is enabled,
Recommendations renders the template whether or not
enough recommendations exist to fill up all the slots in
the template.You will have to build your templates to
account for this. For example, you might create your
template to include null checks.
See Content Serve Settings
Added the ability to disable the appending of backups to
recommendations at the algorithm level, using a checkbox
Allow Backup recommendations to be disabled at the
Algorithm level.
located in the Content Serve Settings on the
Recommendations Edit tab. Previously, this was only
available at the client level.
The value of the new field is set based on the current
value of the client-level setting.
See Content Serve Settings
Custom algorithm updates for partial template rendering and disabled backup recommendations need to be set via
the custom algorithm API:
&disableBackup=[true|false]&allowPartialTemplate=[true|false]
Recommendations 14.8
This release includes the following enhancements:
12Release Notes

DescriptionEnhancement
Algorithm name and environment ID details are included
when there is only one algorithm returned.
CSV download performance has been improved.
This enhancement fixes an issue that sometimes
prevented backup recommendations from being served.
Backup recommendations are included for Report Suite
data sourced Affinity algorithms.
Recommendations 14.6
This release includes the following changes:
• Adobe Analytics traffic classification at the product level is no longer supported.
• Recommendations now supports pageURL and thumbnailURL variations of pageUrl and thumbnailUrl. Additionally
entity.categoryId is treated similarly to entity.category in that it supports multiple values.
Recommendations 14.5
This release adds support for Past Behavior-based recommendations.These recommendations work across sessions,
and include recently viewed items.
Recommendations 14.1-TR-2.15.5
This release includes the following enhancement:
DescriptionEnhancement
Previously, Recommendations displayed the last five data
feeds on the Feeds and Uploads page, although the
Increase the number of data feeds shown to users on
the Product > Feeds and Uploads page.
entire history was stored.You can now use a URL
parameter to configure how many days back are shown
in the data feed history.
This release also includes the following fixes:
• Fixed an issue where different versions of the Recommendations algorithms returned different information.
• Improved the report suite feeds using a new compression technique. This fixes an issue where report suite feeds
sometimes failed due to an unexpected EOF error.
Recommendations 2.15c
This release includes the following change:
DescriptionFeature
Schedule uploads of .csv formatted product feeds from
a FTP or HTTP location into Recommendations.
Scheduled .csv file upload for Recommendations
July 2013
This release (2.15) includes the following changes:
13Release Notes

DescriptionFeature
Shows items that have been viewed recently. See Selecting an
Algorithm
Recently Viewed Items algorithm
Exclude certain items from being shown, such as items that are already
in the cart. See Dynamically Excluding an Entity.
Dynamically Exclude Entity
recommendations
A "host group name" attribute has been added to custom algorithms.
If no host group name is specified, the default host group is used. See
Uploading Custom Algorithm Data.
Support for host groups with custom
algorithms
Previously, the default Production host group was hard-coded as the
source for backfill. Now you can choose the source for the backfill.
Support for multiple environments added to
production back fill
This setting must be set by Adobe Client Care. See Backfilling
Environments with Production Data.
This release includes the following fix:
• Fixed an issue in the UI that was causing graphs to be duplicated.
March 2013
This release of Recommendations (2.14) includes the following changes:
Recommendations is now an integral capability within AdobeTarget. Adobe Target, part of the Adobe Marketing
Cloud, is a solution that provides data-driven personalization for revenue impact by leveraging the integrated
capabilities of Test&Target, Test&Target 1:1 (Automated Behavioral Targeting), Geo-targeting, Analytics-Powered
Targeting, Recommendations and Search&Promote. Many of our upcoming upgrades within the tool will support
new efficiencies in data/profile integration, extended algorithm options, and campaign creation / deployment within
Recommendations. Inherent benefits will include stronger collaboration with the other Adobe Target capabilities, as
well as across the Adobe Marketing Cloud.
DescriptionFeature
All available mboxes are listed in a dropdown on the Recommendations
edit page. Browsing your site to find the mbox is no longer required.
Mbox selection via dropdown
Recommendations can be limited to show only in mboxes when certain
conditions are met.These can include matching particular URL values,
Mbox Delivery Targeting
mbox parameter values, or profile values. These rules are reevaluated
on every mbox request.With this new ability, multiple recommendations
can be set up on one mbox name but displayed in different
circumstances. For example: one recommendation can display on
women's product pages by targeting the mbox to URL contains /women/
and show on men's product pages when the URL contains /mens/,
even if the same mbox name is used across all product pages.
The following improvements have been made to support multiple host
group environments:
Improved support for multiple client
environments (host group management)
• Host groups can be selected for display in reports.
14Release Notes

DescriptionFeature
The report for the host group that is set as the default displays unless
a different host group is selected.
• The host group displays on the search details page.
• Multiple host groups can be set when uploading a CSV file and when
setting up a feed.
Data can now be included when an attribute does not match the key's
attribute.
The inclusion filter has been enhanced to
include a "does not match" option.
Multiple "Include Only When" filters can be used. When more than one
filter is used, the filters are combined with an AND.
Multiple filter inclusion rules
September 2012
This release of Recommendations includes the following changes:
Change to recommendation cards
If you are not testing against default content, the lower bar no longer appears on the recommendations card. See
Recommendations Cards
Changed algorithm data source
In past releases, only the Site Affinities algorithm used DataWarehouse data. In this release, View Affinities and
View/Purchase Affinities also use DataWarehouse data.
Choice of control data when viewing recommendation results
You can now choose the control data you want to use when viewing the results of a recommendation. See .Viewing
Complete Recommendation Results
Improved product search
You can now search on all variables, including custom variables.You can also specify multiple search criteria to
further narrow your results. See Searching Catalogs.
Increased length limit of algorithm names
The length permitted for algorithm names has been increased to 255 characters. See Naming a Custom Algorithm
May 2012
This release of Recommendations includes the following changes:
keyType attribute added to Custom Algorithm Name API
keyType is an optional parameter that allows users to specify their own key for custom algorithms. See Naming a
Custom Algorithm for more information.
Changed Change Log to History and added functionality
The Change Log has been renamed History. In addition to the previous functionality, the History also shows the
number of recommendations uploaded per algorithm so you can see that the algorithm has run and is ready with
content. See Viewing the History.
15Release Notes

Changed Dynamic Attribute Filtering functionality
• Changed Dynamically Matches the Key to Matches to improve usability and clarity.
• Changed Dynamically in the Range of the Key to Is Between to improve usability and clarity. Also removed the
upper limit for the specified range.
See Setting Data Details for more information.
October 2011
This release of Recommendations includes the following new features:
Dynamic Attribute Filtering
Dynamic filtering enables you to set up one recommendation that automatically applies for each item across the
site.You can limit recommendations to items that match or share an attribute of the key item. For example,
recommendations could be limited to items of the same brand as the current item, or could be limited to items from
different categories. Or, you could set a rule to recommend items whose price is within 10% of the currently viewed
item's price. See Setting Data Details.
Improved Algorithms
The existing affinity algorithms, "People who viewed this viewed that", "People who viewed this bought that", and
"People who bought this bought that", will be upgraded to use enhanced collaborative filtering strategies that take
into account a broader consideration set of similar visitors' behavior to drive more successful and relevant
recommendations. See Selecting an Algorithm.
To more accurately reflect the robust nature of these new algorithms, the names have been updated as follows:
• "People who viewed this viewed that" is now "View Affinities"
• "People who viewed this bought that" is now "View/Purchase Affinities"
• "People who bought this bought that" is now "Purchase Affinities"
Any current recommendations that employ the existing affinity algorithms will be automatically updated to their
matching upgraded algorithm with no disruption to the recommendation delivery.
Statistical Confidence in Reports
For each reported metric, you can view the statistical confidence level for the lift vs control. See Confidence Level
and Confidence Interval.
Location Testing
This new recommendation type enables you to determine the best location for a recommendation on a page.The
same algorithm is delivered to each mbox location at different times. When the recommendation is showing in one
mbox, the other mbox shows default content.This new recommendation enables you to determine which location
is the best place for the selected recommendation. See Adding a Location Test Recommendation.
July 2011
This release of Recommendations includes the following new features:
Simplified Recommendation Creation
When you add a recommendation, you now begin by choosing a recommendation type. This simplifies the creation
of each kind of recommendation. See Adding a New Recommendation.
16Release Notes

Test&Target Custom Profile Attributes
Users of both Recommendations and Test&Target can base a recommendation on any Test&Target profile attribute.
See Basing the Recommendation on a Recommendation Key.
Change Logs
The change log records the date and time any changes and activations occur, and who made them. See Viewing
the History.
Trended Graph Report
The Trended Graph report shows trends for the recommendation over a specified amount of time. See Viewing the
Trended Graph Report.
May 2011
This release of Recommendations includes the following new features:
Affinity Algorithms
These new algorithms take the same raw data as the old algorithms, but apply collaborative filtering strategies to
gather different and better results.The affinity algorithms must be enabled by Client Services. See Selecting an
Algorithm.
More Logical Operators
New logical operators give the marketer increased control over the items displayed in a recommendation. See Setting
Data Details.
Improved Backup Recommendations
Backup recommendations now randomly select more items from the most popular items on your site or in your
catalog. See Using a Backup Recommendation.
New Report Metrics
New report metrics give you a direct understanding of the influence Recommendations had on a customer's decision
to purchase by tracking whether the recommendation was clicked before something was purchased. Any purchase
after the recommendation was clicked counts. See Viewing Complete Recommendation Results.
Entity Feeds
Because Recommendations users already configure XML or txt feeds to send to Google either via URL or FTP,
entity feeds accept that product data and use it to build out the Recommendations catalog.Tell Recommendations
where that feed exists and Recommendations retrieves the data.
Entity feeds enable more ways to get product or content information into Recommendations. Item details can be
sent to Recommendations from SAINT product classifications or using the Google Product Search feed format.This
allows you to bypass complex mbox implementation or augment your mbox data with information that is either
unavailable on the page or unsafe to send directly from the page (like margin, COGS, and so on). See Using Entity
Feeds.
February 2011
This release of Recommendations includes the following new features:
Catalog Item Viewer
17Release Notes

After you create a product catalog, you can view and search it within Recommendations.You can search the catalog
and see all the data that Recommendations has learned about your items including ID, price, inventory, categories,
and so on, so you can be confident knowing what information will display in your Recommendations. You can also
delete an item you no longer want in your catalog directly from this item viewer. See Searching Catalogs.
November 2010
• Catalogs
The catalog is the set of products or items that are eligible for the recommendation.The backup recommendations
generated for each algorithm within the recommendation also uses this catalog, so only items in the catalog are
included in the backup recommendation.With catalogs, you can be sure that only products that make sense to
show in a location are displayed. See Creating Catalogs.
• Optimizing Recommendations
The Optimizing recommendation type ensures the most effective recommendations are shown more often by
automatically displaying the best performing recommendations. Optimizing recommendations allow marketers to
use an automated approach to improving site performance. With an Optimizing recommendation, fewer visitors
see underperforming experiences. Automatically and over time, more traffic is shown the best performing
recommendations.When you create an Optimizing recommendation, you specify the optimizing metric used to
determine performance, which can be the conversion rate, average order value, or revenue per visit.You also
choose whether to include default content in the calculations. See Choosing a Test Type.
18Release Notes

Getting Started
Adobe Recommendations automatically displays products or content that might interest your customers based on
previous user activity on your Web site. Recommendations help direct customers to items they might otherwise not
know about, improving sales generated on your Web site.
A recommendation determines how a product is suggested to a Web site user, depending on that user's activities
on the site. For example, if you discover that users who purchase a portable DVD player often buy batteries, you
might create a recommendation that shows items that are often purchased together, using the People who bought
this also bought that algorithm.
Recommendations helps you:
• Choose sophisticated algorithms to automate recommendations across multiple areas of your site
• Automatically display the recommendations by using a few JavaScript snippets on your site
• Test and optimize the display templates and algorithms that display the Recommendations
For a list of available in-person, instructor-led courses, visit the Adobe Customer Training website.
Prerequisites and Integrations
You can use recommendations alone or combine them with other features of Adobe Target and the Adobe Marketing
Cloud.
Although most functionality remains the same whether recommendations are used alone or with other capabilities,
some recommendation types are only available when used with other Adobe Marketing Cloud capabilities, as
explained in Creating or Editing a Recommendation.
Preparing Your Website for Recommendations
To display your recommendations to site visitors, you must set up sections of your pages as mboxes.
Mboxes are special marketing boxes that enable you to dynamically change the content of selected areas on your
Web pages based on information gathered about site visitors.
If you do not set up mboxes on your pages, you can still create and test recommendations, but you cannot display
dynamic content on your pages based on the test results.
Typically, mboxes are set up by Web site designers, not the marketers who normally create and use recommendations.
Setting up an mbox requires some familiarity with HTML coding and JavaScript, although you can follow the instructions
in this guide even if you are not a Web designer.
Implementing mboxes requires the following steps:
1. Download the mbox.js file.
2. Include references to the mbox.js file on your Web pages.
3. Create mboxes to contain the latest information about each product that you want to recommend.
4. Create an mbox to capture order information.
5. Create mboxes to display the recommendations.
19Getting Started

Downloading the mbox.js Library File
Download the mbox.js library file and save it on all hosts (domains) serving mboxes.
You need only one copy on each host. All pages with mboxes must reference this file.You can use the same
mbox.js file for recommendations and other Adobe Target features.
1. From the recommendations menu, click Settings > General.
2. In the Download section of the Settings screen, click the link to download mbox.js.
3. Save the file.
4. To verify the download, open a Web browser and browse to your Web domain, then browse to the URL where
you saved your mbox.js file.
For example, if the mbox.js file is saved in a directory called /js, browse to
http://www.yourserver.com/js/mbox.js.
You have successfully downloaded mbox.js if any of the following occur:
• The mbox.js appears in your browser as a text file filled with JavaScript functions.
• Your browser attempts to download the file, prompting you for where to save it.
• Your browser warns you about JavaScript.
Alternative Download Option
You can also download mbox.js using the Target API.
The Mbox.js Download API is a REST API with the following structure:
https://admin3.testandtarget.omniture.com/admin/rest/v1/mboxjs/download/v58?client=CLIENTCODE&email=youremail&password=yourpassword
Replace "admin3" with the admin environment your account uses in Target Classic. To find the right value, log in to
Target Classic and look at the beginning of the URL. Options are:
• admin3
• admin4
• admin5
• admin6
• admin7
• admin8
• admin9
• admin10
• admin12
• admin16
v58 is the version of the mbox.js file being requested. All versions back to version 51 are supported by this API.
CLIENTCODE is the value for your client code.
youremail and yourpassword are your Adobe Target Classic login credentials.
Validating the mbox.js Download
After you download the mbox.js file, you should validate the download.
20Getting Started

1. Download the mbox.js file as instructed in Downloading the mbox.js Library File.
2. Open a Web browser and browse to your Web domain.
3. Browse to the URL where you saved your mbox.js file.
For example, if the mbox.js file is saved in a directory called /js, browse to
http://www.yourserver.com/js/mbox.js.
You have successfully downloaded mbox.js if any of the following occur:
• The mbox.js appears in your browser as a text file filled with JavaScript functions.
• Your browser attempts to download the file, prompting you for where to save it.
• Your browser warns you about JavaScript.
Referencing the mbox.js File on Your Web Pages
Any Web page that includes an mbox must reference the mbox.js file on the host. This allows the page to contact
the recommendations server.
Note: Add the mbox.js reference to an include or header file that exists in the head all of your Web pages.
Keep the following points in mind when adding the mbox.js reference to a Web page:
• Add the reference to the Web page only once, regardless of the number of mboxes on the page.
• Use a relative or absolute path depending on where you saved your mbox.js and as suits your file structure.
An absolute path is preferred.
• Best practice is to place the reference in the head section, but you can place it anywhere before the first mbox on
your page.
1. Create the reference code.
For example, if the mbox.js file is saved in a directory called /js, the reference must be similar to:
<script src="http://www.mycompany.com/js/mbox.js" type="text/javascript"></script>
2. Add a reference to the head section of all Web pages that will have an mbox.
For example:
<head>
<script src="http://www.mycompany.com/js/mbox.js" type="text/javascript"></script>
</head>
Note: Add the mbox.js reference to an include or header file that exists in the head of all your Web pages.
Keep the following points in mind when adding the mbox.js reference to a Web page:
• Add the reference to the Web page only once, regardless of the number of mboxes on the page.
• Use a relative or absolute path depending on where you saved your mbox.js and as suits your file structure.
An absolute path is preferred.
• Best practice is to place the reference in the head section, but you can place it anywhere before the first mbox on
your page.
21Getting Started

Implementing Display Data Mboxes
Display data mboxes send updated catalog data for recommendations, and display product recommendations.
Display data mboxes have two purposes:
• Show recommendations, like any other mbox
• Send dynamic catalog data to the recommendations server
Sending updated catalog data ensures that the recommendations displayed on your site always include the most
updated information about your products. Display data mboxes make an offline catalog import strategy unnecessary.
The display data mbox sends the productId or productPurchasedId (referred to as entity.id in the code) that
is used in the algorithms.
Note: entity.id must match the productPurchasedId sent to the order confirmation page and the productId
used in Adobe Analytics product reports).
Each parameter can accept only one value. new values overwrite old values, except for the categoryId parameter.
The categoryId parameter can accept a comma-delimited list of values for each category containing that product.
There is a character limit of 250 for categoryId.
See Advanced Recommendations Options for more information on each of the attributes that can be passed.
In general, the display information mbox might look like the following example. Change the details in bold to refer
to your products.
Note: All entity parameter attributes are case sensitive.
<div class="mboxDefault"></div><script language="JavaScript1.2">
mboxCreate('productPage',
'entity.id=67833',
'entity.name=GIANTS VS ROCKIES 5/12',
'entity.categoryId=BASEBALL, GIANTS, SF BAY AREA',
'entity.pageURL=../baseball/giants-tix/giantsvrockies5.12.2000-67833',
'entity.venue=AT&T PARK',
'entity.secondary=ROCKIES',
'entity.thumbnailURL=../baseball/giants-tix/giants-136px.gif',
'entity.message=FAMILY SPECIAL',
'entity.value=15.99',
'entity.inventory=1'
);
</script>
22Getting Started

Note: Relative URLs are preferred for pageURL and thumbnailURL rather than absolute URLs because
recommendations receive data being sent from all environments on your site. Using relative URLs avoids
hardcoded links to a staging or development server.
The following table describes the available variables.
DescriptionEntity Attribute
This required parameter identifies the product.This ID must be the same across all
Adobe Marketing Cloud products that are used, including Analytics, for the various
products to recognize the item and share data about it.
entity.id
You cannot use a comma in an entity ID, unless you escape it.
Example:
'entity.id=67833'
Provides a name for the item.entity.name
Example:
'entity.name=Giants vs Rockies 5/12'
Category of the current page.This can include multiple categories, such as a cardigans
sub-subsection (i.e.womens, womens:sweaters, womens:sweaters:cardigans). Multiple
categories should be separated by commas.
entity.categoryId
categoryId is limited to 250 characters. Multiple categories should be separated by
commas.
Note: To show a recommendation based on a category, only one categoryId
can be passed into the mbox used to display that particular recommendation.
Example:
'entity.categoryId=BASEBALL, GIANTS, SF BAY AREA',
For category-based Recommendations, a comma is used to separate category value.
Any values separated by commas become categories.You can also define subcategories
by using a different separator, such as a colon (:), to separate subcategories within the
category value.
For example, in the following code the Womens category is divided into several
subcategories:
mboxCreate('mboxName',
'entity.id=343942-32',
'entity.categoryId=
Womens,
Womens:Outerwear,
Womens:Outerwear:Jackets,
Womens:Outerwear:Jackets:Parka,
Womens:Outerwear:Jackets:Caban’,
'entity.thumbnailUrl=...',
23Getting Started

DescriptionEntity Attribute
'entity.message=...',
);
For the mbox delivery, the longest attribute name is used for the key. If there is a tie,
the last attribute is used. In the example above, the category key is
Womens:Outerwear:Jackets:Caban.
Defines the relative URL of the page where the item can be purchased.entity.pageURL
Example:
'entity.pageURL=baseball/giants-tix/giantsvrockies5.12.2000-67833'
Defines the relative URL to the thumbnail image that displays with the item.entity.thumbnailURL
Example:
'entity.thumbnailURL=baseball/giants-tix/giants-136px.gif'
Defines additional information to display with the product in the template, such as "on
sale" or "clearance."
entity.message
Example:
'entity.message=Family special'
Displays the inventory level of the item.entity.inventory
Example:
'entity.inventory=1'
Defines the price of the item.entity.value
Example:
'entity.value=15.99'
Define up to 100 custom variables that provide additional information about the item.
For example, a ticket vendor might create attributes for the venue where an event will
entity <custom>
take place or for a secondary performer, such as a visiting team in a sporting event or
an opening act in a concert.
Examples:
'entity.venue=AT&T Park'
'entity.secondary=Rockies'
If the mbox is on a product page, you can include both the product ID and category ID. The selected algorithm
determines which displays. The product ID is used for affinity algorithms and the category ID is used for category
algorithms.
24Getting Started

Implementing an Order-Confirmation Details Mbox
You should place an mbox on the order confirmation page to capture order information as input to be used by
recommendation algorithms and for measuring the performance of your recommendations.
Sales data can be sent from any mbox, but the parameters must follow the strict syntax in the sample code below.
The parameters orderId and orderTotal are required.The productPurchasedId attribute must match the entity.id
display variable.
productPurchasedId is only required if you are using mbox data to drive algorithms. It is highly recommended.
Note: Replace the text shown in bold with the real values for your product. Parameters are case sensitive
and must be written "camel case" as shown.
<div class="mboxDefault"></div>
<script type="text/javascript">
mboxCreate('orderConfirmPage',
'productPurchasedId=LIST OF PRODUCT IDs FROM ORDER PAGE',
'orderId=ORDER ID FROM ORDER PAGE',
'orderTotal=ORDER TOTAL FROM ORDER PAGE');
</script>
orderConfirmPage is the default mbox and is recommended.
Although it is recommended that you use the orderConfirmPage mbox name, the name can be changed. If you
change the name, you must contact consulting or Client Care.
Placing Mboxes to Display Recommendations
You should place mboxes everywhere on the site where your recommendations display. This might include the
home page, category pages, product or article pages, shopping cart, order confirmation pages, and so on.
The div before the mbox should be around the default content that displays if no recommendation is returned. The
mbox name is completely customizable, but it must be shorter than 255 characters.
If you display affinity recommendations (those based on a dynamic entity.categoryId or entity.id) in the mbox,
then pass the applicable value as an mbox parameter in the mboxCreate call.
You can display a recommendation based either on a category or on a product. For a category-based recommendation,
the code might look like this:
<body>
My existing page.
<div class="mboxDefault">
Part that I'd like to overlay when a recommendation is displayed
</div>
<script type="text/javascript">
mboxCreate('sidebar_recommendations','entity.categoryId=EN:Guide:1');
</script>
25Getting Started

</body>
For a product-based recommendation, the code might look like this:
<body>
My existing page.
<div class="mboxDefault">
Part that I'd like to overlay when a recommendation is displayed
</div>
<script type="text/javascript">
mboxCreate('sidebar_recommendations',’entity.id=12345’);
</script>
</body>
Note: You can pass both the entity.categoryId and entity.id values and then determine what to base
the recommendation on when setting up the recommendation.
For more information about placing an mbox, see Using an Mbox on Your Web Site.
Adding an Opt-Out Link
You can add an opt-out link to your sites to enable visitors to opt-out of all recommendations counting and content
delivery.
1. Add the following link to your site:
<a href="http://clientcode.tt.omtrdc.net/optout"> Your Opt Out Language Here</a>
2. Replace the clientcode text with your client code, and add the text or image to be linked to the opt-out URL.
Any visitor who clicks this link is not included in any mbox requests called from their browsing sessions until they
delete their cookies, or for two years, whichever comes first. This works by setting a cookie for the visitor called
disableClient in the clientcode.tt.omtrdc.net domain.
Even if you use a first-party cookie implementation, the provided opt-out is set via a 3rd-party cookie. If the client is
using a first-party cookie only, Adobe checks whether an opt-out cookie is set.
Starting Recommendations
Access Recommendations Classic capabilities from the Adobe Analytics Tools menu.
When you purchase the product, you receive the user name, password, and other information required for accessing
the application. If you already have other Adobe Marketing Cloud products, such as Adobe Analytics, you can log
in with the same credentials.
1. Sign in to Adobe Marketing Cloud.
2. Click Tools > Recommendations.
26Getting Started

The first time you start, you see the Manage Recommendations screen.
To learn more, click the links below Add New Recommendation.These links appear only if you have not yet
saved a recommendation.
• To create your first recommendation, see Creating or Editing a Recommendation.
• To create a new template to use for your recommendations, see Managing Templates.
• To use other features, see Recommendations Functions.
You can also access your other Adobe Marketing Cloud products from the product buttons along the top of the
screen.
Recommendations Functions
The Recommendations menu displays when you log in and is available from all main screens.
The Recommendations menu contains the following options:
DescriptionMenu Item
Opens the Manage Recommendations page, where you can:Recommendations
• View details and statistics for each recommendation
• Create a new recommendation
• Activate or deactivate a recommendation
• Preview a recommendation
• Edit a recommendation
• Delete a recommendation
For more information about managing recommendations, see Managing Your
Recommendations.
27Getting Started

DescriptionMenu Item
Opens the Template Manager page.You can perform the following actions from the
Template Manager page:
Templates
• Create a new template
• View the number of active and inactive recommendations that use each template
• Edit a template
• Delete a template
• Copy a template
For more information about templates, see Managing Templates.
Group items into different product catalogs, and then create recommendations for
each catalog.
Products
Opens the Settings page.You can perform the following actions from the Settings
page:
Settings
• Create exclusions that prevent entities that contain specified criteria from being
included in a recommendation
• Upload a file containing additional product display information to show in your
recommendations
• Download the mbox.js JavaScript library file
• Reset the client API token
For more information about settings, see Managing Recommendations Settings.
28Getting Started

Managing Your Recommendations
Use Recommendations to configure the criteria that determine what should be offered to a customer based on the
customer's behavior on your website.
To view your recommendations, select Recommendations from the main menu.
The Manage Recommendations page contains cards showing the details of each of your recommendations.
Viewing a Recommendation in the Recommendations Manager
The Recommendations Manager shows an overview of your recommendations.
Recommendations Cards
Recommendations are shown in cards on the Manage Recommendations page.
Each recommendation card displays key information about a recommendation. Click on a card for more details.
29Managing Your Recommendations

ExplanationElement
Displays the name of the recommendation at the top of
each card.
Recommendation Name
Displays the type of test beneath the recommendation
name.
Type of Test
Shows whether the recommendation is active or inactive.
For information about changing the status, see Activating
a Recommendation.
Status Flag
The status flag does not appear next to a download-only
recommendation because there is nothing to activate or
deactivate.
Contains tools that help you manage your
recommendation:
Toolbar
Deactivate or Activate changes the status
of your recommendation.This icon changes
/
depending on the current status of the
recommendation. See Activating a
Recommendation.
The Deactivate/Activate icon does not appear
next to a download-only recommendation
because there is nothing to activate or
deactivate.
Preview opens a preview of your
recommendation in a browser window.The
Preview button is not available if the
recommendation uses a Download Only
template. See Previewing a Recommendation.
Edit lets you change the details of your
recommendation. See Creating or Editing a
Recommendation.
Delete permanently deletes a recommendation
you no longer need. See Deleting a
Recommendation.
Describes the type of recommendation to be offered.
Mouse over this text for statistics that show how the
Recommendation Type
30Managing Your Recommendations

ExplanationElement
recommendation is performing. For a list of
recommendation types, see Creating or Editing a
Recommendation.
Mouse over this text to show the performance statistics
when users are not shown a recommendation.When
No Recommendation
combined with the recommendation type described
above, this enables you to compare performance with
and without the recommendation.
If you are not testing against default content, this bar does
not display.
Shows the amount of lift, the revenue earned per
customer visit, the number of orders resulting from the
Statistics
recommendation, and the number of times the
recommendation has been clicked and the resulting
number of site visits. Mouse over the recommendation
type and No Recommendation text to alternate between
statistics with and without the recommendation.
Shows the number of templates and algorithms being
tested in the recommendation.
Templates and Algorithms
Searching and Filtering the Recommendations List
You can locate a recommendation by its name or status on the Manage Recommendations page.
The displayed recommendations can be filtered to show only active or inactive recommendations, if desired. This
makes it easier to locate a specific recommendation.
1. On the Manage Recommendations page, type all or part of a recommendation name in the Search box.
As you type, the recommendations displayed on the page change to show only those that fit what you type in
the Search box.
2. To filter the search to show only active or inactive recommendations, select Active or Inactive from the dropdown
next to the Search box.
By default, All is selected, showing both active and inactive recommendations.
You can also filter the list to show all active recommendations or all inactive recommendations by selecting either
Active or Inactive from the dropdown without typing anything in the Search box.
Reporting Recommendation Results
You can compare the results of a recommendation with the results you get without it.This provides a clear picture
of how well your recommendations are working so you can adjust them for maximum performance.
31Managing Your Recommendations

When you create a recommendation (see Creating or Editing a Recommendation), you can set up tests by selecting
multiple templates and algorithms. Each algorithm is tested against each template, and visitor traffic is split evenly
between each test. For information on setting up algorithms and templates, see Selecting an Algorithm and Selecting
a Template, Recommendation Area and Targeting Conditions.
Note: Report data remains in Recommendations for five quarters (including the current quarter).
Viewing Test Results on a Recommendations Card
The cards on the Manage Recommendations page show data about each recommendation, including the number
of clicks, the amount of money earned per page visit, and so on.
The card shows the results for the top performing recommendation based on RPV, and for the "No Recommendation"
control group.
If you are testing multiple combinations of templates and algorithms, and want to see all of your results, not just the
top performer, you can do so on the recommendation's edit page, as explained in Viewing Complete Recommendation
Results.
You can compare this information to the same data without the recommendation to see whether your recommendation
is improving sales.
To compare data with and without a recommendation, mouse over either the recommendation type (such as Top
Sellers) or No Recommendation.The data changes to reflect the selected data type.
Viewing Complete Recommendation Results
You can view complete recommendation results, including the results for multiple combinations of algorithms and
templates, on the Edit page.
Note: Report data remains in Recommendations for five quarters (including the current quarter).
1. Click the recommendation whose results you want to view.
2. Click Results.
The test results display. Use the Showing menu to select the host group to display in the report. The report for
the host group that is set as the default displays unless a different host group is selected.
Use the radio buttons at the bottom of the results page to choose the control you want to use for the results.
This report is automatically generated for each recommendation and shows the performance of all success
metrics for your recommendation.
Conversion information is gathered based on the mbox you have specified as your order confirmation page mbox
(set by your consultant). The Time on Site and Page Views per Visit metrics are automatically captured, and
32Managing Your Recommendations

every page with an mbox is used in that calculation. Any page with an mbox is counted once, even if it has more
than one mbox.Therefore, an mbox on every page is required to get a true count of page views.
A specific recommended item does not have to be purchased to count as a conversion.
The "clicked" metrics give you a direct understanding of the influence recommendations had on a customer's
decision to purchase by tracking whether the recommendation was clicked before something was purchased.
Any purchase after the recommendation was clicked counts.
Note: You can view the total numbers for an A/B campaign in Target. Click Locations > List, select the
orderConformPage mbox, and click on one of the campaigns.
Viewing the Optimizing Recommendation Report
The Optimizing Recommendation report shows the results of your Optimizing recommendations.
The Optimizing Recommendation report should help you determine whether you are getting lift by running this
recommendation (total traffic) vs. running a random split test (testing traffic).
Note: Report data remains in Recommendations for five quarters (including the current quarter).
1. Click the recommendation whose results you want to view.
2. Click Results.
33Managing Your Recommendations

The left-most column in the report shows your total traffic.To the right of the dashed line is the targeted vs. testing
traffic.To understand the performance of the Optimizing recommendation, 10% of traffic is sent randomly to
combinations, which are compared to when the algorithm determines which combination to show to each visitor.
This is done separately for each segment, so the report changes per segment.This report shows whether running
the Optimizing recommendation is better than a straight a/b split.
Viewing the Trended Graph Report
The Trended Graph report shows trends for the recommendation over a specified amount of time.
1. Click a recommendation.
2.
Click Results, then click the Trended Graph Report icon ( ).
3. Define the time period for which you want to view trends.
You can mouse over a data point in each trend graph for information about that data point.
Confidence Level and Confidence Interval
For each experience, confidence level and confidence interval are displayed.
Confidence Level
The confidence level is represented by the filled-in bars in the confidence column for each experience.To see the
exact confidence level percentage, hover your mouse over the confidence column for the experience. In the example
below, the confidence level is four bars and 99.90%.
The confidence level, or statistical significance indicates how likely it is that an experience's success was not due
to chance. A higher confidence level indicates:
• The experience is performing significantly different from control.
• The experience performance is not just due to noise.
• If you ran this test again, it is likely that you would see same results.
If the confidence level is over 90% or 95%, then the result can be considered statistically significant. Before making
any business decisions, try to wait until your sample size is large enough and that the 4 bars of confidence on one
or more experiences stays consistent for a continuous length of time to ensure the results are stable.
The following list shows the meaning of the number of confidence bars:
• One bar: significance < 60%
• Two bars: significance < 75%
• Three bars: significance < 90%
• Four bars: significance >= 90%
Confidence Interval
The confidence interval is a range within which the true value can be found at a given confidence level.To view the
confidence interval, rollover the "Lift" column of any experience. In the example above, the confidence interval for
Experience B's lift is -10.15 to 68.82%.
Example: An experience's RPV is $10, its confidence level is 95% and its confidence interval is $5 to $15. If we
ran this test multiple times, 95% of the time the RPV would be between $5 and $15.
34Managing Your Recommendations

What impacts the confidence interval?The formula follows standard statistical methods for calculating confidence
intervals.
• Sample size: As sample grows the interval will shrink or narrow. This is preferred as it means your reports are
getting closer to the true value of the success metric.
• Standard deviation smaller: More similar results, such as similar AOVs or similar numbers or visitors converting
each day, reduces the standard deviation.
Viewing the History
The History records the date and time any changes and activations occur, and who made them.
The History also shows the number of recommendations uploaded per algorithm so you can see that the algorithm
has run and is ready with content.
1. Click on a recommendation card.
2. Open the History tab.
Setting Up and Deleting a Recommendation
You can create or edit a recommendation, use a backup recommendation, preview a recommendation, and delete
a recommendation that you no longer need.
Creating or Editing a Recommendation
Create and configure a new recommendation to display the items you want your site visitors to see.
To add a new recommendation or edit an existing recommendation, mouse over Add New Recommendation and
select the type to add, or select the existing recommendation you want to modify and click Edit.
Adding a New Recommendation
Before you can use a recommendation, you must add it.
Mouse over Add New Recommendation to select the recommendation type you want to add.You can create three
types of recommendations:
Algorithm/Template Test recommendation: Test the performance of your recommendations using different
algorithms and templates. Use this type of recommendation to display items based on criteria such as Purchase
Affinities, and to determine which recommendation layout provides the best performance.
Location Test recommendation: Test the performance of your recommendations based on their location on the
page. For example, you might want to determine whether recommendations perform better on the right side of your
page or on the bottom of the page. Use this type of recommendation to decide which page layout provides the best
performance.
Download Only recommendation: Select Download Only if you do not have display mboxes on your site and you
want to run a recommendation and download the results or export them using the Recommendations API. This
results in a downloaded CSV file that list the recommendations with one row per key.
Adding an Algorithm/Template Test Recommendation
Test the performance of your recommendations using different algorithms and templates.
35Managing Your Recommendations

Use this type of recommendation to display items based on criteria such as Purchase Affinities, and to determine
which recommendation layout provides the best performance.
1. Click Add New Recommendation, then select Algorithm/Template Test.
The Edit Recommendation page opens.
2. Click the Click here to name text, then type a name for the recommendation.
The name should be descriptive enough that you can recognize it later.
3. Configure your new recommendation.
Target your recommendation as explained in Configuring Entry Conditions.
Choose your Catalog containing the items to be recommended, or select All Catalogs, as explained in Creating
Catalogs.
Base the recommendation on a selected key, as explained in Basing the Recommendation on a Recommendation
Key.
36Managing Your Recommendations

Choose algorithm for each recommendation type as explained in Selecting an Algorithm.You can test multiple
recommendation types against each other by adding more than one algorithm.
Choose data source as explained in Choosing the Data Source.
4. Configure data details.
Adjust the Data Details slider to set the period of data you want to use.To further configure your recommendation
details, click Show More and configure the remaining details. See Setting Data Details.
5. Select a template.
If supported by the selected template, you can also set the area where the recommendation displays. See
Selecting a Template, Recommendation Area and Targeting Conditions. This becomes your baseline. The
recommendation you create is compared to the default content to show how each performs.
6. Choose a recommendation type.
If the Recommendation Type selector is not visible, click Testing & Segments.
• A/B Test compares two or more versions of your Web site content to see which provides the better results.
Specify the percentage of visitors who see default content, as explained in Specifying How Many Users See
Default Content.This becomes your baseline.The recommendation you create is compared to the default
content to show how each performs.
• Optimizing recommendation ensures the most effective experiences are shown more often by automatically
displaying the best performing recommendations.
Choose the optimizing metric that is used to determine which recommendations are the most successful.
7. To add a segment, click Add Segment, type a name for the segment, then select the segment parameters, as
explained in Defining Segments.
To delete a segment, click the box next to a segment to open it, then click the X to delete that segment. Deleting
the segment also deletes any data collected for that segment.
8. Click Save.
After you save your new recommendation, it appears on the Manage Recommendations page as inactive. (See
Activating a Recommendation for information about activating the new recommendation.) The algorithm runs as
soon as data is available, usually within 30 minutes.
Adding a Location Test Recommendation
Test the performance of your recommendations based on their location on the page.
You can set up a recommendation with the same algorithm in two locations with the same or different templates.
This enables you to test the performance of the recommendation in different locations and with the same or different
appearance in each location. For example, you might want to determine whether recommendations perform better
on the right side of your page or on the bottom of the page. Use this type of recommendation to decide which page
layout provides the best performance.
1. Mouse over Add New Recommendation and select Location Test.
The Edit Recommendation page opens.
37Managing Your Recommendations

2. Click the Click here to name text, then type a name for the recommendation.
The name should be descriptive enough that you can recognize it later.
3. Configure your new recommendation.
Target your recommendation as explained in Configuring Entry Conditions.
Choose your Catalog containing the items to be recommended, or select All Catalogs, as explained in Creating
Catalogs.
Base the recommendation on a selected key, as explained in Basing the Recommendation on a Recommendation
Key.
Choose algorithm for each recommendation type as explained in Selecting an Algorithm.You can test multiple
recommendation types against each other by adding more than one algorithm.
Choose data source as explained in Choosing the Data Source.
4. Configure data details.
38Managing Your Recommendations

Adjust the Data Details slider to set the period of data you want to use.To further configure your recommendation
details, click Show More and configure the remaining details. See Setting Data Details.
5. Specify the locations you want to test, then select a template for each location.
Select the mbox from the dropdown list. See Selecting a Template, Recommendation Area and Targeting
Conditions.
6. Set up targeting conditions.
Recommendations can be limited to show only in mboxes when certain conditions are met. These can include
matching particular URL values, mbox parameter values, or profile values.These rules are reevaluated on every
mbox request. With this ability, multiple recommendations can be set up on one mbox name but displayed in
different circumstances. Click Target This Mbox, then specify the targeting criteria from the options that appear.
For example: to display one recommendation can display on women's product pages select Current Page, as
the target type, then select URL and Contains from the next two drop down lists, and type /women/ in the final
text box.To show the recommendation on men's pages, follow the same procedure, but type /mens/.This targets
to the specified parameters, even if the same mbox name is used across all product pages.
7. Select the template for each location.
8. Specify the percentage of visitors who see default content, as explained in Specifying How Many Users See
Default Content.
If the Recommendation Type selector is not visible, click Testing & Segments.
This becomes your baseline. The recommendation you create is compared to the default content to show how
each performs. If you choose a percentage for default content, then no recommendation is shown in either mbox
for that percentage of the people to compare against.
9. To add a segment, click Add Segment, type a name for the segment, then select the segment parameters, as
explained in Defining Segments.
To delete a segment, click the box next to a segment to open it, then click the X to delete that segment. Deleting
the segment also deletes any data collected for that segment.
10. Click Save.
After you save your new recommendation, it appears on the Manage Recommendations page as inactive. (See
Activating a Recommendation for information about activating the new recommendation.) The algorithm runs as
soon as data is available, usually within 30 minutes.
Adding a Download Only Recommendation
Select Download Only if you do not have display mboxes on your site and you want to run a recommendation and
download the results or export them using the Recommendations API.
This results in a downloaded CSV file that list the recommendations with one row per key.
1. Click Add New Recommendation or Create New Recommendation, or select the recommendation you want
to modify and click Edit.
The Edit Recommendation page opens.
39Managing Your Recommendations

2. Click the Click here to name text, then type a name for the recommendation.
The name should be descriptive enough that you can recognize it later.
3. Configure your new recommendation.
Choose your Catalog containing the items to be recommended, or select All Catalogs, as explained in Creating
Catalogs.
4. Define your algorithm.
Base the recommendation on a selected key, as explained in Basing the Recommendation on a Recommendation
Key.
Choose algorithm for each recommendation type as explained in Selecting an Algorithm.You can test multiple
recommendation types against each other by adding more than one algorithm.
Choose data source as explained in Choosing the Data Source.
5. Configure data details.
Adjust the Data Details slider to set the period of data you want to use.To further configure your recommendation
details, click Show More and configure the remaining details. See Setting Data Details.
6. Click Save.
After you save your new recommendation, it appears on the Manage Recommendations page as inactive. (See
Activating a Recommendation for information about activating the new recommendation.) The algorithm runs as
soon as data is available, usually within 30 minutes.
Configuring Entry Conditions
Entry conditions help to determine who sees the recommendation when they visit your site.
40Managing Your Recommendations

To help you determine who sees your recommendation, configure entry conditions. Entry conditions are based on
segments, as explained in Defining Segments. Entry conditions provide the first level of targeting for your
recommendations. A visitor must meet the entry conditions before the recommendation is displayed.
1. Create a new recommendation, or locate the existing recommendation you want to target and click Edit.
2. Under Configuration, select the desired entry condition.
The available options are:
Everyone: All visitors to your site.
People who have purchased before: Any visitor who has bought an item from your site.
People who have spent...: People who have spent more than or less than a specified amount.When you select
this target, additional options appear that let you select whether the target amount is less than or more than a
specified amount.
First time visitor: People who have not visited your site before. Note that, if cookies have been deleted, a return
visitor appears as a first time visitor.
Returning visitor: People who have been to your site before.
Custom profile attribute: (For Adobe targeting users only.) People who have a particular profile value as defined
in Target.When you select this option, additional parameters appear. In the first box, type the name of an in-mbox
profile parameter, or a script profile parameter. (More information about these parameters is available in the
Target help.) Next, select a delimiter from the menu, then type the value that must be met for the recommendation
to show.
For in-mbox profile parameters, type profile.attributeName in the text box. For script profile parameters, type
user.attributeName. Replace attributeName with the name of the attribute.
3. Set or change the remaining options for the recommendation as desired.
4. Click Save.
Choosing a Test Type
You can choose either or two types of tests: A/B Test or Optimizing.
An A/B Test recommendation automatically splits traffic across all combinations of algorithms and templates you
have set up. Optionally, traffic can be directed to default content as well to compare performance with and without
recommendations.
When you create an A/B test recommendation, you specify the percentage of visitors who see the default content.
All others see the recommendations.
The Optimizing recommendation ensures the most effective recommendations are shown more often by automatically
displaying the best performing algorithm/template combination. As visitors respond to different combination over
time, more traffic is automatically sent to the best performing combination.Visitors who fall into marketer-defined
segments (set up at the bottom of the recommendation edit page) are sent to the best performing combination for
that segment.
Unlike A/B campaigns, where a visitor has the same experience until he converts, optimizing campaigns might serve
a new experience per visit (or session).
41Managing Your Recommendations

With an Optimizing recommendation, fewer visitors see underperforming combination. Automatically and over time,
more traffic is shown to the best performing combinations. A small percentage is always sent to the underperforming
combinations, in case there is a change and they start to perform better and even start beating the current winner.
When you create an Optimizing recommendation, you specify the optimizing metric used to determine performance,
which can be the conversion rate, average order value, or revenue per visit.You also choose whether to include
default content in the calculations.
To choose a test type:
1. Create a new recommendation, or locate the existing recommendation you want to target and click Edit.
2. Under Testing and Segments, select the desired test type and the parameters used by the selected type.
For an A/B Test recommendation, select the percentage of users who see default content. (See Specifying How
Many Users See Default Content.) For an Optimizing recommendation, select the optimizing metric and whether
to include default content.
3. Click Save.
Choosing a Catalog
You can narrow the set of items available for a recommendation by choosing a catalog.
A catalog must be created before it can be chosen. For more information about catalogs and how to create them,
see Creating Catalogs.
1. Create a new recommendation, or locate the existing recommendation you want to target and click Edit.
2. Under Configuration, choose the desired catalog.
You can choose one of the catalogs that has been created, or make all items available to the recommendation
by choosing All Catalogs.
3. Click Save.
Basing the Recommendation on a Recommendation Key
You can create multiple recommendation keys and test them against each other.
Each algorithm is defined in its own tab. Traffic is split evenly across your different algorithm tests. In other words,
if you have two algorithms, traffic is divided equally between them. if you have two algorithms and two templates,
traffic is split evenly between the four combinations.You can also specify a percentage of site visitors who see the
default content, for comparison. In that case, the specified percentage of visitors see the default content, and the
rest are split between your algorithm and template combinations.
1. Create a new recommendation, or find the recommendation whose type to set and click Edit.
2. To change the recommendation key, select the new key from the Base the recommendation on: dropdown
list, then select any additional options.
The list contains the following options:
DescriptionOption
This set of recommendation types is defined by the visitor's activity on the current
page.
Current Page Activity
42Managing Your Recommendations

DescriptionOption
The recommendation is determined by the item the visitor is currently viewing.
Recommendations are set up to display other items that might interest visitors
who are interested in the specified item.
Current Item
When this option is selected, the entity.id value must be passed as a
parameter in the display mbox.
The recommendation is determined by the product category that the visitor is
currently viewing. Recommendations are set up to display items in the specified
product category.
Current Category
When this option is selected, the entity.categoryId value must be passed
as a parameter to the display mbox.
For users who use the recommendations and testing and targeting functions of
Adobe Target.
Custom Profile Attribute
The recommendation is based on any profile attribute set up for testing. The
value for the attribute must resolve to an entity.id. For example, you might
want to keep track of an item someone abandoned in their cart.You could write
a profile script that stores that entity.id, and then deliver recommendations
based on that abandoned cart item the next time the visitor returns to the site.
This set of recommendation types lists any custom algorithms that have been
defined. If there are no custom algorithms, this portion of the Recommendation
Type list is empty.
Custom Algorithms
This set of recommendation types is defined by the past behavior of your site
visitors.
Past Behavior
Nth Last Purchased Entity
Note: This key was formerly named "Last Purchased Item."
The recommendation is determined by a recent item that was purchased by
each unique visitor. This is captured automatically, so no values need to be
passed on the page.
Choose from the following options to determine the item to key off of:
• Last
• Second-to-Last
• Third-to-Last
• Fourth-to-Last
• Fifth-to-Last
After choosing the item, select one of the following:
• No Aggregate
43Managing Your Recommendations

DescriptionOption
Only produce recommendations from the specified key.
• Aggregate
Your recommendations begin with the specified entity, then continue in
chronologically reverse order of the visitor's behavior on your site until your
template is filled. For example, if you key off the third most-viewed entity,
Recommendations begins with that entity, followed by the fourth most-viewed
entity, then the fifth, and so on until the template is filled.
• All or Nothing
Creates a recommendation based on the first entity ID that fills the template.
For example, if your recommendation contains eight items and you key off the
last purchased entity, then Recommendations begins with that entity and works
back through your history until it finds an entity ID containing at least eight
items. If an entity ID contains fewer than eight items, it is skipped.
Nth Last Viewed Entity
Note: This key was formerly named "Last Viewed Item."
The recommendation is determined by a recent item that was viewed by each
unique visitor. This is captured automatically, so no values need to be passed
on the page.
Choose from the following options to determine the item to key off of:
• Last
• Second-to-Last
• Third-to-Last
• Fourth-to-Last
• Fifth-to-Last
After choosing the item, select one of the following:
• No Aggregate
Only produce recommendations from the specified key.
• Aggregate
Your recommendations begin with the specified entity, then continue in
chronologically reverse order of the visitor's behavior on your site until your
template is filled. For example, if you key off the third most-viewed entity,
Recommendations begins with that entity, followed by the fourth most-viewed
entity, then the fifth, and so on until the template is filled.
• All or Nothing
Creates a recommendation based on the first entity ID that fills the template.
For example, if your recommendation contains eight items and you key off the
last purchased entity, then Recommendations begins with that entity and works
44Managing Your Recommendations

DescriptionOption
back through your history until it finds an entity ID containing at least eight
items. If an entity ID contains fewer than eight items, it is skipped.
Nth Most Viewed Entity
Note: This key was formerly named "Most Viewed Item."
The recommendation is determined by an item that has been viewed often,
using the same method as used for Nth Most Favorite Category.
This is determined by recency/frequency algorithm that works as follows:
• 10 pts for 1st product view
• 5 pts for every one after
• At end of session divide all values by 2
For example, viewing surfboardA then surfboardB in one session results in A:
10, B: 5.When the session ends, you will have A: 5, B: 2.5. If you view the same
items in the next session, the values change to A: 15 B: 7.5.
Choose from the following options to determine the item to key off of:
• Most
• Second-Most
• Third-Most
• Fourth-Most
• Fifth-Most
After choosing the item, select one of the following:
• No Aggregate
Only produce recommendations from the specified key.
• Aggregate
Your recommendations begin with the specified entity, then continue in
chronologically reverse order of the visitor's behavior on your site until your
template is filled. For example, if you key off the third most-viewed entity,
Recommendations begins with that entity, followed by the fourth most-viewed
entity, then the fifth, and so on until the template is filled.
• All or Nothing
Creates a recommendation based on the first entity ID that fills the template.
For example, if your recommendation contains eight items and you key off the
last purchased entity, then Recommendations begins with that entity and works
back through your history until it finds an entity ID containing at least eight
items. If an entity ID contains fewer than eight items, it is skipped.
Nth Most Favorite Category
Note: This key was formerly named "Favorite Category."
45Managing Your Recommendations

DescriptionOption
The recommendation is determined by the category that has received the most
activity, using the same method used for "most viewed item" except that
categories are scored instead of products.
Choose from the following options to determine the item to key off of:
• Most
• Second-Most
• Third-Most
• Fourth-Most
• Fifth-Most
After choosing the item, select one of the following:
• No Aggregate
Only produce recommendations from the specified key.
• Aggregate
Your recommendations begin with the specified entity, then continue in
chronologically reverse order of the visitor's behavior on your site until your
template is filled. For example, if you key off the third most-viewed entity,
Recommendations begins with that entity, followed by the fourth most-viewed
entity, then the fifth, and so on until the template is filled.
• All or Nothing
Creates a recommendation based on the first entity ID that fills the template.
For example, if your recommendation contains eight items and you key off the
last purchased entity, then Recommendations begins with that entity and works
back through your history until it finds an entity ID containing at least eight
items. If an entity ID contains fewer than eight items, it is skipped.
The recommendation is determined by the popularity of items on your site.
Popularity includes top sellers and top viewed by mbox data and, if you use
Popularity
Adobe Analytics, all of the metrics available in the product report (previously
called optimize on any metric). These recommendations rank the items based
on the criteria you choose in the Algorithm dropdown.
(Available only if you use the search capabilities of Adobe Target.) The
recommendation is determined by the search results on a particular page.Those
Site Search
search results are used as input to the recommendation to determine
complementary items.
3. Click Save.
46Managing Your Recommendations

Selecting an Algorithm
The algorithm determines which action will result in which recommendation.You can test multiple recommendation
types against each other by adding more than one algorithm.
Note: If you are running a recommendation and change its algorithm, you will lose your settings data. A
warning message reminds you that this will occur.
All one-day and two-day algorithms run twice daily. All one-week and longer algorithms run once daily. Site Affinity
algorithms run once daily. Backup algorithms run twice daily.
If the number of recommended items is less than the number of "slots" defined in a template, the ability to partially
render the template can be set at the algorithm level using a checkbox located in the Content Serve Settings on the
Recommendations Edit tab. If partial template rendering is not enabled and there aren't enough recommended
entities to fill all the slots, the entire template is not rendered. If partial template rendering is enabled,
Recommendations renders the template whether or not enough recommendations exist to fill up all the slots in the
template.You should build your templates to account for this behavior. For example, you might create your template
to include null checks.
Considering each key and the algorithms that map to it, different recommendations lend themselves to placement
on different pages:
Where on Your SiteAlgorithmsKey
Single-category pages, such as
category pages, NOT null search
results pages
Current category
• Top Sellers
• Most Viewed
General pages, such as home or
landing pages and offsite ads.
Popularity
• Top Sellers
• Most Viewed
• Highest/Best ____
Single-item pages, such as product
pages, NOT null search results pages
Current item
• Purchase Affinities
• View Affinities
• View/Purchase Affinities
• Site Affinity
Varies. Home pages, landing pages,
cart pages, etc.
Custom profile attribute
• Purchase Affinities
• View Affinities
• View/Purchase Affinities
• Site Affinity
NOT product page, pages relevant to
purchases. For example, Home page,
My Account page, offsite ads.
Nth Last Purchased Entity
• Purchase Affinities
• View Affinities
• View/Purchase Affinities
• Site Affinity
47Managing Your Recommendations

Where on Your SiteAlgorithmsKey
NOT product page. Pages relevant to
purchases. For example, Home page,
My Account page, offsite ads.
Nth Last Viewed Entity
• Purchase Affinities
• View Affinities
• View/Purchase Affinities
• Site Affinity
General pages, such as home or
landing pages and offsite ads.
Nth Most Favorite Category
• Top Sellers
• Most Viewed
Varies. Home pages, landing pages,
offsite ads, etc.
Nth Most Viewed Entity
• Purchase Affinities
• View Affinities
• View/Purchase Affinities
• Site Affinity
Varies. Item-based algorithms on
product pages, category-based
algorithms on category pages.
CustomCustom Algorithms
1. Create a new recommendation, or find the recommendation whose algorithm you want to set and click Edit.
2. Select an algorithm from the Choose Algorithm dropdown list.
The following algorithms are available:
Note: The affinities algorithms must be enabled by Client Services.
Purchase Affinities: Items that are most often purchased by someone who purchased the current item.
View Affinities: The items that are most often viewed in the same session that the specified item is viewed.
View/Purchase Affinities: The items that are most often purchased in the same session that the specified item
is viewed.This algorithm returns other products people purchased after viewing this one, the specified product
is not included in the results set.
Site Affinity:This tuning parameter determines which products are best to recommend with other products based
on the following criteria:
• Product page views
• Cart adds
• Cart removes
• Purchases
• Site activity
You can configure this recommendation algorithm to determine how much data is required before a
recommendation is presented.The site affinity recommendation is based on the certainty of a relationship between
two products. For example, if you select Strong, then the products with the strongest certainty of a match are
recommended.
For example, you set a strong affinity and your template includes five items, three of which meet the strength of
connection threshold.The two items that do not meet the minimum strength requirements do not display in your
48Managing Your Recommendations

recommendations and are replaced by your defined backup items.The items with the strongest affinity display
first.
Some customers with diverse product catalogs and diverse site behaviors might get the best results if they set
a weak site affinity.
Adobe Search&Promote Recommendation: If you use the Adobe Target site search and merchandising capabilities,
this people who searched for this bought that recommendation displays in a promo area on the Site Search page.
The placement of the mbox is determined with your site search consulting team.
Advanced users can create custom algorithm types, as explained in Creating a Custom Algorithm.
Popularity By Metric: Choose any metric from the products report in Adobe Analytics to show the top products
by revenue, orders, cart adds, ratings, etc.
Top Sellers: The items that are included in the most completed orders. Multiples of the same item in a single
order are counted as one order.
Most Viewed: The items that are viewed most often.
Recently Viewed Items: Items that have been viewed recently by the visitor. When using this algorithm, you
should update the Target template to handle cases where blank recommendations would show when there are
not enough previously viewed items to display.
3. Click Save.
Choosing the Data Source
1. Create a new recommendation, or find the recommendation whose algorithm you want to set and click Edit.
2. Select a source from the Choose Data Source dropdown list.
3. Specify the period for which data should be used when calculating recommendations.
4. To configure more data options, click Show More.
See Setting Data Details.
5. Click Save.
Content Serve Settings
The Content Serve settings are optional settings that define how content is shown.
If the number of recommended items is less than the number of "slots" defined in a template, Recommendations
can either fill the template with backup recommendations or display a partially rendered template. Use the Content
Serve settings to manage these options.
49Managing Your Recommendations

ResultBackup
Recommendations
Partial Template
Rendering
If fewer recommendations are returned than the template
calls for, the recommendations template is replaced by
default content and no recommendations are displayed.
DisabledDisabled
The template is rendered, but may include blank space
if fewer recommendations are returned than the template
calls for.
DisabledEnabled
Backup recommendations will fill available template
"slots," fully rendering the template.
EnabledEnabled
If applying inclusion rules to backup recommendations
restricts the number of qualifying backup
recommendations to the point that the template cannot
be filled, the template is partially rendered.
If the criteria does not return any recommendations, and
inclusion rules restrict backup recommendations to zero,
the template is replaced with default content.
Backup recommendations will fill available template
"slots," fully rendering the template.
EnabledDisabled
If applying inclusion rules to backup recommendations
restricts the number of qualifying backup
recommendations to the point that the template cannot
be filled, the template is replaced by default content and
no recommendations are displayed.
Setting Data Details
Several options help you narrow the items that display in your recommendations.
The data details are optional. However, setting these details gives you more control over the items that display in
your recommendation. Each detail you configure further narrows the display criteria. For example, you can choose
to display only women's shoes that have an inventory above 50 and a price between $25 and $45.You can also
weight each attribute so those items that are more important to your business are most likely to display.
1. Specify the period for which data should be used when calculating recommendations.
This helps you target recommendations based on recent activity over a specified time period. Set the time period
to provide enough data for a valid recommendation, but not so much data that the recommendation is out of date.
2. To access the data detail options, create or edit a recommendation, then click Show More in the Data Details
section under Define Your Algorithm.
The Data Details section is not available until you choose an algorithm
3. Set the minimum inventory amount for the products you want to recommend.
50Managing Your Recommendations

4. Set a price range for the products you want to recommend.
5. Configure the recommendation to display items only when they meet certain criteria.
You can specify that items are included only when one of the following attributes meets or does not match one
or more specified conditions:
• ID
• Category
• Name
• Message
• Margin
• Value
• Inventory
• Brand
You can set more than one value for each attribute. Separate each value with a comma.
Note: If you select Inventory but an Inventory value is not passed, that control on the recommendations
setup page is ignored. In this case, use an "include only when" rule or a catalog to achieve your inventory
control goal.
In addition to the usual evaluators (contains, does not contain, equals, and so on), you can select one of
the following options:
• Include Only When: Matches
The recommendation's attribute must match the key's attribute to display.
• Include Only When: Does Not Match
The recommendation's attribute must not match the key's attribute to display.
• Include Only When: Is Between
To display, a recommendation's attribute must fall within the range specified for the value, margin, or other
numeric-based attribute.You might, for example, specify 50% and 200% if you want to display items that cost
$25 to $100 when the user views a $50 item.This prevents the recommendation from displaying a $5000 dollar
item when a $200 value item is being viewed, showing instead items that are more likely to interest the buyer.
The lower limit is 0%.There is no upper limit.
You can use multiple Include Only When filters to reduce the overhead of setting up many separate campaigns.
Multiple filters are combined with an AND.
Note: This option limits the items that are displayed in the recommendation. It does not affect which pages
the recommendation is displayed on.To limit where the recommendation displays, recommendation-level
targeting is required.
Dynamic attribute filtering should be used sparingly. They are useful if, for example, your organization has rules
that demand that one brand is not recommended while another brand is being shown. There is a cost to this
feature.You could possibly lose a percentage of lift by restricting some items from not showing when they would
normally be shown by the algorithm.
6. If desired, weight attributes so they are more or less likely to show.
51Managing Your Recommendations

Select an attribute, then enter one or more values for that attribute (separated by a comma), then use the slider
to set the weight for that weighting.
To add another weighting, click Add Weighting and set the attribute, values, and weight.You can set as many
weightings as you need.
7. Click Save.
Selecting a Template, Recommendation Area and Targeting Conditions
The template and recommendation area determine the appearance of your recommendation and where it appears.
1. Create a new recommendation, or find the recommendation whose template you want to set and click Edit.
2. To specify the template used for the recommendation, click Presentation then select a template from the Choose
Template(s) drop-down list.
You can select multiple templates if you want to test templates against each other. For more information about
templates, see Managing Templates.
Select Download Only if you do not have display mboxes on your site and you want to run a recommendation
and download the results or export them using the Recommendations API. This results in a downloaded CSV
file that list the recommendations with one row per key.
For example, if you have a People who bought this bought that recommendation, the key is the product ID that
you want to show recommendations for (typically passed through the display mbox) and the products that were
purchased with that product are recommended. If you are using the Top seller in category algorithm, the key is
the category and the recommendations are the top sellers in that category.
Note: If you select Download Only, the options to choose a template and a display area (described in
the next step) do not appear.
3. Select the recommendation area (mbox) where you want to display the recommendation.
This option is not available if you select Download Only.
4. If desired, target the selected mbox.
Recommendations can be limited to show only in mboxes when certain conditions are met. These can include
matching particular URL values, mbox parameter values, or profile values.These rules are reevaluated on every
mbox request. With this ability, multiple recommendations can be set up on one mbox name but displayed in
different circumstances. Click Target This Mbox, then specify the targeting criteria from the options that appear.
For example: to display one recommendation can display on women's product pages select Current Page, as
the target type, then select URL and Contains from the next two drop down lists, and type /women/ in the final
text box.To show the recommendation on men's pages, follow the same procedure, but type /mens/.This targets
to the specified parameters, even if the same mbox name is used across all product pages.
5. Click Save.
Defining Segments
Segments show you how specific groups of visitors are performing on your site.
For example, if you present the same information to all users on your site, you can then use segments to determine
how well your presentation succeeds with certain segments of visitors, such as visitors who are new to your site or
visitors who have bought products from your site in the past.This information helps you determine how best to target
your information so you show the right information to the best segments.Targeting a recommendation determines
52Managing Your Recommendations

who sees the recommendation when they visit your site, as explained in Configuring Entry Conditions.You can add
up to ten segments for each recommendation.
1. Create a new recommendation, or locate the existing recommendation you want to target and click Edit.
2. Under Testing and Segments, click Add Segment.
3. In the first box of the segment builder, type the name of the segment you want to define.
4. Specify the segment options.
People who have purchased before: Any visitor who has bought an item from your site.
People who have spent...: People who have spent more than or less than a specified amount.When you select
this target, additional options appear that let you select whether the target amount is less than or more than a
specified amount.
First time visitor: People who have not visited your site before. Note that, if cookies have been deleted, a return
visitor appears as a first time visitor.
Returning visitor: People who have been to your site before.
Custom profile attribute: (For testing and targeting users only.) People who have a particular profile value as
defined in Target. When you select this option, additional parameters appear. In the first box, type the name of
an in-mbox profile parameter, or a script profile parameter. (More information about these parameters is available
in the Target help.) Next, select a delimiter from the menu, then type the value that must be met for the
recommendation to show.
5. Repeat this procedure for each segment you want to define.
6. Click Save.
Specifying How Many Users See Default Content
For an A/B test, specify a percentage of users who will see default content. The remaining users see the
recommendation.
You can compare the results from those who saw the recommendation against those who saw default content to
determine how effective the recommendation is at directing users toward your desired results.
1. Create a new recommendation, or find the recommendation whose template you want to set and click Edit.
2. To change the template used for the recommendation, click Testing & Results and select A/B Test.
3. To change the percentage of visitors who see default content, specify a percentage.
4. Click Save.
Using a Backup Recommendation
If you use the backup recommendation feature, any recommendation that does not have enough recommended
items will not display default content. Instead, recommendations display the results of the backup algorithm.
If you do not use a backup recommendation, if a recommendation does not have enough items to fill the display,
the system displays default content to the user.
The backup recommendation feature always uses the top-viewed items on the site to fill in any remaining slots after
the algorithm's data is used. For example, your template is configured to show five recommended items, and you're
using the Purchase Affinities algorithm. However, you only have enough data to fill two of the five slots, so the backup
recommendation feature fills the other three spots with top-viewed items.
53Managing Your Recommendations

Backup recommendations are randomly chosen from the top 500 most-viewed products across the entire site. The
data time period for backup recommendations is one week.
The 500 most-viewed results are ordered sequentially and then split into buckets of 20.The buckets are served in
order, but the results inside each bucket are randomized and returned to the page. If users refresh the page, they
are presented with new, randomized results. If the result set from the union of the collection and the filtering rules
is smaller than 20, it will randomly select from the collection.
Note: If you group your items into catalogs, the backup recommendations generated for each algorithm within
the recommendation also uses the catalog, so only items in the catalog are included in the backup
recommendation.
Any item that is excluded by global exclusion rules is not served as a backup recommendation.
Backup recommendations are enabled by default and fill in the extra slots in a template with a random selection of
the most popular items on the site.
Duplicates are removed from batches of recommendations.
Using backup recommendations is usually part of the discussion with the implementation team during your initial
setup. If you want to change the backup recommendation setting after implementation, contact your account manager.
If partial rendering (see Content Serve Settings) is not enabled and the template doesn't show, then either the backup
recommendation or default content is shown instead.
Previewing a Recommendation
You can preview a recommendation to see how it looks in a browser. Browse around the site to see how the pages
change with and without the recommendations and mboxes.
Note: The Preview option is not available for recommendations that use a Download Only template.
1. On the Manage Recommendations page, find the recommendation you want to preview.
2.
Click Preview ( ).
A new browser window opens, displaying a preview of your recommendation.
54Managing Your Recommendations

Using Preview Options to Change the Page View
The top of the preview screen contains a number of options.
ExplanationOption
Changes the page view so you can compare how the page looks with and without a
recommendation. Click either end of the slider to change the view.
View Slider
Displays information about the recommendation target, the conversion, the location of the
mbox, and the offer.
More
55Managing Your Recommendations

ExplanationOption
Hides the additional information.Less
Prevents the mbox overlays from displaying.Hide Mboxes
Deleting a Recommendation
Delete a recommendation when you no longer want to use it.
When you delete a recommendation, any results data associated with the recommendation is also deleted. The
template is not deleted.
1. On the Manage Recommendations page, find the recommendation you want to delete.
2. Click Delete.
Starting a Recommendation
Start your recommendation when your site is prepared and your recommendation is ready to collect data.
Knowing When to Launch a Recommendation
Launch a recommendation once data is being collected.
The recommendations server begins gathering item description data when mboxes are placed on the site or the
entity details are uploaded via a CSV file, even if no recommendations are set up yet. These mboxes also start
capturing usage data, such as views and purchases of products that are used for the recommendations algorithms.
If you use Adobe Analytics for algorithm data, this information is also immediately available.
When a new recommendation is created, or a new algorithm is added to an existing recommendation, data is
generated within 30 minutes for the algorithm(s). These new algorithms use existing item information and usage
information, and data gathering starts before each algorithm is created. If an existing algorithm is updated or changed,
then the changes are used by the system the next time the algorithm is run.
The algorithm schedule is determined by the data range specified for the algorithm. If one day of data is used, the
algorithm updates every two to four hours. If two months of data is selected, then the algorithm updates every 24
hours. After the initial run of an algorithm within 30 minutes of creation, it runs on this schedule.
Algorithm filters and weighting are applied during these algorithm updates. Other controls like inventory and price
rules are applied at display time. When the recommendations server is updated with item information about price
and inventory (either via an mbox or csv upload), those changes are immediately reflected in the recommendation
displaying on the site, even if the algorithm has not updated yet.
To confirm that recommendations are prepared and ready to go, download the recommendation output from the
edit page by clicking the orange x icon next to the name. The downloaded file includes all recommendation data
56Managing Your Recommendations

that is ready. The recommendation is ready to be activated there is one row per key for an algorithm based on a
particular product or category view. For a popularity algorithm, only one row of data displays.
Activating a Recommendation
You can set whether a recommendation is active.
If a recommendation is not active, it does not run on your Web pages or recommend offers to your customers.You
can easily recognize whether a recommendation is active by the status flag that appears beneath the recommendation
name on the Manage Recommendations page:
The icons on the toolbar change depending on the status of the recommendation.
If the recommendation is inactive, the Activate icon displays.
If the recommendation is active, the Deactivate icon displays.
1. Make sure your recommendation is ready to be launched, as explained in Knowing When to Launch a
Recommendation.
2. On the Manage Recommendations page, find the inactive recommendation you want to activate.
3. Click Activate.
Deactivating a Recommendation
Deactivate a recommendation to stop displaying it on your site.
If a recommendation is active, it runs on your Web pages and recommends offers to your customers.You can easily
recognize whether a recommendation is active by the status flag that appears beneath the recommendation name
on the Manage Recommendations page:
The icons on the toolbar change depending on the status of the recommendation.
If the recommendation is inactive, the Activate icon displays.
If the recommendation is active, the Deactivate icon displays.
1. On the Manage Recommendations page, find the active recommendation you want to deactivate.
2. Click Deactivate.
57Managing Your Recommendations

Creating a Custom Algorithm
You can create one or more custom algorithms and provide a list of the recommended items to show for a specific
key.
Note: Creating a custom algorithm requires the use of two APIs.This process should only be performed by
advanced users.
To create a custom algorithm, you must use two APIs.
• Name the custom algorithm
• Upload the data displayed by the custom algorithm
These APIs must be used sequentially in the order shown above. However, they can be done at different times.
Also, after you have created the algorithm name, you can upload data whenever needed (for example, on a schedule
to keep the information up to date) without repeating the Algorithm Name API call.
You can also delete a custom algorithm, as explained in Deleting a Custom Algorithm.
Naming a Custom Algorithm
Use the Algorithm Name API to create a name for a custom algorithm.
The syntax for the Algorithm Name API is:
https://recommendations.omniture.com/rest?action=algorithm.upload
&client=clientCode&clientToken=51dafdf4-f825-4581-a7c0-8ce9db31bd31
&algorithmName=sampleCustomAlgorithm&keyType=currentitem
Where:
recommendations.omniture.com is the domain for the current recommendations environment you are using.
clientCode is your client code.
51dafdf4-f825-4581-a7c0-8ce9db31bd31 is the client token that is displayed on the settings page.The token shown
is a sample; yours will be different.
sampleCustomAlgorithm is the name of the algorithm as it will be displayed in the algorithm selection dropdown
when you create or edit a recommendation.You can name it whatever you like, but it has a 255 character limit.This
name is used when you upload the recommendation data, as shown in Uploading Custom Algorithm Data.
keyType is an optional parameter that allows users to specify their own key for custom algorithms. If no value is
passed, it is assumed to be the current item.The value can be changed to any user.attribute or
profile.attribute defined in the A/B and multivariate testing and targeting interfaces, or to one of the following
(case and space sensitive):
• currentitem
• lastvieweditem
• lastpurchaseditem
• mostvieweditem
• favoritecategory
58Managing Your Recommendations

• currentcategory
For example, if the profile script was named abandonedCartItem, the parameter for this API would be
keyType=user.abandonedCartItem.
After you use this API, the new name appears immediately as an algorithm type.
Uploading Custom Algorithm Data
After you create a custom algorithm name , you can upload a list of the recommended items to display for a specific
key item when you use that custom algorithm.
Note: If you try to upload recommendations data to a custom algorithm that has not yet been created, you
receive an error stating that the algorithm does not exist.
The syntax for the Upload API is:
https://recommendations.omniture.com/rest?action=entity.recommendations.upload
&client=clientCode&environmentId=184868&clientToken=51dafdf4-f825-4581-a7c0-8ce9db31bd31
&algorithmName=sampleCustomAlgorithm&recommendations=<recommendations><recommendation>
<key>1</key><entityId>2</entityId><entityId>3</entityId>
<entityId>4</entityId></recommendation></recommendations>
Where:
recommendations.omniture.com is the domain for the current recommendations environment you are using.
clientCode is your client code.
environmentId is the ID of the environment you want to use.You can specify a valid ID (environmentId=8), or ALL
to use all host groups (environmentId=ALL). If environmentId is not included then it defaults to the default Production
environment.
51dafdf4-f825-4581-a7c0-8ce9db31bd31 is the client token that is displayed on the Settings page.The token
shown is a sample; yours will be different.
sampleCustomAlgorithm is the name of the algorithm created in Naming a Custom Algorithm.
<key>...</key> is what the recommendation is based on.This can either be an entity/product id or a category value.
These values must be known entity.id and entity.categoryId values, meaning that Recommendations already
has display data for the entities. The key values can also be left blank for non-keyed recommendations such as
overall top sellers or top viewed.
<entityId>...</entityId> is the entity to be recommended for the specified key. This setting must be a known
entity.id value, meaning that the recommendations server already has display data for the entities.
<recommendations>. ..</recommendations> is the XML representation of the recommendations that will display.
A <recommendation> must be included for each key. The <entityId> values are the recommended items for the
specified key. In proper XML syntax, the recommendation might look similar to the following:
<recommendations>
<recommendation>
<key>1</key>
<entityId>4</entityId>
59Managing Your Recommendations

<entityId>2</entityId>
<entityId>3</entityId>
</recommendation>
<recommendation>
<key>2</key>
<entityId>5</entityId>
<entityId>3</entityId>
<entityId>6</entityId>
</recommendation>
...
</recommendations>
Deleting a Custom Algorithm
Delete a custom algorithm name with the Delete Algorithm API call.
Note: If you try to delete a custom algorithm that has not yet been created, you receive an error stating that
the algorithm does not exist.
Syntax:
https://recommendations.omniture.com/rest?action=algorithm.delete
&client=clientCode&clientToken=51dafdf4-f825-4581-a7c0-8ce9db31bd31
&algorithmName=sampleCustomAlgorithm
Where:
recommendations.omniture.com is the domain for the current recommendations environment you are using.
clientCode is your client code.
51dafdf4-f825-4581-a7c0-8ce9db31bd31 is the client token that is displayed on the settings page.The token shown
is a sample; yours will be different.
sampleCustomAlgorithm is the name of the algorithm created in Naming a Custom Algorithm.
Localized Recommendations Based on Geography
You can provide recommendations such as top sellers, top viewed and so on based on the location of the browser,
search, and transactions.
1. Open a Recommendation and click Edit, or create a new recommendation and open the Edit tab.
2. Define your algorithm.
There are three groups of geo-based recommendations:
• Hierarchical
Hierarchical algorithms use Target data to create a tree that flows from general to specific information to fill the
template. For example, you might specify user attributes that flow from store to city to state to country. If there
60Managing Your Recommendations

are not enough recommendations for store to fill the template, then recommendations are added from city, then
state, and finally country, until the template has been filled.
• Sequential
Sequential algorithms use Target data to run through a series of attributes that do not necessarily have a relation.
For example, you might display items that match one color group, then another, at that match a specified gender
and a then another attribute, such as location or age. If the first attribute does not fill the template, the next
attribute is used, then the next until the template is filled.
• No group
Does not use either grouping.
3. Click Save.
Examples
Sequential
For example, define the following profile script attributes for a sequential grouping:
user.recsAttributeCity
user.recsAttributeRegion
user.recsAttributeState
user.recsAttributeCountry
The order in which the attributes are defined matters. Recommendations begins with the first, then moves to the
second, and so on.
In this example, sequential algorithms first attempt to fill the template with City, then Region, then State, and finally
Country, until the template has been filled.
Hierarchical
Similarly, define the following profile script attributes for hierarchical grouping:
user.recsAttributeCountry
user.recsAttributeState
user.recsAttributeRegion
user.recsAttributeCity
The order in which the attributes are defined matters. Recommendations assumes that the attributes are listed from
biggest to smallest, or parent to child. When using the hierarchy to fill the template, Recommendations starts with
the combination that creates the smallest unit, as defined by the attribute order, then moves up to the next smallest,
and so on, until the largest unit has been reached.
In this hierarchical example, Recommendations attempts to fill the template using the following attribute combinations:
user.recsAttributeCountry+user.recsAttributeState+user.recsAttributeRegion+user.recsAttributeCity
If there are not enough items to fill the template, Recommendations then uses:
user.recsAttributeCountry+user.recsAttributeState+user.recsAttributeRegion
If there are still not enough items to fill the template, Recommendations then uses:
user.recsAttributeCountry+user.recsAttributeState
Finally, if the template is still not filled, Recommendations uses:
user.recsAttributeCountry
61Managing Your Recommendations

Advanced Recommendations Options
This topic lists all possible parameters you can set when creating or editing a recommendation, and the algorithms
where each parameter can be used.
AlgorithmsDescriptionParameter
Top SellersSpecify how many items must be in stock before a
product is recommended.
Only recommend products
with inventory greater than
or equal to
Most Viewed
Purchase Affinities
The product is not recommended unless there are
at least the specified number in stock.This helps to
View/Purchase Affinities
prevent recommending products that are sold out
or nearly sold out.You can also use this setting to
Popularity
try to reduce the inventory of products that are
overstocked.
Site Affinity
Note: The .csv file follows the rules
established in the algorithm setup, except for
any information filtered at display time (price
limit and inventory limit).
Top SellersSpecify the price range that products must fit into
before they are recommended.
Only recommend products
within the price range
Most Viewed
This helps you target recommended products to
buyers. If, for example, a customer usually
Purchase Affinities
Popularity
purchases bargain products, lower-priced products
are recommended.
Note: The .csv file follows the rules
established in the algorithm setup, except for
any information filtered at display time (price
limit and inventory limit).
Site AffinitySpecify the affinity between the recommended
products and the source product.
Strength of connection
between recommended
products and the referenced
product
This helps you target your recommendations based
on how often people act on the source product and
the recommended product during the same Web
session.The strength is calculated according to the
number of times the recommended product has
been viewed, added to the cart, or purchased in the
same session as the source product.
If you want to make recommendations without very
much affinity data, select Weak. If you prefer to wait
62Managing Your Recommendations

AlgorithmsDescriptionParameter
until there's a lot of data before the algorithm starts
to make recommendations, select Strong.
Top SellersSpecify the Adobe Analytics report suite used to
track the data used with this recommendation.
Site Catalyst Report Suite
Most Viewed
Purchase Affinities
Popularity
Site Affinity
PopularityUse any metric available on the product report in
Adobe Analytics to drive your algorithm.You can
SiteCatalyst Metric
choose algorithms that rank your products based
on any metric, such as "add to carts," revenue, units
sold, etc.
Purchase AffinitiesUse attribute weighting to "nudge" the algorithm.
Marketers can influence the algorithm based on
Attribute Weighing
View Affinities
important description or metadata about the content
View/Purchase Affinities
catalog. Apply a higher weighting to these on-sale
items so they show more often in the
Top Sellers
recommendation. Non-sale items are not completely
Most Viewed
excluded, but they display less often. Multiple
weightings can be applied to the same algorithm,
and the weightings can be tested on split traffic in
the recommendation.
25%High
12%
0
-12%
-25%Low
Site AffinityShow this recommendation only if one or more
selected variables exactly matches the specified
Include Only When
Purchase Affinities
criteria. For example, you can set this option to
View/Purchase Affinities
specify that the recommendation shows only for a
specific entityID.
View Affinities
Popularity
Top Sellers
63Managing Your Recommendations

AlgorithmsDescriptionParameter
Most Viewed
Creating Catalogs
The catalog is the set of products or items that are eligible for the recommendation.
The backup recommendations generated for each algorithm within the recommendation also uses this catalog, so
only items in the catalog are included in the backup recommendation.With catalogs, you can be sure that only
products that make sense to show in a location are displayed.
Catalogs are rebuilt or updated every time each algorithm runs.
You can group your items into catalogs, then create separate recommendations for each catalog.
1. From the recommendations menu, select Products, then click Catalogs.
2. Click Add New Catalog.
3. Type a name for the catalog.
4. Select the parameter used to build the catalog.
For example, your catalog might be built around a product ID or category, margin, or any other parameter in the
list.
5. Type one or more values for the parameter.
6. (Optional) Add any other rules required for the category.
Multiple rules are joined with an AND. All specified rules must be matched for the catalog to apply.
7. Click Save.
Note: Catalogs and exclusion rule modifications are reflected on your site immediately after being updated.
Updated catalogs and exclusions rules filter from the existing algorithm results. For example, if you have a
catalog that contained items from BrandA and you modified the catalog to contain items from BrandB, and
they were exclusive, then you would get no results until the algorithm ran again. However, if you modified a
catalog to be more inclusive (for example, changing the value range from $10-$100 to $20->$80), then the
runtime filter rule is applied at serve time.
Searching Catalogs
After you create a product catalog, you can view and search it.
You can search the catalog and see all the data that has been learned about your items including ID, price, inventory,
categories, and so on, so you can be confident knowing what information will display in your recommendations. You
can also delete an item you no longer want in your catalog directly from this item viewer.
1. Click Products, then click the Product Search tab.
2. Select the attribute you want to search for, choose a search attribute, type a value, and click Search.
You can click Add Rule to add additional search terms to further narrow your search results.
64Managing Your Recommendations

Troubleshooting Recommendations
This topic includes information about fixing problems that might occur.
Problem: My recommendations don't display on my site.
Review the Recommendations Not Showing Workflow. Some tasks in this workflow are advanced operations that
might best be performed by Client Care.
Problem: My mbox is not functioning as expected.
Review Troubleshooting Mboxes.
Problem:The currently visited item is not excluded when the algorithm key is userProfileAttribute and
the type is customAlgorithm.
This behavior is expected.
Managing Templates
Templates determine how your recommendations look on a Web page or flashbox.You can create customized
templates to provide the appearance you desire.
Using the Template Manager
The Template Manager lists your templates so you can see how many active and inactive recommendations use
each template, and so you can create, edit, delete, or copy a template.
1. Click Templates.
The Active Recommendations and Inactive Recommendations columns show how many recommendations
use each template.
2. Mouse over a template name to access a toolbar that enables you to edit, delete, or copy the template.
65Managing Your Recommendations

Creating or Editing an HTML Template
Create customized templates to provide the look you want for your recommendations.
1. From the recommendations menu, select Templates.
The list of current templates opens.This list includes the template name and information about how often each
template is used in active and inactive recommendations.
2. Select HTML Template, then click Create New Template, or place the mouse pointer over the template you
want to change and click Edit.
The Edit Template screen opens.
3. Edit the code for the template.
Recommendation templates use the open-source Velocity template language. Information about Velocity can be
found at http://velocity.apache.org. For more information, see Customizing a Template.
You can start with one of three size options by clicking the size you want:
3 Across: Displays three recommendations in a one-row table with three columns.
3 Down: Displays three recommendations in a one-column table with three rows.
2x2: Displays four recommendations in two rows, each with two columns.
66Managing Your Recommendations

You are not limited to these options. For more information about creating or editing a template, see Customizing
a Template.
Note: The maximum number of entities that can be referenced in a template, either hardcoded or via loops,
is 20.
If the number of recommended items is less than the number of "slots" defined in a template, the ability to partially
render the template can be set at the algorithm level using a checkbox located in the Content Serve Settings on
the Recommendations Edit tab. If partial template rendering is not enabled and there aren't enough recommended
entities to fill all the slots, the entire template is not rendered. If partial template rendering is enabled,
Recommendations renders the template whether or not enough recommendations exist to fill up all the slots in
the template.You should build your templates to account for this behavior. For example, you might create your
template to include null checks.
4. (Optional) Select the template usage statistics you'd like to view.
You can see how many recommendations are using the template. Select All, Active, or Inactive to see the
recommendations that use the template. Links to the recommendations that use the template appear to the right
of the template usage statistics.
5. Click Save.
Note: When using conditional coding with Velocity, check for NULL references on the values. Processing
NULL values can result in errors.
Customizing a Template
Use the open-source Velocity template language to customize recommendation templates.
Information about Velocity can be found at http://velocity.apache.org.
All Velocity logic, syntax, and so on can be used for a recommendation template.This means that you can create
for loops, if statements, and other code using Velocity rather than JavaScript.
Any variable sent to recommendation in the productPage mbox or the CSV upload can be displayed in a template.
These values are referenced with the following syntax:
$entityN.variable
Variable names must follow Velocity shorthand notation, which consists of a leading $ character, followed by a
Velocity Template Language (VTL) Identifier.The VTL Identifier must start with an alphabetic character (a-z or A-Z).
Velocity variable names are restricted to the following types of characters:
• Alphabetic (a-z, A-Z)
• Numeric (0-9)
• Hyphen ( - )
• Underscore ( _ )
The following variables are available as Velocity arrays. As such, they can be iterated over or referenced via index.
• entities
• entityN.categoriesList
67Managing Your Recommendations

For example:
#foreach ($category in $entity1.categoriesList)
<br/>$category
#end
Or
#if ($entities[0].categoriesList.size() >= 3 )
$entities[0].categoriesList[2]
#end
For more information about Velocity variables, see
https://velocity.apache.org/engine/releases/velocity-1.7/user-guide.html#variables.
Note: The maximum number of entities that can be referenced in a template, either hardcoded or via loops,
is 20.
For example, if you want a template that displays something similar to this:
you can use the following code:
<table style="border:1px solid #CCCCCC;">
<tr>
<td colspan="3" style="font-size: 130%; border-bottom:1px solid
#CCCCCC;"> You May Also Like... </td>
</tr>
<tr>
<td style="border-right:1px solid #CCCCCC;">
<div class="search_content_inner" style="border-bottom:0px;">
<div class="search_title"><a href="$entity1.pageUrl"
style="color: rgb(112, 161, 0); font-weight: bold;">
$entity1.id</a></div>
By $entity1.message <a href="?x14=brand;q14=$entity1.message">
(More)</a><br/>
sku: $entity1.prodId<br/> Price: $$entity1.value
<br/><br/>
</div>
</td>
<td style="border-right:1px solid #CCCCCC; padding-left:10px;">
68Managing Your Recommendations

<div class="search_content_inner" style="border-bottom:0px;">
<div class="search_title"><a href="$entity2.pageUrl"
style="color: rgb(112, 161, 0); font-weight: bold;">
$entity2.id</a></div>
By $entity2.message <a href="?x14=brand;q14=$entity2.message">
(More)</a><br/>
sku: $entity2.prodId<br/>
Price: $$entity2.value
<br/><br/>
</div>
</td>
<td style="padding-left:10px;">
<div class="search_content_inner" style="border-bottom:0px;">
<div class="search_title"><a href="$entity3.pageUrl"
style="color: rgb(112, 161, 0); font-weight: bold;">
$entity3.id</a></div>
By $entity3.message <a href="?x14=brand;q14=$entity3.message">
(More)</a><br/>
sku: $entity3.prodId<br/> Price: $$entity3.value
<br/><br/>
</div>
</td>
</tr>
</table>
Note: If you want to add information after the variable value, you can do so using formal notation. For example:
${entity1.thumbnailUrl}.gif.
You can also use algorithm.name and algorithm.dayCount as variables in templates, so one template can be
used to test multiple algorithms, and the algorithm name can be dynamically displayed in the template. This shows
the visitor that he's looking at "top sellers" or "people who viewed this bought that." You can even use these variables
to display the dayCount (number of days of data used in the algorithm, like "top sellers over the last 2 days," etc.
Note: When referencing tokens in templates (tokens are listed in Dynamic Values in Targets and Profiles in
the Target Classic help), use a backslash to escape the token. For example: \${campaign.recipe.id}
Copying a Template
You can copy a template if you want to base a new template on an existing template.
1. From the Recommendations menu, select Templates.
2. In the Template Name list, place the mouse pointer over the template you want to copy, and click Copy.
A copy of the template appears in the template list.
69Managing Your Recommendations

3. Place the mouse pointer over the template copy and click Edit.
4. Give the copy of the template a unique name.
5. Make changes to the template as needed.
6. Click Save.
Deleting a Template
You can delete a template you no longer need.
1. From the Recommendations menu, select Templates.
2. In the Template Name list, place the mouse pointer over the template you no longer want, then click Delete.
3. Click OK to confirm that you want to delete the template.
The template is removed from the template list.
Template FAQ
There are several frequently asked questions about templates.
Why isn't category showing in the template? I'm using $entity1.categoryId.
Category ID can't be displayed in the template. Since multiple categories can be stored, the system wouldn't know
which category to display.
How should I change a template to get an instant update?
Altering the template that is currently in use takes a while to update.To change the template instantly, create a new
template, select it in the campaign, and save the recommendation.
How can we capture key information for display in the template? Example: If we want to display the key
product's category, how would we code that value in the velocity template?
The $key.value parameter captures most of the key product's information to display within the template. Example:
If you want to display the key product's thumbnail, you would use $key.thumbnailURL.
Which version of Velocity is used?
Version 1.5 with no additional tools or libraries added in. Basic Velocity functionality is available.
How do I replace an existing entity value with a blank? For example, an item's entity.message needs to be
cleared out when a promotion ends.
Sending in a JavaScript nonbreaking space seems to do this. Have the developers send in \u00A0 as the value.
Example: entity.message=\u00A0.You might consider having that be the default value when no value is present
instead of a null.
Managing Recommendations Settings
The Settings option on the Recommendations menu provides access to Recommendations settings.
70Managing Your Recommendations

Creating Global Exclusions
Exclusions let you specify that a product or item never be included in your recommendations if they meet specific
criteria. Multiple global exclusions are combined using "Or" logic.
1. From the recommendations menu, select Settings.
2. Click Exclusions, then click Add exclusion rule.
3. Specify an entity parameter.
The possible parameters are:
DefinitionParameter
The product category used to organize products on your site. A product can
have multiple categories, but only one category can be entered in this field.
category
The number used to identify the product.entityid
The product name that is displayed on the Web site when the product is
recommended.
name
The absolute URL that points to the thumbnail image of the product that is
displayed in the recommendation.
thumbnailUrl
The URL of the product page displayed in the recommendation.pageUrl
A message about the product that is displayed in the recommendation.The
message is typically more verbose than the product name.
message
The price or value of the product.value
The profit margin or other value of the item.margin
The current amount of the product in inventory.inventory
Note: If you don't pass a value for the inventory parameter, the
inventory control on the setup page is ignored. If you choose to use a
custom parameter for inventory, use an "include only when" rule or a
catalog to achieve your inventory control goal.
You can include up to 100 custom attributes that provide additional
information about your products.You can specify any unused attribute name
Custom attributes
for each custom attribute. For example, you might create a custom attribute
called brand that specifies the brand name of the product.
4. Specify the string that must be matched for the exclusion to be used.
71Managing Your Recommendations

5. Click Save.
Once you have created a global exclusion rule, you can click Edit to change its settings. Click Delete to remove the
exclusion rule.
Note: Updating or adding new global exclusions triggers all recommendations to re-run, so your changes are
reflected immediately in all recommendations.
Catalogs and exclusion rule modifications are reflected on your site immediately after being updated. Updated
catalogs and exclusions rules filter from the existing algorithm results. For example, if you have a catalog that
contained items from BrandA and you modified the catalog to contain items from BrandB, and they were exclusive,
then you would get no results until the algorithm ran again. However, if you modified a catalog to be more inclusive
(for example, changing the value range from $10-$100 to $20->$80), then the runtime filter rule is applied at serve
time.
Dynamically Excluding an Entity
In the query string, you can pass entity ids for entities that you want to exclude from your recommendations. For
example, you might want to exclude items that are already in the shopping cart.
To enable the exclusion functionality, use the excludedIds mbox parameter. This parameter points to a list of
comma-separated entity ids. For example, mboxCreate(..., "excludedIds=1,2,3,4,5").The value is sent when
requesting recommendations.
Note: If too many entities are excluded, recommendations behave as if there aren't enough entities to fill the
recommendation template.
To excluded entityIds, append the &excludes=${mbox.excludedIds} token to the offer content url. When the
content url is extracted, the required parameters are substituted using current mbox request parameters.
By Default, this feature is enabled for newly created recommendations. Existing recommendations need to be saved
to support Dynamically Excluded entities.
Uploading Entities to Recommendations
You can create a .CSV file that contains display information for your products, then bulk upload it to the
recommendations server.
Use the bulk upload method to send display information if you don't have mboxes on your page, or you want to
supplement your display information with items that are not available on your site. For example, you might want to
send inventory information that might not be published on your site.
Any data uploaded using the upload template file overwrites that value in our database, so if you send price information
in JavaScript and then send different price values in the file, the values in the file override the information sent with
JavaScript.
Note: You can't overwrite an existing value with a blank value.You have to pass another value in its place
to overwrite it. In the case of sale price, a common solution is to either pass in an actual "NULL" or some other
message.You can then write a template rule to exclude items with that value.
The product is available in the admin interface approximately two hours after successfully uploading its entity.
72Managing Your Recommendations

Downloading the Entity Upload Template
A template file that you should download if you want to upload entity information is provided. Using the template
ensures that your entity information is properly uploaded.
1. From the recommendations menu, click Settings.
The Settings screen opens.
2. Click Uploads.
3. In the Entity Upload Section, click the link to download the template file.
4. Save the file.
Editing the Entity Upload Template
After you have downloaded the entity upload template, you can edit it.
1. Open the upload template file in Excel or a text editor.
2. Make the desired changes.
For example, you could fill out this file with productId and inventory information, and leave the other fields blank.
Entity upload data uses the form entity.attribute. For example, if you sell athletic shoes, the entity is the Air
Jordan Show and an attribute could be the $120 price for that shoe.
Unless otherwise noted, there is a 100-character limit for entity attribute parameters. In some cases, more than
100 characters might be possible, but only 100 characters are supported.You can have up to 80 entity attributes
per product.
The possible parameters are:
DescriptionParameter
The number used to identify the product.entity.id
The product name that is displayed on the Web site
when the product is recommended.
entity.name
The product category used to organize products on your
site. A product can have multiple categories, but only
entity.categoryId
one category can be entered in this field.There is a
250-character limit for categoryId.
A message about the product that is displayed in the
recommendation.The message is typically more
verbose than the product name.
entity.message
The absolute URL that points to the thumbnail image
of the product that is displayed in the recommendation.
entity.thumbnailURL
73Managing Your Recommendations

DescriptionParameter
The price or value of the product. Do not include the
currency sign, for example the dollar sign ( $ ). The
currency sign is not supported.
entity.value
The URL of the product page displayed in the
recommendation.
entity.pageURL
The current amount of the product in inventory.entity.inventory
The profit margin or other value of the item.entity.margin
You can include up to 100 custom attributes that provide
additional information about your products.You can
Custom attributes
specify any unused attribute name for each custom
attribute. For example, you might create a custom
attribute called entity.brand that specifies the brand
name of the product.
3. Save the file.
Uploading the Entity Information to Recommendations
After you have downloaded and edited the template and saved your upload file, you can upload the file.
Any data uploaded using the upload template file overwrites that value in our database, so if you send price information
in JavaScript and then send different price values in the file, the values in the file override the info sent with JavaScript.
1. From the recommendations menu, click Settings.
The Settings screen opens.
2. Click Uploads.
3. In the Entity Upload section, browse to your save upload file, then click Upload.
It takes a moment for the upload to be processed. When the upload is complete, a message tells you how many
data lines were processed and that the upload was successful.
The product is available in the Admin interface approximately two hours after successfully uploading its entity.
Using Entity Feeds
Entity feeds enable more ways to get product or content information into your recommendations. Item details can
be sent from SAINT product classifications or using the Google Product Search feed format.
This allows you to bypass complex mbox implementation or augment your mbox data with information that is either
unavailable on the page or unsafe to send directly from the page (like margin, COGS, etc.).
74Managing Your Recommendations

You can select which columns from your SAINT product classifications file or Google Product Search file you want
to send to the recommendations server.These pieces of data about each item can then be used in template display
and for controlling recommendations.
If data is collected by both an entity feed and an mbox, the most recent data wins. Usually, the most recent data
comes from an mbox, because it is viewed more often. In the rare event that entity feed data and mbox data hit at
the same time, the mbox data is used.
Google
Important: The Google Product Search feed type uses the Google format. This is different from the Adobe
proprietary csv upload format.
Note: It is not required to use Google data. Recommendations just uses the same format as Google.You
can use this method to upload any data you have, and use the available scheduling features. However, you
must retain the predefined attribute names defined by Google when you set up the file.
Most retailers upload products to Google, so when a visitor uses Google product search their products will show up.
Recommendations follows Google's specification exactly for entity feeds. Entity feeds can be sent to Recommendations
via XML, .txt, or .tsv and can use the attributes defined by Google here:
http://support.google.com/merchants/bin/answer.py?hl=en&answer=188494&topic=2473824&ctx=topic#US. The
results are searchable when a visitor goes here: http://www.google.com/prdhp.
Note: The POST method must be allowed on the server that is hosting the Google feed content.
Because Recommendations users already configure XML or .txt feeds to send to Google either via URL or FTP,
entity feeds accept that product data and use it to build out the recommendations catalog. Specify where that feed
exists and the recommendations server retrieves the data.
If you use Google Product Search for the entity feed upload, you still need to have a product page mbox on the page
if you want to show recommendations there or track product views for algorithm delivery based on views.
The feed runs at the time you save and activate it. It runs at the time you save the feed, then every day an hour
later.
SAINT
The SAINT Product classification is the only classification available for recommendations. For more information
about this classification file, see the SAINT Classifications User Guide. It's possible that not all the information you
need for recommendations will be available in your current SAINT implementation, so follow this user guide if you
want to add to your classifications file.
Adding Entity Feeds
To add entity feeds to recommendations, follow these steps:
1. Click Products, then click the Feeds & Uploads tab.
2. Click Add Entity Feed.
The Edit Feed form opens.
3. Enter a name for the feed, then select SiteCatalyst SAINT from the Feed Type dropdown.
75Managing Your Recommendations

If you are a retailer who uses Google Product Search, you can select Google Product Search to map your
recommendation entities to the parameters you already send to Google. In this case the following steps are
essentially the same, except you also select a file location type (URL or FTP) and specify the URL or FTP
information.
4. Select a report suite, then select Product from the Classification dropdown.
5. Select a feed field.
The feed field is the classification field you want to map to recommendations. The value in this field for each
product will be passed to the recommendations.
6. Select the recommendation entity attribute you want to map to the selected classification field.
Select New Custom Attribute to add a new recommendation entity attribute if an applicable one is not already
listed.
7. Click Add Mapping to create additional mappings.
It is not necessary to map all of your entity attributes. Create a mapping only for those attributes you need to
map.
Note: You must map a value from SAINT or Google Product Search to the "id" attribute in recommendations.
This is how it is known which product recommendations to assign these new values to.
8. If you want to specify how frequently the feeds are updated, click the Schedule tab, then select the desired
upload frequency.
Selecting never is the same as pausing the feed from running.
9. Click Save.
After you click Save, the status displays under the Schedule tab. Open an entity feed by clicking Edit to see
your status updates.
Managing Mboxes
An mbox is a "marketing box," a portion of your Web page that can be configured to show different content in different
situations.
An mbox can also log the behavior of visitors to your site. Mboxes are defined in the code for each Web page.
Mboxes are essential to campaigns and tests. Any mbox may do one, both or none of the following as you choose:
• Display and swap content for visitors.
• Log visitor behavior in real-time.
The following image highlights an mbox that recommends two products.
76Managing Your Recommendations

Using an Mbox on Your Web Site
Creating an mbox is a three-step process.
1. Preparing for the Mbox
2. Referencing the mbox.js File on Your Web Pages
3. Creating the Mbox
Preparing for the Mbox
How you prepare for the mbox depends on the strategy and design of your recommendations
Your strategy and design determines the following:
• The Web site locations of the mboxes needed to display recommendations
• The boundaries of the default content for each mbox
77Managing Your Recommendations

The default content of display mboxes should be a size and shape that supports the offers (creative) designed for
the recommendations.
• The mbox names, which Operators will recognize when setting up recommendations
Mbox names are case sensitive. Adobe recommendations recognize "Mymbox" and "myMbox" as two different
mboxes.
Creating the Mbox
After the Web site is prepared and the mbox.js reference is created, you can create the mbox.
1. Ensure the Web page contains a reference to mbox.js.
It is recommended you insert this reference in the file's <head> section.
2. In the body of the HTML page where you want to insert an mbox, define the beginning and end of the default
content with the div tags as shown below.
If the mbox will only track and not display, insert no content between the default div tags. Immediately follow the
default content close </div> tag with the mboxCreate function.
AfterBefore
<head><head>
</head> <script src="http://www.mycompany.com/
myfolder/mbox.js" type="text/javascript">
</script>
</head>
<body><body>
My existing page.My existing page.Part that I'd like to overlay
<div class="mboxDefault">Part that I'd like to
overlay during a campaign or test.during a campaign or test.
</body> </div>
<script type="text/javascript">
mboxCreate('sidebar_recommendations',
'entity.categoryId=EN:Guide:1');
</script>
</body>
Placing an Mbox Around a Table
Wrap the default mbox around an entire table. Do not wrap rows.
WrongRight
<table><div class="mboxDefault">
<div class="mboxDefault"><table>
78Managing Your Recommendations

WrongRight
<tr> <tr>
<td>peaches</td> <td>peaches</td>
<td>cherries</td> <td>cherries</td>
</tr> </tr>
<tr> <tr>
<td>walnuts</td> <td>walnuts</td>
<td>almonds</td> <td>almonds</td>
</tr> </tr>
</table> </div>
</table></div>
<script type="text/javascript" > mboxCreate('myMbox');
</script>
Placing an Mbox Around a Table Cell
Insert the default mbox within the cell, not outside the cell.
WrongRight
<table><table>
<tr><tr>
<div class="mboxDefault"><td>
<td> peaches > </td><div class="mboxDefault">
</div>Peaches
<td>cherries</td></div>
</tr><script type="text/javascript" > mboxCreate('myMbox');
<tr></script>
<td>walnuts</td></td>
<td>almonds</td><td>cherries</td>
</tr></tr>
</table><tr>
<td>walnuts</td>
<td>almonds</td>
</tr>
79Managing Your Recommendations

WrongRight
</table>
Creating Multiple Mboxes on a Page
Because each mbox adds some load time to the page, try to limit the number of mboxes on each page to ten.
Follow the instructions for inserting a single mbox, as explained in Creating the Mbox. Repeat steps 2 and 3 for each
mbox. Only reference the mbox.js file once.
Note: Multiple test elements on a page can be combined into a single larger-sized mbox.
Creating a Whole Page as an Mbox
You can set up an entire page as an mbox.
Use an mbox to replace all of the content between the <body></body> tags. Do not place the mbox outside the
body tags. Mboxes depend on the <body> onLoad function to execute, and mbox recursion problems can occur
when a <body> is used in an offer.
<html>
<body>
<div class=”mboxDefault”>
<...>
...
</...>
</div>
<script type="text/javascript" > mboxCreate(‘wholePageMbox’);
</script>
</body>
</html>
About Dynamic Mboxes
Many Rich Internet Applications (RIAs) manipulate HTML after the page has already loaded by using technologies
like DHTML and AJAX.
For example, after clicking a button, your Web page may display a new section of content.This scenario is supported,
allowing you to define dynamic mboxes through its mboxDefine() and mboxUpdate() functions.
For example, if you want to serve content when an HTML node called "dynamicElement" appears on the page:
<div id="dynamicElement"></div>
then you could trigger the following script on a JavaScript event:
<script type="text/javascript">
mboxDefine("dynamicElement", "mbox_dynamic", "parameter1=value1");
80Managing Your Recommendations

mboxUpdate("mbox_dynamic", "parameter1=value1");
</script>
Of note:
• mboxDefine() defines an HTML element as a container for content to be served. It takes in the unique element
id, the mbox name, and any number of parameters.The parameters can be used for targeting by the active
campaign, even if not passed in again with a later mboxUpdate() call.
mboxDefine() does not actually serve content so it should be followed with mboxUpdate().
• mboxUpdate() retrieves the content. This function may be called multiple times if you want to further change the
content.
Like mboxCreate, it takes in the mbox name and any number of parameters.
• The usual mboxCreate() function only works for HTML elements that exist on the page on the initial load.
• mboxUpdate() can also be used for mboxes created with mboxCreate() rather than mboxDefine().
This allows the page to update content dynamically after the initial page load.
• mboxUpdate() applies the offer only when the DOM-ready event has been fired.
When using dynamic mboxes, delivering offers that include document.write cause the page where the dynamic
mbox is located to appear blank because the document.write function is invoked after the DOM has loaded. Note
also that plug-ins using offers with document.write should never be used on sites employing dynamic mboxes.
Creating a Dynamic Mbox
You can create an mbox on a page whose code is changed after the page loads.
Many Rich Internet Applications (RIAs) manipulate HTML after the page has already loaded by using technologies
like DHTML and AJAX. For example, after clicking a button, your Web page might display a new section of content.
Adobe supports this scenario, allowing you to define dynamic mboxes through its mboxDefine() and mboxUpdate()
functions.
For example, if you want to serve content when an HTML node called dynamicElement appears on the page:
<div id="dynamicElement"></div>
Then you could trigger the following script on a JavaScript event:
<script type="text/javascript" >
mboxDefine('dynamicElement’,'mbox_dynamic’,
'parameter1=value1’);
mboxUpdate('mbox_dynamic’, 'parameter1=value1’);
</script>
Of note:
• mboxDefine() defines an HTML element as a container for content to be served.
This function takes in the unique element id, the mbox name, and any number of parameters.The parameters can
be used for targeting by the active campaign, even if not passed in again with a later mboxUpdate() call.
mboxDefine() does not actually serve content so it should be followed with mboxUpdate().
• mboxUpdate() retrieves the content from Adobe.
81Managing Your Recommendations

This function may be called multiple times if you want to further change the content. Like mboxCreate, it takes in
the mbox name and any number of parameters.
• The usual mboxCreate() function only works for HTML elements that exist on the page on the initial load.
• mboxUpdate() can also be used for mboxes created with mboxCreate() rather than mboxDefine().
This allows the page to update content dynamically after the initial page load.
Troubleshooting Mboxes
This section contains information about debugging mboxes.
Troubleshooting the Debug Window
If the Debug window does not appear as expected, use the information in this topic to solve the problem.
If the Debug window does not appear:
• Confirm the mbox.js reference is correct on all Web pages with the mboxes.
• Confirm you have downloaded the mbox.js into a folder with public permissions.
If the Debug window appears but enabled = false:
• Delete your cookies and clear cache. Close and reopen a browser and reload the page.
• If enabled=false persists, seek and remove JavaScript errors. Some common errors include:
• Improper termination of quotes in mbox arguments
• Spelling mistakes in your mbox functions
• Script tags that are not invoked or that are not closed
• If enabled=false persists, contact your account representative.
If the mboxes are not listed in the mboxDebug popup window, or if mboxes appear blank on the page, review
your page code for the following:
• Confirm the mbox.js reference is correct on all Web pages with the mboxes.
• Confirm that any tag opened before the mbox script is closed after the mbox script.
• Remove JavaScript errors.
• Scrub layout to support DOM rendering by all browser types.
Mboxes insert new nodes into the DOM tree as the browser creates it. Each brand of browser has its own
implementation of the W3C DOM specification, so mboxes can affect page rendering differently based on the browser
type. Specify absolute sizes of table cells and images to help the browser more accurately display a page's HTML
layout.
Mbox Troubleshooting Guide
This topic provides a grid to help you troubleshoot mbox problems.
82Managing Your Recommendations
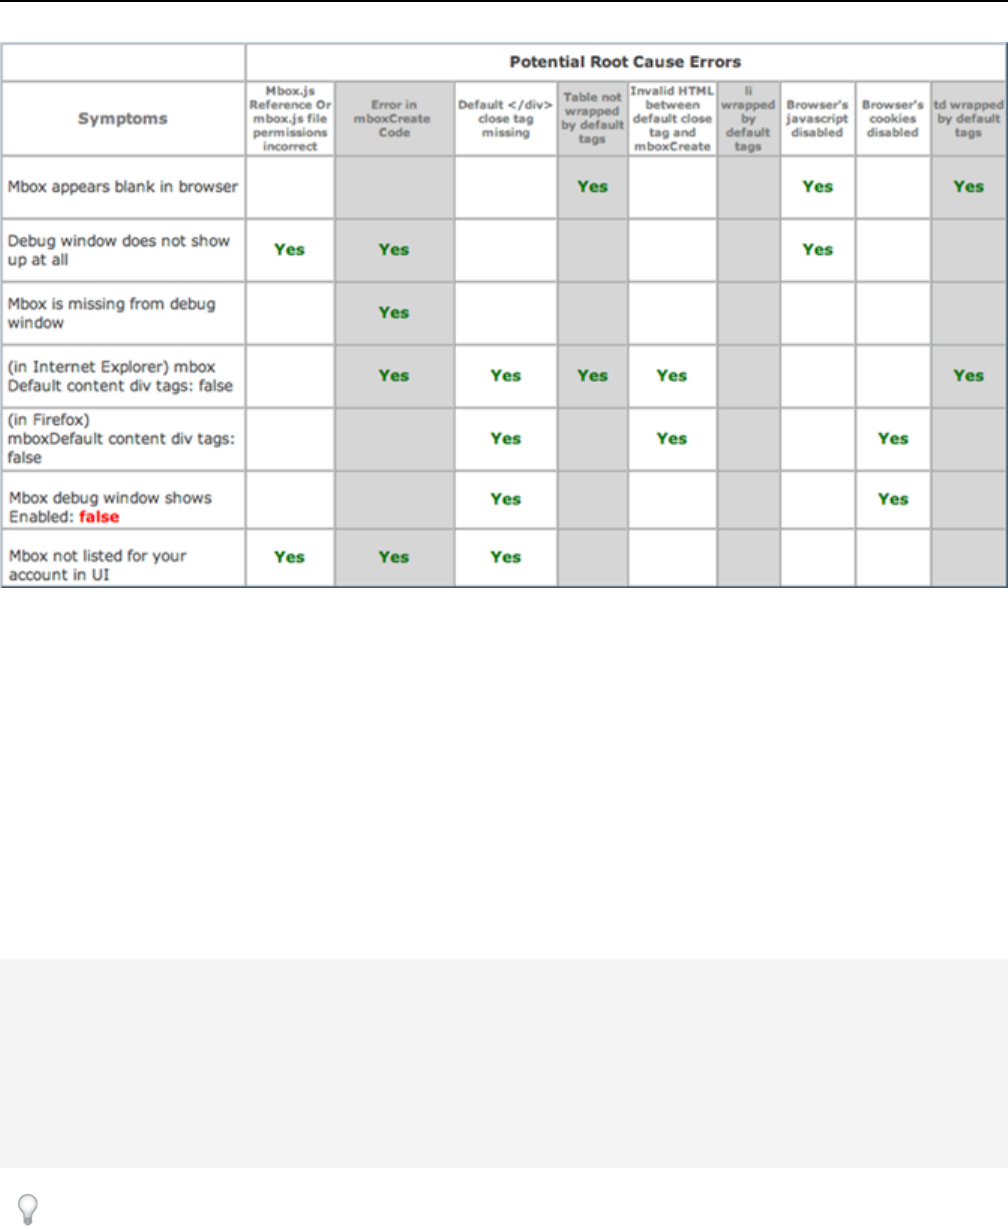
Troubleshooting Resources
The Mozilla Firefox browser includes a JavaScript console that quickly finds and lists the JavaScript errors in your
page.
The Firebug extension for Firefox, available at provides a full-featured JavaScript debugging tool, and also shows
generated source with mbox code.
Sending Sales Data Values
Sales data can be sent to Adobe Target from any mbox.
The parameters must follow the strict syntax below. The parameters orderId and orderTotal are required.The
productPurchasedId attribute must match the entity.id display variable.
<script type="text/javascript">
mboxCreate('orderConfirmPage',
'productPurchasedId=LIST OF PRODUCT IDs FROM ORDER PAGE',
'orderId=ORDER ID FROM ORDER PAGE',
'orderTotal=ORDER TOTAL FROM ORDER PAGE');
</script>
Note: You must pass the orderId parameter value as it allows Target to remove double calls (duplicate
orders). The parameter names are also case-sensitive and must be followed as shown above.
83Managing Your Recommendations
Using the Recommendations Download API
Use the recommendations download API to download your recommendations in a .CSV file that can be viewed in
a spreadsheet or text editor. The .CSV file lists all recommendations for each product key.
Every time you download recommendations results, all of the data is refreshed, not just the data that changed
between when you last ran the algorithm and when you downloaded the results.
The algorithm server updates the recommendations every two to six hours. Changes are reflected immediately in
the results of the download API.
This API is always available except during regularly scheduled maintenance windows, which occur on Thursday
nights at 8 PM Pacific Time or later.
API Structure
The download API uses a simple structure in a REST call. For example:
https://recommendations.omniture.com/rest?action=downloadRecommendations
&id=43&clientKey=24be79b2-d631-4207-a435-c6d5dd11059a
&client=clientcodehere
Where:
Id is the recommendation ID visible in the app. Find the ID by looking at the URL on the recommendation's Edit
page. Use the id=XXX value, not the groupId value.
clientKey is the API token that can be viewed and changed on the Settings page of the recommendations application.
clientcode is displayed under the client API token on the Settings page.
If you provide an invalid client key or recommendation ID, the error "Client key or recommendation id invalid" is
returned.
Deleting an Item From the System
You can use the Catalog Item Delete API to remove a single item from your Recommendations system.
This API deletes all information about an individual entity. Once the cache is updated after a few hours, the entity
no longer shows in any recommendations.These entities will be eligible to be "relearned" through a productPage
mbox request or a CSV product upload.
Note: There is no undo for this API.
The syntax for the Catalog Item Delete API is:
https://recommendations.omniture.com/rest?action=entity.delete&client=clientCode&clientToken=76bde9de-74f7-434b-ad1a-6d2d4c1b42d9&entityIds=Entity_ID
Where:
recommendations.omniture.com is the domain for the current recommendations environment you are using.
clientCode is your client code.
76bde9de-74f7-434b-ad1a-6d2d4c1b42d9 is the client token that is displayed on the settings page.The token
shown is a sample; yours will be different.
84Managing Your Recommendations

Entity_ID is the ID of the item you want to delete.You can delete multiple items by including multiple entityId
values separated by comma.
Deleting All Items From the System
You can use the Catalog Delete API to remove all items in your catalog.
The Catalog Delete API removes all entity.attributes for all items in your catalog. It does not remove behavioral data
associated with product IDs.When you upload your catalog again, your algorithm data will be correctly associated
if your product IDs have not changed.
Note: There is no undo for this API.
The syntax for the Catalog Delete API is:
https://recommendations.omniture.com/rest?action=entity.deleteAll&client=clientCode
&clientToken=76bde9de-74f7-434b-ad1a-6d2d4c1b42d9
Where:
recommendations.omniture.com is the domain for the current recommendations environment you are using.
clientCode is your client code.
76bde9de-74f7-434b-ad1a-6d2d4c1b42d9 is the client token that is obtained from the settings page. The token
shown is a sample; yours will be different.
Integrating Recommendations with Email
There are two ways to integrate email with recommendations.
The email service provider's capabilities determine which method to use.
Note: It is suggested that you talk with your account manager before implementing either of these options.
Option 1: Using a "Rawbox" Email Template
This is the preferred option.
Set up a recommendation as usual, using a template that has the desired look and feel for the email. Instead of
choosing an mbox on your site to show the recommendations, select a "rawbox" that is in the email template in your
ESP system. At email build time, ESP makes a call for each rawbox in each email that is being generated. A rawbox
call is very similar to an adbox, but instead of returning an image, the recommendations server returns raw HTML.
The ESP needs a way to take this HTML and include it in the email when it is sent.This approach allows us to track
performance of recommendations in emails, test them in the normal way with a recommendation, and continue
tracking on the site.
Sample rawbox URL:
http://CLIENT_CODE.tt.omtrdc.net/m2/CLIENT_CODE/ubox/raw?mbox=myAreaName&mboxContentType=text/html&mboxPC=UNIQUE_ID_PER_EMAIL&mboxSession=UNIQUE_ID_PER_EMAIL&mboxXDomain=disabled&entity.id=productId&mboxDefault=DEFAULT_URL&mboxHost=MBOX_HOST
Change the capitalized values per client/recommendation combination.
85Managing Your Recommendations

ExampleValueParameter
back-to-school-emailMY_EMAIL_NAMEmbox
text|htmltext|htmlmboxContentType
228722993UNIQUE_ID_PER_EMAILmboxPC
387873-3878783UNIQUE_ID_PER_EMAILmboxSession
disableddisabledmboxXDomain
1298-3989PRODUCT_IDentity.id
http://www.domain.com/welcome.htmlDEFAULT_URLmboxDefault
http://domain.com/MBOX_HOSTmboxHost
Note: Be sure to provide a unique value of mboxSession and mboxPC for each email recipient (i.e., for each
API call). If you do not provide unique values for these fields, API response might slow or fail due to the large
number of events generated within a single profile.
Option 2: Using the Download-Only Template
Set up a recommendation as usual, but choose download only in the presentation section instead of a template
and mbox combination.Then in the ESP, tell the ESP what recommendation ID you created.The ESP accesses
the recommendation data via API.This data shows which items should be recommended for a particular category
or key item, such as the item abandoned in the cart.The ESP then stores this data, connects it with their own look
and feel, displays information about each item, and then delivers that in the emails.With this option, the
recommendations server cannot directly track the performance of a recommendation or split traffic across multiple
algorithm/template combinations.
For more information about the download API, see Using the Recommendations Download API.
Backfilling Environments with Production Data
Backfilling other environments with entity recommendations from your production data is available as a setting update
request through Adobe Client Care.
This setting is useful for when you don't have sufficient behavioral data in lower environments (or host groups) to
generate recommendation results. One consideration is you won't be able to deliver results from the lower
environments as they will now show the chosen production environment results. Lower environment results can still
be checked in the Recommendation CSV download.
The backfill setting switches between using environment-specific product databases and replacing non-production
environment results with production environment database results. Separate product and traffic databases are
maintained for each environment determined by the Target host group and environment-specific data continues to
be collected for each host group irrespective of this setting.
The backfill setting doesn't affect any product or traffic data in the backend, it just affects the runtime, effectively
overwriting the lower environment id at request time with the chosen environment id. Ingestion will still send the
lower environment products to the lower environment while the backfill is set. As it's not affecting any data you can
switch back and get the lower env results as if it had been set to the lower environment all along.
86Managing Your Recommendations

The two options are:
• No backfill.This is the default configuration. In this configuration, entity recommendation delivery will be according
to the product relationship traffic in each host group / environment. Products seen in QA might not be seen in
production (and vice versa).
• Backfill set for production data to backfill to other environments. In this configuration your production entity
recommendation delivery results will be "mirrored" to all other environments.This means you're only using production
data and is useful when you don't have enough traffic to generate entity recommendation results in lower
environments.
Recommendations FAQ
The Recommendations FAQ contains answers to common questions.
Can I turn off backup recommendations?
Yes. Keep in mind that backup recommendations apply to all campaigns, not just one. Also, if backup
recommendations are disabled and there aren't enough real recommendations to fill the number of slots in the
template, then default content is shown.
Can I geo-target recommendations?
Use the built-in profiles that are shown in the Available Tokens window when creating a new user script profile in
Adobe Target.They are:
• profile.geolocation.city
• profile.geolocation.country
• profile.geolocation.dma
• profile.geolocation.state
• profile.geolocation.zip
Does the recommendations server store products in its back-end database independently for each campaign
or is the data shared across all campaigns? For example, if I create a new campaign, then download the
.csv file, does the file already have data in it, because data has already been collected for another campaign,
or do I get a new, empty .csv file? What if I create a new algorithm in an existing recommendation, then
download the .csv file?
Data is gathered the moment mboxes start sending recommendation data. This data is stored at the account level.
Recommendations do not need to be set up for this data to be gathered. Once the algorithm runs the first time
(usually within 30 minutes of setup), you have a full, ready to use recommendation. Recommendations driven from
Adobe Analytics data work historically as well; therefore, as soon as you set it up you can pull usage data from up
to two months in the past.
To collect data for multiple algorithms, do I need to set up each type of algorithm up front, or will setting up
just one type of algorithm capture data relationships for all other algorithm types?
Data collection is not tied to algorithm or recommendation setup.
How long is back-end data stored? Does it disappear after a certain amount of time? How long is reporting
stored? Does it disappear after one year like other Adobe Target data?
87Managing Your Recommendations

Usage data that drives an algorithm is completely separate from performance report data. Usage data expires after
two months. Product data expires after 60 days. Performance report data follows the Target expiration rules.
Is data in the .csv files ordered in the same way that it appears in a display recommendation?
Yes. For example, for a Purchase Affinities algorithm, if column A is the key, then column B is the product most
often purchased with product A. Column C is the second most purchased item with product A, and so on.
What actions will reset the campaign's CSV data?
When you change a campaign's catalog setting, algorithm type, or template, the cross-sell data (CSV) for that
campaign will reset to prevent any information that is no longer viable from displaying.
What actions will reset the Recommendation reporting data?
• Switching mboxes
• Switching algorithms
• Switching templates
How many recommended products are stored for each key? Does it depend on the algorithm?
More is displayed in the .csv file than is supported in display. Up to 20 products are displayed, but more can be
included in the .csv if you want to use that data for other purposes.
When I download the .csv file, does it only download data for the time frame specified when setting up a
recommendation, or does it download all data?
The .csv file follows the rules established in the algorithm setup, except for any information filtered at display time
(price limit and inventory limit). For example, if you set up a recommendation to use two weeks of data and only
include brand=jjesquire, your download only includes activity for JJ Esquire products for the last two weeks.
What is the difference between entity.categoryId and the regular parameter categoryId, and is there a
priority system?
The categoryId parameter is given higher weight than either entity.category or entity.categoryId even if
categoryId is in the URL and entity.categoryId is in the mbox.
If the character limit is exceeded, how are the categories prioritized? Which ones will be saved?
Categories are prioritized by chronology. The first category passed is the first one in the list of categories that a
product belongs to.
How many categories can a product support?
There is a 250-character limit for categoryId.
What is the default setting for conversion, restart the same experience or is it always convert?
It's restart the same experience. So, two visitors, two conversions.
How many views are needed for a product before a recommendation is served? For example, if two products
are viewed once in one session will they then be related to display in the view affinity recommendation for
the next user?
At least two sessions are required.Two people need to view the same product.
88Managing Your Recommendations
