
OWNER’S MANUAL

Table of Contents
Certications & Specications ....................... 7
Manufacturer’s Certications ...................................................................7
Manufacturer’s Specications .................................................................9
Introduction ................................................... 11
Warranty & Construction Standards ...................................................... 11
Specic Data ......................................................................................... 11
Education .............................................................................................. 11
Owner/Operator Responsibilities...........................................................12
Nautical Terms .......................................................................................13
Safety ............................................................ 17
Explanation of Safety Precautions ......................................................17
Fire ........................................................................................................18
Fire Suppression Equipment ................................................................. 19
Flooding, Swamping ..............................................................................19
Lifesaving Equipment ............................................................................ 20
Impaired Operation................................................................................21
Carbon Monoxide Poisoning ................................................................21
Information ............................................................................................24
Load Capacity .......................................................................................25
Power Capacity .....................................................................................25
Stability ..................................................................................................25
Warning Labels .....................................................................................26
Weather ................................................................................................. 28
Accident Report .....................................................................................28
Hotlines .................................................................................................28
Minimum Required Equipment .............................................................. 29
Additional Recommended Equipment .................................................. 30
Barletta Floorplan Occupant Positions - L Class ................................... 31
Barletta Floorplan Occupant Positions - E Class ..................................33
Barletta Floorplan Occupant Positions - C Class ..................................35
Navigation ...................................................... 37
Rules of the Road..................................................................................37
Basic Rules ...........................................................................................38
Boat Navigation Lights ..........................................................................39
Charts & Aids to Navigation...................................................................41
Environmental Considerations ..................... 43
Fuel & Oil Spillage .................................................................................43
Waste Disposal .....................................................................................43
Garbage Discharge Restrictions ..........................................................44
Excessive Noise .................................................................................... 45
Wake/Wash ...........................................................................................45
Exhaust Emissions ................................................................................ 45
Paint, Cleaning Agents & Other Substances .........................................46
Emergency Procedures ................................. 49
Explosion & Fire ....................................................................................49
Flooding, Swamping or Capsizing ........................................................51
Collision .................................................................................................51
Grounding..............................................................................................51
Leaks .....................................................................................................51
Towing ...................................................................................................52
Person Overboard ................................................................................. 53
Drowning ...............................................................................................53
Medical Emergency ...............................................................................53
Carbon Monoxide .................................................................................. 54
Propulsion, Control or Steering Failure .................................................54
Radio Communication .......................................................................... 54
Distress Signals.....................................................................................55
Operational Inspection .................................. 57
Before Departure ...................................................................................57
After Return ........................................................................................... 58
Operation ....................................................... 59
Fueling...................................................................................................59
General..................................................................................................60
Boarding (Wear a PFD!) ........................................................................ 61
Reboarding - Unassisted .......................................................................62
Starting, Stopping ..................................................................................62
Shifting ..................................................................................................64
Casting O ............................................................................................64
Approaching Dock ................................................................................. 65
Handling Dock Lines .............................................................................68
Anchoring ..............................................................................................69
Maneuvering/Maintaining Control..........................................................72
Operating In Shallow Water ..................................................................76
Water Skiing, Swimming & Diving .........................................................77
Version 8.20 August 2020
Maintenance .................................................. 81
Service Schedule ..................................................................................81
Maintenance Log ..................................................................................81
Maintaining Hull & Deck .......................................................................82
Housekeeping .......................................................................................84
Lifting .....................................................................................................85
Winterizing/Storing ................................................................................85
Recommissioning .................................................................................. 87
Troubleshooting .....................................................................................88
Systems.......................................................... 91
Trailering ...................................................... 107
Table of Contents
Certications & Specications ....................... 7
Manufacturer’s Certications ...................................................................7
Manufacturer’s Specications .................................................................9
Introduction ................................................... 11
Warranty & Construction Standards ...................................................... 11
Specic Data ......................................................................................... 11
Education .............................................................................................. 11
Owner/Operator Responsibilities...........................................................12
Nautical Terms .......................................................................................13
Safety ............................................................ 17
Explanation of Safety Precautions ......................................................17
Fire ........................................................................................................18
Fire Suppression Equipment ................................................................. 19
Flooding, Swamping ..............................................................................19
Lifesaving Equipment ............................................................................ 20
Impaired Operation................................................................................21
Carbon Monoxide Poisoning ................................................................21
Information ............................................................................................24
Load Capacity .......................................................................................25
Power Capacity .....................................................................................25
Stability ..................................................................................................25
Warning Labels .....................................................................................26
Weather ................................................................................................. 28
Accident Report .....................................................................................28
Hotlines .................................................................................................28
Minimum Required Equipment .............................................................. 29
Additional Recommended Equipment .................................................. 30
Barletta Floorplan - Occupant Positions ................................................31
Navigation ...................................................... 37
Rules of the Road..................................................................................33
Basic Rules ...........................................................................................34
Boat Navigation Lights ..........................................................................35
Charts & Aids to Navigation...................................................................37
Environmental Considerations ..................... 39
Fuel & Oil Spillage .................................................................................39
Waste Disposal .....................................................................................39
Garbage Discharge Restrictions ..........................................................40

Specications & Intro - 7
Certications &
Specications
Manufacturer’s Certications
A “CE Mark” means that the boat complies with all applicable European
direc tives for recreational boats. International Organization for Standardization
(ISO) standards are widely used within the certication process.
“NMMA Certication” means that the boat has been determined by the National
Marine Manufacturers Association to be in compliance with appli cable United
States Federal Regulations and American Boat and Yacht Council (ABYC)
Standards.
The following information is furnished in compliance with European direc tives
(Recreational Craft Directive, RCD) and Recreational Craft Sectoral Group
(RSG) Guidelines in eect as of the date of publication of this manual. The boat
manufacturer will provide additional information if standards are amended.
Manufacturer
Name _____________________________________________
Address ___________________________________________
City, State, Country __________________________________
Hull Identication Number (HIN) ___________________________
Engine Serial Number ___________________________________
Model Name ___________________________________________
Boat Type:
q Non-powered q Power Inboard q Sail
q Power Outboard q Power Multi-hull q Sail Multi-hull
Design Category:
q Ocean q Inshore
q Oshore q Sheltered Waters
Denition of the relevant design category(ies)
__________________________________________________________
__________________________________________________________
Barletta Boat Company, LLC
51687 County Road 133
Bristol, IN USA
8 - Specications & Intro
Length of hull - meters (feet) __________________________________
Beam of hull - meters (feet) ___________________________________
Maximum Rated Engine Power - kilowatts (horsepower) _____________
Mass of boat for trailering _____________________________________
Unladen Weight - kilograms (pounds) ___________________________
Maximum Load recommended - kilograms (pounds) ________________
Maximum Number of Persons Recommended ____________________
Conformity to Standards listed as follows: ________________________
__________________________________________________________
__________________________________________________________
__________________________________________________________
Specications & Intro - 9
Manufacturer’s Specications
ISO 10240 requires specic information to be provided. ABYC Technical
Information Report T-24 recommends additional data be provided. The following
may be included in an owner’s packet supplied with the boat.
• Warranty Terms and Conditions
• Hull Identication Number
• Engine/Outdrive Serial Numbers
• Type of Boat/Series Name
• Dimensions - meters (feet):
- Length
- Beam
- Vertical Clearance
- Draft
• General Arrangements:
- Deck Plan
- Interior Plan
- Prole
• Sail and Rigging Plan
• Propulsion:
- Engine Type
- Engine Layout
- Propeller
- Shafting
- Instructions on the safe operation
of the engine(s) and generator
• Electrical:
- Information on re or explosion
hazards
- Rated Amperage
- Voltages, Frequency, Phases
- Battery Capacity
- Switches, Fuses, Circuit
Breakers (location, type)
- Description of Switch Panels
• Lightning Protection System
• Tank Capacities - liters (gallons):
- Fuel
- Fresh Water
- Waste Holding Tanks
- Gas Cylinders (LPG) and
Information on the safe operation
of gas (LPG) appliances
- Information on the useable
capacity of tanks depending on
boat trim and loading
• System Diagrams:
- Potable Water
- Gray Water
- Black Water (Waste)
- Information on all water
systems including the location
of through hull and deck ttings
and the draining point. Also,
use of a Y-valve and pump-out
procedures for holding tanks.
- Exhaust
- Ventilation
- Bilge Pump(s)
- Steering
- Engine Cooling
• Openings in the Hull:
- Location of seacocks and
through hull openings
- Advice on keeping hull openings
closed or open as appropriate, to
minimize the risk of ooding.
- Advice on keeping other
openings closed when
appropriate, e.g. in rough water.
10 - Specications & Intro
• Instrument Use & Calibration
• Stability and Buoyancy and
Flotation Capability and
Explanation
• Strong Points for Docking, Lifting,
Trailering
• Safety Labels, Part Numbers, and
Ordering Procedure
• Bilge Pumps:
- Advice that the bilge pump is not
for damage control
- Location of each pump and its
capacity
- Operating Instructions
- Advice to check function at
regular intervals
• Fire Protection Equipment:
- Instructions on the location and
use of the re ghting equipment
- Identication and location
- of means of escape from the
interior in case of re
• Recommended Spare Parts
• Standard Equipment
• Optional Equipment
• Reference Manuals for Other
Equipment
• Contacting Manufacturers of
Other Systems
• Contacting Factory Service
Department
• Construction Features
• Construction Standards

Specications & Intro - 11
Section I
Introduction
This manual has been compiled to help you operate your craft with safety and
pleasure. It contains details of the craft, typical equipment supplied or tted, its
systems and information on its operation and maintenance. Please read this
manual carefully, and familiarize yourself with the craft before using it.
If this is your rst boat, or if you are changing to a type of boat that is unfa miliar
to you, for your own safety and comfort, please ensure that you obtain handling
and operating instruction/experience before “assuming command” of your boat.
Your dealer, local yacht club, local Coast Guard Auxiliary, or the US Coast Guard
oce will be pleased to assist you in nding sources of instruction.
Please keep this manual in a secure place, and hand it over to the new
owner when you sell the craft.
Warranty & Construction Standards
Your boat manufacturer may provide a Warranty Statement describing terms
and conditions under which defects in your boat will be repaired. Familiarize
yourself with the warranty and follow instructions regarding proper operation and
maintenance. Lack of attention to instructions can void the warranty.
A copy of the factory warranty for the boat is included with the documents you
received when the boat was delivered.
The manufacturer may also provide a Construction Standards Statement
detailing industry standards followed in building your boat. Consult your marine
dealer for additional information.
Specic Data
You must know specic data about your boat’s capabilities and requirements.
This information is available from the manufacturer and/or your dealer. See the
Manufacturer’s Certications & Specications sections in the front of this manual
for specic data that you should expect to have provided.
The owner’s manuals for equipment installed on or associated with your boat
is included with the documents you received when the boat was delivered.
Before operating equipment, particularly the engine, read the owner’s manual
accompanying the equipment.
Education
Learn how to operate your boat safely!!!!! This manual is not intended to teach
you everything you need to know about the operation of your boat. It is strongly
recommended that you receive training in proper boat handling and navigation
before using your boat.
12 - Specications & Intro
Some agencies which oer boating courses are:
• Coast Guard Auxiliary
• United States Power Squadrons
• Canadian Power and Sail Squadrons
• Red Cross
• State Boating Oces
• Yacht Clubs
Ask your marine dealer or check local listings for agencies near you. Information
is also available from the BoatUS Foundation by calling 1.800.368.5647, or you
can go to the Internet to check for boating courses.
www.boatus.com
www.boatsafe.com
www.uscgboating.org
www.boat-ed.com
www.nationalsafeboatingcouncil.org
For international information, consult your dealer.
Owner/Operator Responsibilities
The law requires the owner/operator to assist any person or boat in dis tress as
long as he does not endanger his boat. The owner/operator is also responsible
for understanding and complying with the following regulations, procedures and
operational requirements:
• Registration - Register your boat in the area where it is used most
frequently. Many areas require additional registration when an out-of
area boat is used within their boundaries. Contact boating authorities or
your marine dealer for registration requirements and forms.
• Insurance required, liability and hull coverage.
• Manufacturer’s warranty registration, procedures, terms and conditions.
• Safety equipment.
• Maintenance and safe conduct of the vessel and its systems.
• Safety and safety training of the passengers and crew.
• Rules of the Road for navigation and boat handling.
• Knowledge of boating safety courses.
• Knowledge of boat systems and capabilities/limitations of the boat.
• Break-in procedure.
• Seaworthiness and operational inspection of the boat.
• Safe operating practices and avoidance of product misuse.
• Avoiding use of alcohol or drugs while boating.
• Knowledge of federal, state, and/or local environmental regulations.
• Knowledge of accident reporting requirements (See USCG Accident
Report form).

Specications & Intro - 13
Nautical Terms
Abeam Object 90 degrees to center line on either side of boat.
Abaft A point on a boat that is aft of another, or toward or at the
stern of the boat.
Aft Toward the rear or stern of the boat.
Beam The width of a boat.
Bow The forward part of a boat.
Bulkhead Vertical partition in a boat.
Chine Meeting juncture of side and bottom of boat.
Chock Deck tting, used as guide for mooring or anchor lines. Also
a wedge to stop wheels from rolling.
Cleat A deck tting with arms or horns on which lines may be
secured for mooring. (Mooring cleats are not for towing or
being towed.)
Cockpit An open space from which a boat is operated.
Deck Upper structure which covers the hull between gunwales.
Draft Depth of water required to oat the boat and its propul sion
system.
Fathom Six feet.
Fenders Rope, plastic, wood, or rubber pieces hung over the side to
protect the hull from chang.
Freeboard The minimum distance from the waterline to the top edge of
the side of the boat.
Ground Tackle General term referring to anchors, anchor lines, etc.
Gunwale (Pronounced as gunnel} The top edge of the side of the
boat.
Hatch An opening in deck to provide access below.
Head Toilet or toilet area in a boat.
Headroom Vertical distance between the deck and cabin or cano py
top.
Helm Steering console.
Hull The basic part of a boat that provides buoyancy to oat the
weight of the vessel and its load.
Keel The major longitudinal member of a hull; the lowest external
portion of a boat.
Knot Unit of speed in nautical miles per hour. 1 knot= 1.15 MPH
Lee The side that is sheltered from the wind.

14 - Specications & Intro
PFD Personal otation device; life preserver.
Port A term designating the left side of the boat when fac ing
forward.
Rudder Movable xture at the stern used for steering.
Scupper Hole permitting water to drain overboard from deck or
cockpit.
Sheer Curve or sweep of the deck as viewed from the side.
Snub To check or tighten a line suddenly.
Starboard A term designating the right side of the boat when facing
forward.
Stem Eye Bolt with looped head mounted on extreme forward part of
bow.
Stern The aft end of a boat.
Transom The main member of the boat structure at the stern of the
boat extending from deck to keel.
Wake Disturbed water that a boat leaves behind as a result of
forward motion.
Windward Toward the direction from which the wind is blowing.
Specications & Intro - 15
LENGTH OVERALL
BOW
STERN
AFT FORWARD
DECK
COCKPIT
HELM
ENGINE
PORT
STARBOARD
BEAM
HIN (HULL
INDENTIFICATION
NUMBER) IS STAMPED
ONTO THE TRANSOM
TRANSOM
= STRONG POINT
16 - Specications & Intro

Safety - 17
Section I
Safety
The freedom of boating is a magnicent feeling. However, fun can be over taken
by disaster if you ignore safety precautions. This book presents basic guidelines,
but it cannot describe every possible risk you may encounter. You are strongly
urged to:
• Take a boating safety course and get hands-on training from your
boat dealer.
• Regularly review safety requirements.
• Maintain your boat and its systems.
• Have your boat inspected at least annually by a qualied
mechanic or dealer.
Explanation of Safety Precautions
This manual contains safety precautions which must be observed when operating
or servicing your boat. Review and understand these instructions and warnings.
Labels are used to alert the boater to potential hazards. Each label will contain all
four of the following messages:
1. Signal Word; Danger, Warning or Caution.
2. The nature of the hazard.
!
DANGER
Indicates an imminently hazardous situation, that if not avoided, WILL result
in death or serious injury. Limited to the most extreme situations. Red, if
color is used.
CAUTION
!
Indicates a potentially hazardous situation that, if not avoided, MAY result in
minor or moderate injury or property damage. It may also be used to alert
against unsafe practices. Yellow, if color is used.
NOTICE
Information that is important to proper operation or maintenance, but is not
hazard-related. Any color can be used.
Indicates a potentially hazardous situation that, if not avoided, COULD result
in death or serious injury. Orange, if color is used.
WARNING
!

18 - Safety
3. The consequences that can result if the instructions to avoid the
hazard are not followed.
4. Message panel - Instructions on how to avoid the hazard.
Fire
Fire is always serious, but it usually can be brought under control if you
are prepared and act quickly. Extinguishers required by the Coast Guard
or other boating law enforcement agencies are only the minimum needed.
Install re extinguishers where they might be needed, and test equipment
and emergency plans regularly.
Prevention is the safest method of ghting re. Remember:
• Use extreme caution and do not smoke while fueling.
• Extinguish smoking material carefully.
• Keep hatches and hull/cabin openings shut while fueling.
• Keep blowers o while fueling.
• Use the “sni test” to check for fumes in the bilge and engine
compartment after fueling and at regular intervals.
• Remove canvas before starting engine.
• Run exhaust blowers at least 4 minutes before starting engine(s).
• Ensure that ventilation systems are clear and not obstructed.
• Use only marine safety approved cooking and heating systems.
• Open ames demand constant attention.
• Be extremely careful when using liquied petroleum gas (LPG) or
compressed natural gas (CNG).
• Close valves to LPG/CNG cylinders and supply lines when not in
use.
• Ensure fuel does not leak. Regularly inspect all fuel systems
including LPG/CNG.
• Store ammable material in safety-approved containers.
• Keep ammable material containers in a locker sealed from the
boat interior and vented overboard.
• Use special care with ames or high temperatures near urethane
foam, if used.
• Check cleaning products for ammability.
• Ventilate when cleaning or painting.
• Disconnect electrical system from its power source before
performing maintenance. (See Systems - Electrical.)
• Replace breaker or fuse with same amperage device.
• Electrical appliances must be within rated amperage of boat
circuits.
• Observe the boat carefully while the electrical system is
energized.
• Only a qualied marine electrical technician may service the
boat’s electrical system.
1 2 3 4 5 6
8 9 10 11 12 13
15 16 17 18 19 20
12 23 24 25 26 27
29 30 31 32 33 34
7
14
21
28
35
Safety - 19
Fire Suppression Equipment
General
• Fire suppression equipment can be either xed or portable.
Fixed systems are located in the machinery compartments. They
should be supplemented by portable extinguishers mounted at
key sites, for example, near the engine compartment, galley and
helm.
• Coast Guard or other boating law enforcement agency
regulations govern the number and type of devices on board.
(See Safety - Minimum Required Equipment.)
Fixed System
• An automatic re extinguishing system may be installed
permanently in one or more machinery spaces. In the event of
a re, the system releases re-extinguishing material into the
compartment.
• Fixed system is wired to the ignition and turns on with the engine.
• An indicator light on the helm is lit when the re suppression
system is available. The light goes out when the system
discharges.
Portable Extinguishers
Fire extinguishers are classied according to re type:
• “A” - Combustible solids (wood, plastic)
• “B” - Flammable liquids (oil, gasoline)
• “C” - Electrical res
Sizes are identied by Roman numerals - from I (smallest) to V (largest). Small
size provides only a few seconds of reghting capability.
Flooding, Swamping
Flooding or swamping can be caused by many factors. Operator disregard for
hazardous weather and water conditions is one of the most common causes,
along with improper loading, handling and anchoring. Be aware of the possible
consequences of your actions. Have everyone wear a personal otation device
when boating. STAY WITH THE BOAT!
Remember:
• Certication Label states maximum weight/number of persons the
boat will handle safely under normal conditions. Give yourself an
extra margin in rough water. (See Safety - Load Capacity.)
• Install drain plugs before launching.
• Ensure proper bilge pump operation.
• Anchor from bow if using only one anchor.
• Match speed to sea conditions.
• Adjust trim and close openings in rough weather.
20 - Safety
• Reverse engine only when headway slows to prevent following
sea from swamping boat.
• Operate boat within maneuvering speed limitations.
Lifesaving Equipment
Wear a personal otation device (PFD) when boating. Boat operators are
required to carry one wearable personal otation device (fype I, 11, Ill or
V) for every person on board. Boats must also have at least one throw able
device (f ype IV). Classications of PFDs are:
• O-Shore Life Jacket (type I) - most buoyant, it is designed to
turn an unconscious person face up; used in all types of waters
where rescue may be slow.
• Near-Shore Life Vest (type II) - “keyhole” vest with otation-lled
head and neck support is also designed to turn a person face up,
but the turning action is not as pronounced; used in calm, inland
waters or where quick rescue is likely.
• Flotation Aid (type Ill) - vest is designed so conscious wearers
can turn face up; often designed for comfort while engaged in
sports such as skiing.
• Throwable Devices (type IV) - horseshoe buoys, ring buoys,
and buoyant cushions are designed to be grasped, not worn.
• Special-Use Devices (type V) - sailboat harnesses, white-water
vests, oat coats, and hybrid vests.
When purchasing PFDs look for a tag that says they are approved by the U.S.
Coast Guard and there should be an approval number on the tag. PFDs come in
dierent shapes, colors, and materials, and they are designed for dierent uses.
Choose your PFD with your planned activities and water conditions in mind. Also,
be sure you understand the require ments and regulations of the state or region in
which you are boating.
Children and non-swimmers must wear PFDs at all times when aboard. All
passengers and crew should wear them, since an unworn PFD is often useless
in an emergency. The law requires that PFDs, if not worn, must be readily
accessible, that is, removed from storage bags and unbuckled. Throwable
devices must be readily available, that is, right at hand. The operator is
responsible for instructing everyone on their location and use.
Size PFDs for the wearer. Children require special attention. Check state boating
law regulation for child PFD wear requirements.
PFDs require regular maintenance and service. Always dry your PFD before
storage. Take your PFD to your dealer or call the manufacturer for other
instructions about service and maintenance.
Test PFD buoyancy at least once a year.

Safety - 21
Impaired Operation
Give special attention to the eects of alcohol and drugs while boating.
No other single factor causes so many marine accidents and deaths.
Wind, waves and sun, heighten the eects of alcohol and drugs, so your
reactions may be quickly impaired.
Carbon Monoxide Poisoning
Each year, boaters are injured or killed by carbon monoxide. Most poison-
ings occur on older boats and within the cabin or other enclosed areas. Virtually
all of them are preventable.
Carbon monoxide is a potentially deadly gas produced any time a carbon-
based fuel, such as gasoline, propane, charcoal or oil, burns. Sources
on your boat include gasoline engines and generators, cooking ranges, space
heaters and water heaters. Cold or poorly tuned engines produce more carbon
monoxide than warm, properly tuned engines.
Carbon monoxide is colorless, odorless and tasteless and mixes evenly
with the air. It enters your blood stream through the lungs and displaces the
oxygen your body needs. Early symptoms of carbon monoxide poison ing are
irritated eyes, headache, nausea, weakness and dizziness are often confused
with sea sickness. Prolonged exposure can lead to death.
Carbon monoxide concentrationscan be hazardous on the open deck of
a boat, on a deck with an open bimini top, in an open cockpit, on a deck
with canvas enclosures, on the decks of adjacent boats, on nearby docks,
or in any open area that is in the vicinity of an engine exhaust. The area
of concern can be a considerable distance from the engine exhaust and still be
dangerous if the prevailing wind blows the carbon monoxide into the area. Be
alert to the symptoms of carbon mon oxide poisoning described in this section.
Carbon monoxide can collect within a boatina variety of ways. Exhaust
leaks, the leading cause of death by carbon monoxide, can allow car bon
monoxide to migrate throughout the boat and into enclosed areas. Even
properly vented exhaust can re-enter a boat if it’s moored too close to a dock or
another boat, or if the exhaust is pushed back by prevailing winds. Exhaust can
also re-enter boats when cruising under certain conditions-the station wagon
eect-especially with canvas enclosures in place.
CONTROL HAZARD - Federal laws prohibit operating a boat under the
inuence of alcohol or drugs. These laws are vigorously enforced.
WARNING
!
22 - Safety
Carbon monoxide awareness and regular & proper boat main tenance and
operation are your best defenses against injury from carbon monoxide.
What To Do
1. Schedule regular engine and exhaust system maintenance
inspec tions by experienced and trained technicians.
2. Be aware that dangerous concentrations of carbon
monoxide can accumulate when a boat, generator or other
fueled device is operat ed while the boat is at a dock or seawall
or alongside another boat. Do not run the boat or equipment for
an extended time under these conditions or without continuous
monitoring. Even if your boat is die sel powered, carbon monoxide
can accumulate from proximity to other boats.
3. Keep forward-facing hatches open, even in inclement
weather, to allow fresh air circulation in accommodation
spaces. When possi ble, run the boat so that the prevailing winds
will help dissipate the exhaust.
4. Do not confuse carbon monoxide poisoning with
seasickness or intoxication. If someone on board complains
of irritated eyes, head ache, nausea, weakness or dizziness,
immediately move the person to fresh air, investigate the cause
and take corrective action. Seek medical attention, if necessary.
5. Do not let people swim in the areas near engine or generator
exhaust.
6. Install a carbon monoxide detector in each accommodation
space on your boat. Check the detectors periodically for proper
functioning.
Checklist
Each trip:
q Make sure all exhaust clamps are in place and secure.
q Look for exhaust leaking from the exhaust system components,
indicated by rust and/or black streaking, water leaks, or corroded or
cracked ttings.
q Inspect rubber exhaust hoses for burned or cracked sections. All rubber
hoses should be pliable and free of kinks.
q Conrm that water ows from the exhaust outlet when the engines and
generator are started.
q Listen for any change in exhaust sound that could indicate an exhaust
component failure.
q Test the operation of each carbon monoxide detector by pressing the
test button.
Do not operate the vessel if any of these problems exist!

Safety - 23
At least annually: (performed by a qualied marine technician)
q Replace exhaust hoses if any evidence of cracking, charring or
deterioration is found.
q Replace each water pump impeller and inspect the condition of the
water pump housing. Replace if worn. (Refer to the engine and
generator manuals for further information.)
q Inspect each of the metallic exhaust components for cracking, rusting,
leaking or looseness. Pay particular attention to the cylin der head,
exhaust manifold, water injection elbow, and the thread ed adapter
nipple between the manifold and the elbow.
q Clean, inspect and conrm the proper operation of the generator cooling
water anti-siphon valve (if equipped).
WARNING!
These Conditions May Cause Carbon Monoxide to Accumulate:
Blockage of exhaust outlets can cause carbon
monoxide to accumulate in the cabin and cockpit
area-even when the hatches, windows, portholes and
doors are closed.
Exhaust from another vessel that is docked or
anchored alongside your boat can emit poisonous
carbon monoxide gas into the cabin and cockpit of
your boat.
The station wagon eect, or backdrafting, can cause
carbon monoxide to accumulate inside the cabin,
cockpit and bridge when operating the boat at a high
bow angle or with improper or heavy loading.
The station wagon eect, or backdrafting, can also
cause carbon monoxide to accumulate inside the
cabin, cockpit and bridge when the boat is under way
using protective weather coverings.
Slow speeds or having boat stopped (idling) in the
water can cause carbon monoxide gas to accu mulate
in the cabin, cockpit and bridge. A tail wind (force
of wind entering from aft section of yacht) can also
increase accumulation.

24 - Safety
Information
To nd out more about making boating safer - including how you can prevent
carbon monoxide poisoning on recreational boats - contact:
National Marine Manufacturers Association
200 E. Randolph Drive, Suite 5100
Chicago, IL 60601-6528
www.nmma.org 312.946.6200
United States Coast Guard Oce of Boating Safety
CG Headquarters G-OPB-3
2100 Second Street SW
Washington, DC 20593
www.uscgboating.org 202.267.0984
American Boat & Yacht Council, Inc.
3069 Solomon’s Island Road
Edgewater, MD 21037-1416
www.abycinc.org 410.956.1050
!
DANGER
EXTREME HAZARD -
1. Carbon monoxide can accumulate on the open deck of a boat
or on the open deck of an adjacent boat. This accumulation can
be more concentrated if the wind direction is unfavorable or if
an open bimini top is in use.
2. Carbon monoxide can accumulate on nearby docks on in the
open air near the exhaust of any engine.
3. Carbon monoxide concentrations can be extremely high at the
transom of any boat with engine exhaust through the transom.
Never swim near the back of a boat or near any engine or
generator exhaust.
4. Never play on the swim platform or ride on the swim platform
while the engine(s) is running. Never allow anyone to hold onto
the swim platform and be dragged by the boat. There is danger
of carbon monoxide poisoning and death from drowning.

Safety - 25
Load Capacity
• The Coast Guard requires boats
less than 6.4 meters (20 feet) to
have a Certication Label stating
the maximum number of persons
and the maximum weight the boat
will handle safely under normal
conditions. ISO international
directives require a builder’s plate
on boats up to 24 meters (78.7
feet).
• Certication Label is attached to
the hull or superstructure near the
helm or transom.
• Overloading violates regulations.
Do not carry more weight or
passengers than indicated on the Certication Label.
• The number of seats is not necessarily an indication of the
number of persons a boat can carry safely.
• When operating the boat above the idle speed, carry no more
passengers than there are real, safe seats, and insist that
passengers sit down in those seats. Follow the instructions of
seating chart labels if provided.
• The presence of the Certication Label does not relieve the
owner/opera tor from responsibility for using common sense and
sound judgment.
• Overloading, improper loading and distribution of weight are
signi cant causes of accidents. Give yourself an extra margin of
safety in rough water.
Power Capacity
Do not exceed the maximum engine power rating stated on the Certication
Label attached to your boat.
Stability
• The manufacturer may provide a statement with the owner’s
informa tion packet indicating the stability and otation standards
for your boat.
• Stability may be reduced if passengers or equipment are added
to the boat. Stability is more severely reduced if the added weight
is placed on the superstructure of the boat.
• Stability is substantially reduced by loose uids or weight within
the hull. Keep bilge area as dry as possible, and close openings
in rough weather.
• It is important to know the sea and wind conditions for which your
boat is assessed to be suitable. Consult the boat manufacturer
to determine the design category for your boat: A-Ocean, B-
Oshore, C-lnshore, D-Sheltered waters.

26 - Safety
Warning Labels
Warning labels are mounted at key locations to advise you of safety pre cautions
when operating or servicing equipment. Do not remove or cover warning labels.
Replace when illegible. Contact an authorized Barletta Pontoon Boat dealer for
replacement warning labels.

Safety - 27
28 - Safety
Weather
Learn to understand weather patterns and signs of change. Bad weather and
sea conditions can cause an uncomfortable and unsafe situation. Here are a few
basic weather-related rules:
• Check the forecast and sea conditions before leaving and while
underway.
• A sudden change in wind direction or speed or an increase in
wave height indicates deteriorating weather.
• Be aware of the hazards of thunderstorms, downbursts,
microbursts, and tornados. Monitor National Weather Service
broadcasts and Coast Guard marine weather information
including small craft advisories on VHF channel 22 on your
marine radio.
• Wear a personal otation device.
• If a storm approaches, immediately seek a safe harbor.
• If a storm hits, head the bow of your boat into the wind.
• If you encounter fog, determine your position, set a safe course,
slow down and alert other boats of your presence with a sound
signal.
• The best lightning protection is a properly grounded lightning
rod that is high enough to provide a protective umbrella over
the boat. Stay clear of the rod and all attached wiring. See your
dealer for more information.
Accident Report
The U.S. Coast Guard and state agencies require a report to be led by the
operator of a boat involved in an accident involving loss of life, disappear ance,
injury requiring treatment beyond rst aid, loss of boat or property damage
exceeding $500. Contact the state boating agency where the accid ent occurs for
a copy of the state’s accident report form. In the absence of a state enforcement
agency, contact the Coast Guard oce nearest the acci dent site. Other
countries have other reporting requirements. Consult your nation’s boating law
enforcement agency. A copy of the USCG Accident Report Form is included in
the back of this manual.
Hotlines
The Coast Guard oers many pamphlets on safety and other information not
covered in this book. Contact your local Coast Guard unit or call these toll-free
safety hotlines:
• U.S. Coast Guard 1-800-368-5647, www.uscgboating.org
• Canadian Coast Guard 1-800-267-6687, www.ccg-gcc.gc.ca

Safety - 29
Minimum Required Equipment
Consult your national boating law enforcement agency.
Equipment Class A Class 1 Class 2 Class 3
(Less than
4.8 meters
[16 feet])
(4.8 to less
than 7.9
meters
{16 to less
than 20 feet])
(7.9 to less
than 12.2
meters [26 to
less than 40
feet])
(12.2 meters
to less than
19.8 meters
[40 to less
than 65 feet])
Engine
backre
ame
arrester
One approved device on each carburetor of all gasoline
engines, except outboard motors.
Bell, Whistle
Some means of making ecient sound signal,
for example, whistle or air horn.
Must carry a
whistle and
a bell audible
for .5 nautical
mile
Fire
Extinguisher
- Portable
(if no xed re
extinguishing
system is
installed in
machinery
spaces)
At least one B-1 type Coast
Guard approved portable
marine re extinguisher. (Not
required on outboard motor
boats less than 7.9 meters [26
feet] in length without
permanently installed fuel
tanks and not carrying
passengers for hire, provided
construction of boat will
not permit entrapment of
explosive or ammable gases
or vapors.)
At least two
B-1 type
Coast Guard
approved por
table marine
re extinguish
ers, or at least
one B-1 type
approved
por table
marine re
extinguisher.
At least three
B-1 type
Coast Guard
approved
porta ble
marine re
extinguishers,
or at least
one B-1 type
plus one B-1
type approved
porta ble
marine re
extinguisher.
Navigation
Lights
Required between sunset and sunrise or in reduced visibility.
Muing
Device
Ecient muing device or system to prevent excessive or
unusual engine noise.
Personal
Flotation
Devices
(PFDs)
One Coast Guard approved type I, II or Ill device for each
person aboard, plus one throwable Type IV device. Type V
device is acceptable if worn for approved use. Always wear a
PFD when boating.
Ventilation Boats with closed compartments or permanently installed fuel
tanks must be equipped with an ecient natural or mechanical
bilge ventilator or meet applicable Coast Guard construction
standards for fuel and electrical systems.
30 - Safety
Additional Recommended Equipment
A wise boater will include many of the following items:
• Visual distress signals for day and night use (required in some
areas; consult local regulations)
• Sound signal devices such as horn, bell, whistle, or gong
• Marine radiotelephone
• Compass
• Depth sounder
• Charts
• Spare keys
• Emergency position-indicating radio beacon
• Portable radio with weather band
• Waterproof ashlight
• Batteries
• Mooring lines
• Fenders
• Extra propeller
• Ground tackle (at least 2 anchors, rhode, shackles)
• Paddles or oars
• Boat hook
• Safety approved gas can, properly stowed
• Bailer
• Spare parts kit (spark plugs, fuses, etc.)
• Tool kit
• First aid kit
• Carbon monoxide detection system if your boat has an enclosed
accommodation compartment

Safety - 31
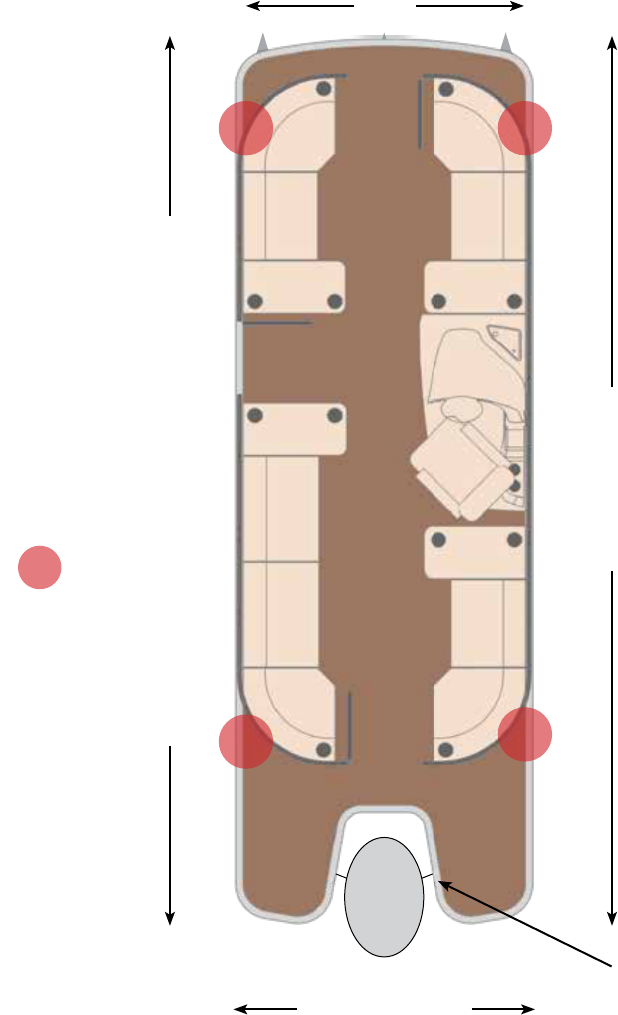
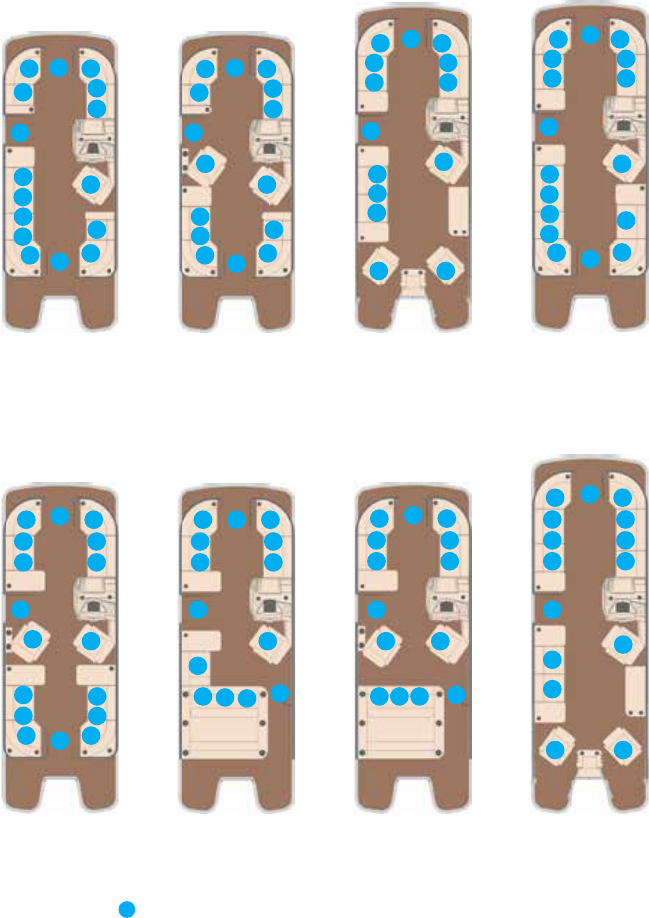
Barletta Floorplan Occupant Positions - L Class
Designated Occupant Postion - a standing or seated area with a minimum width
of 16 inches (40.6 cm) designed to be occupied at boat speeds in excess of ve
mph (4.3 kts). THESE DIAGRAMS ARE NOT PERSONS CAPACITY.
L23Q & QA
L23QC & QCA L23U & UA L23UC & UCA
L25Q & QA
= seated
L21Q L21QC L21U

32 - Safety
= seated
Barletta Floorplan Occupant Positions - L Class
L25QC & QCA L25U & UA L25UC & UCA
L25UE & UEA
Safety - 33
E20Q E20QC E22CC E22Q
E22QC E22U E22UC E24CC
= seated
Barletta Floorplan Occupant Positions - E Class
Designated Occupant Postion - a standing or seated area with a minimum width
of 16 inches (40.6 cm) designed to be occupied at boat speeds in excess of ve
mph (4.3 kts). THESE DIAGRAMS ARE NOT PERSONS CAPACITY.

34 - Safety
E24Q E24QC E24U E24UC
= seated
Barletta Floorplan Occupant Positions - E Class

Safety - 35
C20Q C20QC C22CC C22Q
C22QC C22U C22UC C24CC
= seated
Barletta Floorplan Occupant Positions - C Class
Designated Occupant Postion - a standing or seated area with a minimum width
of 16 inches (40.6 cm) designed to be occupied at boat speeds in excess of ve
mph (4.3 kts). THESE DIAGRAMS ARE NOT PERSONS CAPACITY.

36 - Safety
C24Q C24QC C24U C24UC
= seated
Barletta Floorplan Occupant Positions - C Class

Navigation - 37
Section 2
Navigation
Rules of the Road
Navigational rules are commonly called Rules of the Road. There are two types:
Inland Rules apply to vessels on United States inland waters; International
Rules apply to vessels on the high seas. Basic principles agree, but some
dierences exist. Learn and follow the rules that apply to your area.
It is impossible to establish rules for every situation. Therefore, it is important to
act prudently.
This manual is not intended to teach all the rules of navigation. It presents
a general overview, and you are strongly urged to get training before taking
command of your boat.
Understand important terminology distinctions:
• Power-Driven Vessel - A boat propelled by an engine (including
a sailboat propelled by engine and sail).
• Sailing Vessel - A boat propelled by sail only, with no engine in
operation.
• Underway - A boat not anchored, not made fast to shore and not
aground.
• Vessel Engaged in Fishing - A commercial shing boat with
gear that restricts maneuverability (does not include trolling lines
or other gear that does not restrict maneuverability).
CAUTION
!
• Follow navigation rules to avoid collisions.
• Less maneuverable boats generally have the right of way. Steer
clear of the stand-on (right-of-way) boat and pass to its stern.
• If a collision appears unavoidable, both vessels must act.
Prudence takes precedence over right-of-way rules if a crash is
imminent.
• The Rules do not relieve the give-way vessel of the obligation to
keep out of the way.

38 - Navigation
Basic Rules
Power-Driven Vessels must keep out of the way of:
• A vessel unable to maneuver or not under command
• A vessel whose maneuverability is restricted
• A vessel engaged in commercial shing
• A sailing vessel
Sailing Vessels must keep out of the way of:
• A vessel unable to maneuver or not under command
• A vessel whose maneuverability is restricted
• A vessel engaged in commercial shing
Vessels Engaged in Commercial Fishing must keep out of the way of:
• A vessel unable to maneuver or not under command
• A vessel whose maneuverability is restricted
MEETING
CROSSING
OVERTAKING

Navigation - 39
Boat Navigation Lights
Boats must display navigation lights when operating between sun set and
sunrise and during periods of reduced visibility, e.g., fog or rain, to alert
other boats to their presence and course. Although boat manufacturers
usually provide lights to comply with these rules, it is the operator’s
responsibility to know and comply with local laws.
Learn to recognize light groupings from dierent positions:
• Masthead Light - 225 degrees of visibility - white light
forward, 8 o’clock to 4 o’clock (approximate).
• Sidelight - 112 degrees of visibility - green light starboard, 12
o’clock to 4 o’clock (approximate); red light port, 8 o’clock to 12
o’clock (approximate.)
• Sternlight - 135 degrees of visibility - white light aft, 4 o’clock
to 8 o’clock (approximate).
• All-Round Light - 360 degrees of visibility - white light showing
in all directions.
• Anchor Light - 360 degrees of visibility - white all-round light.
Inland Rules exempt boats in special anchorage areas.

40 - Navigation
Some other types of navigational lights include:
• Sailboats operating under engine power must display the same
lights as other power-driven vessels.
• Sailboats under sail only must display green and red sidelights
and a white sternlight, but not a white masthead light. Boats
under sail may display two all-round lights, red over green, near
the top of the mast. Sailboats under 7 meters (23 feet) should
display such lights if possible, but if not, the boat must have an
electric torch or lighted lantern to show a white light in time to
prevent collision.
• Commercial shing vessels stopped while trawling must display a
green all-round light over a white all-round light.
• Commercial shing vessels stopped while engaged in other than
trawl ing operations must display a red all-round light over a white
all-round light.
• Towing vessels may display a yellow ashing or xed light.
• Enforcement vessels may display a ashing blue light.
• White strobe light is used as a distress signal.
Special use vessels such as public safety, pilot, dive boats and dredges have
other light requirements.
International and Inland Rules dier slightly on navigational light placement.
Understand the basics and learn the boat lights in your area. Avoid lights you do
not recognize.

Navigation - 41
Charts & Aids to Navigation
A vast expanse of open water o your bow might appear to be a go anywhere
playground or a place to become hopelessly lost. It is neither. How do you know
where to go? Just as maps and signs guide you on land, nautical charts and
buoys guide you aoat.
Nautical Charts provide vital information on water hazards and safe channels.
Several government agencies are responsible for charts for dierent types of
waterways: U.S. Army Corps of Engineers, Canadian Hydrographic Service,
National Oceanic and Atmospheric Administration, and Defense Mapping Agency.
Charts are also available from the following web sites:
www.usace.army.mil
www.nima.mil
www.charts.gc.ca
www.noaa.gov/charts.html
www.nauticalcharts.com
We strongly urge you to attend boating classes to learn charting and navigation
skills before taking the helm of your vessel. (See Introduction - Education.)
Buoys are strategically placed to keep you on course and out of hazardous
areas. Know their meaning and use them appropriately. Buoys are identi ed by
shape, color, light, and in reduced visibility by sound. There are two international
buoyage systems, one using Red Right Returning as a guide (Region B) and
the other using Green Right Returning (Region A). The follow ing map indicates
regions using each system. The illustration on the next page indicates placement
of basic navigational aids and colors for each region.
Example: Red Right Returning - when returning from sea or going up-stream,
keep red markers to starboard (right) and green markers to port (left). When
outbound, reverse the colors - red to port and green to starboard.
Buoys are sometimes not on station due to currents, heavy seas or other
conditions. Consult Local Notice to Mariners publication for information on
buoys o station and light outages. This information is available at
www.navcen.uscg.gov/lnm.
Buoyage
Regions
A & B

42 - Navigation

Environmental - 43
Section 3
Environmental Considerations
Fuel & Oil Spillage
Federal Regulations prohibit discharging fuel or oily waste in navigable waters.
Discharge is dened as any action which causes a lm, sheen or discoloration
on the water surface, or causes a sludge or emulsion beneath the water surface.
A common violation is bilge discharge. Use rags or spong es to soak up fuel
or oily waste, then dispose of it properly ashore. If there is much fuel or oil in
the bilge, contact a knowledgeable marine service to remove it. Never pump
contaminated bilge overboard. Help protect your waters.
If your boat is 26 feet or more in length, it must have a “Discharge of Oil
Prohibited” placard that is at least 5” x 8” posted in a prominent place on the
boat. This placard must say the following:
The Federal Water Pollution Control Act prohibits the discharge
of oil or oily waste into or upon the navigable waters of the United
States, or the waters of the contiguous zone, or which may aect
natural resources belonging to, appertaining to, or under the
management authority of the United States, if such discharge
causes a lm or discoloration of the surface of the water or
causes a sludge or emulsion beneath the surface of the water.
Violators are subject to substantial civil penalties and/or criminal
sanctions including nes and imprisonment.
Fill your fuel tank(s) and oil tank(s) to less than rated capacity to allow for
expansion of the liquids.
Waste Disposal
The use of Marine Sanitation Devices (MSD or head} is controlled by Federal
Law to eliminate the discharge of untreated sewage from vessels into the waters
of the United States. Discharge includes, but is not limited to, any soiling, leaking,
pouring, pumping, emitting, emptying, or dumping. If your boat is equipped with a
MSD, it must be a Certied Type I, or Type II, or Type Ill. The boat owner must be
familiar with the dierent types of MSDs and the allowable types that can be used
in the boating area.
CAUTION
!
Do not place facial tissue, paper towels or sanitary napkins in head.
Such material can damage the waste disposal system and the
environment.

44 - Environmental
• Use of Holding Tanks - If your boat is tted with a sewage
holding tank you must be knowledgeable about its operation
and maintenance, the use of a “Y” valve if one is installed, its
capacity, chemicals that are to be used, pump out procedures,
storage procedures to be followed if temperatures are below
freezing, and the location of discharge shuto valve(s).
• You must be aware of local environmental laws and you must
respect local discharge codes. Holding tanks are not to be
discharqed close to shore or in prohibited areas. Use marina
pump out facilities to empty the tank prior to leaving the marina.
Respect international regulations against marine pollution.
• Many areas prohibit overboard sewage discharge. Close and
disable ow-through waste system to prevent discharge in such
areas.
• Bag all refuse until it can be disposed of ashore. Regulations
prohibit disposal of plastic anywhere in the marine environment
and restrict other garbage disposal within specied distances
from shore.
Garbage Discharge Restrictions
The placard referenced above must contain the following information:
1. The discharge of plastic or garbage mixed with plastic into any
waters is prohibited.
2. The discharge of all garbage is prohibited in the navigable waters
of the United States, and in all other waters within three nautical
miles from the nearest marina.
NOTICE
• There is a possibility of being ned for having an operable direct
overboard discharge of waste in some waters. Closing the seacock
and removing the handle, or other means must be used to avoid ne.
• It is illegal for any vessel to dump plastic trash anywhere in the
ocean or navigable waters of the United States.
NOTICE
• If your boat is over 40 feet in length, you may be required to have a
written Waste Management Plan.
• If your boat is over 26 feet in length, you may be required to display
a placard that is 9 inches wide and 4 inches high which noties the
reader of the applicable restrictions.
• Operation of your boat in the Great lakes may require a dierent
placard.

Environmental - 45
3. The discharge of dunnage, lining, and packing materials that oat
is prohibited within 25 nautical miles of the nearest land.
4. Other unground garbage may be discharged beyond 12 nautical
miles of the nearest land.
5. Other garbage ground to less than one inch may be discharged
beyond three nautical miles of the nearest land.
6. A person who violates the above requirements is liable for
a civil penalty of up to $25,000, a ne of up to $50,000, and
imprisonment of up to ve years for each violation.
7. Regional, State, and local restrictions on garbage discharges
also may apply.
Note: Check with your dealer or the Coast Guard for clarication.
Excessive Noise
Many areas regulate noise limits. Even if there are no laws, courtesy demands
that boats operate quietly.
Local restrictions and international standards are constantly changing. It is
advisable to check with your dealer to be sure that your boat complies with the
local or international sound emission requirements that are applicable to your
boat and your particular usage area.
Wake/Wash
Powerboat wakes can endanger people and vessels. Each powerboat operator
is responsible for injury or damage caused by the boat’s wake. Be especially
careful in conned areas such as channels or marinas. Observe “no wake”
warnings. Some areas have no-wake or speed limit zones for other reasons,
such as protection of wildlife. The boat operator must comply with these added
restrictions.
Exhaust Emissions
Enclosed cabins or cockpits may accumulate carbon monoxide. You can be
overcome by fumes from your own engine or from neigh boring boats. Ensure
continuous movement of fresh air. Install one or more carbon monoxide detectors
in boat’s enclosed cabin or cockpit. Exhaust emissions can accumulate in
an open boat with only an open bimi ni top installed, on the open decks and
especially on the swim platform or the aft deck. Ensure continuous airow in this
situation.
CAUTION
!
Reduce speed in congested waterways.

46 - Environmental
Paint, Cleaning Agents & Other Substances
!
DANGER
EXTREME HAZARD - Ensure adequate ventilation. Gasoline engines
produce carbon monoxide gas (CO). Prolonged exposure can cause
serious injury or death. Depending on the concentration of CO in an
area inside or outside a boat, even brief exposure can cause serious
injury or death. To reduce CO accumulation, increase air movement
by opening windows or adjusting canvas. The following conditions
require special attention:
NOTICE
Refer to cleaning product specications and directions before use.
EXPLOSION/FIRE HAZARD - Ventilate when painting or cleaning.
Ingredients may be ammable and/or explosive.
WARNING
!
Environmental - 47
Consult your marine dealer about environmental regulations before painting the
hull.
Common household cleaning agents may cause hazardous reactions. Fumes
can last for hours, and chemical ingredients can attack people, property and
the environment. Avoid products containing chlorine, phosphates, and non-
biodegradable ingredients.
Anti-freeze used in the boat’s engine(s) should be propylene glycol instead of the
more common ethylene glycol, so that potential spillage will not harm wildlife.
48 - Environmental

Emergency Procedures - 49
Section 4
Emergency Procedures
The time to think about emergencies is before they happen. Plan ahead. Know
what to do before you encounter any of these situations. Wear a PFD when
boating.
Explosion & Fire
Explosion
• If explosion seems to be imminent, put on PFDs, grab distress
signals and survival gear, and immediately abandon ship.
Fire
• Turn o engines, generators, stoves and blowers. Extinguish
smoking materials.
• Fixed re suppression system, if equipped, has heat sensors that
automatically ood machinery space with a re extinguishant.
Allow extinguishant to “soak” compartment for at least 15 minutes
to cool hot metals or fuel before cautiously inspecting re area.
Have portable re extinguishers ready. Do not breathe fumes or
vapors caused by the re or extinguishant.
• If no xed reghting system is installed and re is in engine
compartment, discharge portable re extinguishers through
engine compartment access plate, if equipped. Do not open
engine hatch as this feeds oxygen to the re.
EXPLOSION/FIRE/ASPHYXIATION HAZARD
• Open ame cooking appliances consume oxygen. This can
cause asphyxiation or death.
• Maintain open ventilation.
• Liquid fuel may ignite, causing severe burns.
• Use fuel appropriate for type of stove.
• Turn o stove burner before changing the fuel source.
• Do not use stove for comfort heating.
FIRE/ASPHYXIATION HAZARD - Use special care with ames or high
temperatures near urethane foam, if used in construction of your boat.
Burning, welding, lights, cigarettes, space heaters and the like can
ignite urethane foam. Once ignited, it burns rapidly, producing extreme
heat, releasing hazardous gases and consum ing much oxygen.
WARNING
!

50 - Emergency Procedures
• If you have access to re, direct contents of extinguishers at base
of ames, not at the top.
• Throw burning materials overboard if possible.
• Move anyone not needed for reghting operations away from
the ames.
• Signal for help.
• Put on PFDs, grab distress signals and survival gear, and
prepare to abandon ship.
The boat owner/operator shall:
• Know the location of the re extinguishers and their capacities.
• Have re extinguishing equipment checked at the intervals
specied on the equipment.
• Replace portable re extinguishers, if expired or discharged, by
devices of identical re ghting capacity.
• Have xed re extinguishing system(s) relled or replaced when
expired or discharged.
• Ensure that re ghting equipment is readily accessible.
• Inform members of the crew about the location and operation of
the re ghting equipment.
• Keep the bilges clean and free from fuel and gas vapors.
• Replace parts of the re ghting installation with matching
components.
• Keep combustible materials away from the open ame devices.
• Never stow combustible material in the engine spaces.
• Identify exits from the boat.
The boat owner/operator shall never:
• Obstruct exits.
• Obstruct safety controls.
• Obstruct portable re extinguishers.
• Leave the craft unattended when appliances are in use.
• Use gas (LPG) lights on the boat.
• Fill fuel tanks or gas (LPG) bottles when machinery is running.
• Modify any of the craft’s systems.
• Smoke while fueling or handling LPG.
Abandoning Ship
• When clear of danger, account for all who were on board, and
help those in need.
• Use distress signal.
• Keep everyone together to make rescue easier.
BURN HAZARD - Swim against the current or wind if you abandon
ship. Leaking fuel will oat with the current and may ignite.
WARNING
!
Emergency Procedures - 51
Flooding, Swamping or Capsizing
• STAY WITH THE BOAT! A boat will usually oat even if there is
major hull damage. Rescuers can spot a boat much easier than a
head bobbing in water.
• Signal for help.
Collision
• Account for everyone on board.
• Check for injuries.
• Inspect structural damage.
• Reduce ooding.
• Signal for help.
• STAY WITH THE BOAT!
Grounding
Action depends on how hard the boat hits bottom and whether the boat remains
stranded. If it is a simple touch, you may need only to inspect the hull. If you are
aground, assess the situation before reacting. In some cases, throwing the boat
into reverse can cause more damage.
Basic Guidelines
• Check for leaks. If water is coming in, stopping the ow takes
priority over getting free.
• Inspect damage to hull, propulsion and steering systems.
• Determine water depth all around the boat and type of bottom
(sand, mud, rocks, etc.). This will help you decide which way to
move the boat.
• Determine if tide, wind or current will drive the boat harder
aground or will help free it.
Leaks
• Immediately switch on bilge pumps.
• Assign crew to operate manual pumps if needed.
• Check extent of leaks.
• If boat is taking on water, have someone take the helm while you
manage damage control.
• Slow or stop to minimize inow. However, if you can keep a hole
above water by maintaining speed, do so.
• If possible, patch the outside with whatever material is available
(tape or plastic for example). Also, try to stop the leak from the
inside by stung rags, clothing, cushions or any material that will
slow or stop the leak.

52 - Emergency Procedures
Towing
A recreational boat towing another is usually a last resort because of pos sible
damage to one or both boats. The Coast Guard or a private salvage company
is better equipped. A recreational boat may assist by standing by, and possibly
keeping the disabled boat’s bow at a proper angle until help arrives. Only when
conditions are ideal-that is, seas are calm, disabled boat is small, and one or
both skippers know correct technique-should a recreational boat tow another.
Towing Vessel
• Take care that your boat will not run aground, if attempting to tow
a grounded boat.
• Pass the towline to the disabled boat, since the towing boat is
more maneuverable.
• Use double-braided or braid-on-braid line. Never use three-
strand twist ed nylon; it has too much elasticity and can snap back
dangerously.
• Fasten the towline as far forward as possible on the upwind or
upcurrent side of the towing boat. Fastening it to the stern will
restrict maneuverability of the towing boat.
• If possible, use a bridle.
• Move slowly to prevent sudden strain on slack line.
• Be ready to cast loose or cut the line if the towing situation
becomes hazardous.
Vessel Being Towed
• Attach the towline to the stern eye or bow eye. Never use a
mooring cleat for towing!!!!!
• If the boat has eyebolts in the transom for pulling skiers, a towline
may be attached to a small bridle hooked to both eyebolts.
• If it is necessary to be towed after being freed, keep someone
aboard the boat to steer.
Both Vessels
• If you attach the towline to a tting, be sure that the tting is
through bolted and reinforced with a backing plate. Never use a
mooring cleat for towing!!!!!
• Creating a bridle with a line around the hull or superstructure will
dis tribute the load over a wide area; pad pressure points. This
technique can be used on both the towing and towed boat.
PERSONAL INJURY HAZARD - Towing or being towed stresses the
boats hardware and lines. Failure of any part can seriously injure
people or damage the boats.
WARNING
!
Emergency Procedures - 53
• Keep lines clear of propellers on both boats.
• Keep passengers on both boats clear of the towline that is pulled
taut.
• Never hold a towline while it is feeding out or after it is pulled taut.
Person Overboard
• Immediately sound an alarm and keep pointing to the person
over board.
• Throw a life preserver even if the person is wearing a PFD. It will
serve as a marker.
• Immediately stop or slow the boat, then circle toward the person.
• Keep person overboard on helm side so operator has the person
constantly in sight.
• Approach from downwind and move alongside into the wind for
pickup.
• When almost alongside, stop the engine in gear to prevent
dangerous propeller “windmilling.”
• As part of your emergency plan, consider what to do if you were
alone and fell overboard (e.g., wear PFD, keep signal device in
PFD, attach emergency stop switch lanyard to yourself).
• Be sure that there is a functional reboarding device or procedure
that will enable the person overboard or yourself to get back on
board the boat unassisted.
• Be sure that all passengers on board know the details of the
reboarding procedure and the operation of the equipment
required.
Drowning
• If a person is drowning, follow the standard lifesaving procedure.
Reach to pull the victim to safety. If they cannot be reached,
throw a life-saving device to them. Swim to rescue a drowning
victim only as a last resort. (Reach-Throw-Go)
• Immediate resuscitation is critical! At least two people on board
should be certied in CPR.
• Keep the victim warm.
• Use care in handling. Spinal injury may exist if the victim fell
overboard.
• Signal for help and/or take the victim to shore for medical
assistance.
Medical Emergency
In an emergency, you may be far from professional medical assistance. Be
prepared. Take a rst aid course, and carry a rst aid kit. Be aware of special
conditions that may aect anyone on board. Become familiar with the eects of
fatigue and hypothermia so that you can respond to these emergencies properly.
54 - Emergency Procedures
Carbon Monoxide
Carbon monoxide is an odorless, colorless, extremely toxic gas. Symptoms of
carbon monoxide poisoning are dizziness, ears ringing, headaches, nau sea and
unconsciousness. A poisoning victim’s skin often turns cherry red.
Have the victim breathe fresh air deeply. If breathing stops, resuscitate. A victim
often revives, then relapses because organs are damaged by lack of oxygen.
Seek immediate medical attention. See Section 1 - Safety, for more information
on Carbon Monoxide Poisoning.
Propulsion, Control or Steering Failure
• Shut o engine.
• Put out an anchor to prevent drifting.
• Determine if you can x the problem yourself. See engine
operator’s manual if engine is ooded.
• Signal for help.
• Have equipment available and be prepared to rig emergency
steering system, if equipped.
Radio Communication
Radio is the boat operator’s main method of receiving safety information
and summoning aid. VHF-FM radio is the primary means of short-range
communication. Single sideband radio (SSB) is used for longer range
communication.
VHF-FM Channel 16 and SSB 2182 kHz are designated for emergency use.
Such situations can be categorized as:
• Emergency - “MAYDAY, MAYDAY, MAYDAY” - Used when a life
or vessel is in imminent danger.
• Urgency - “PAN-PAN, PAN-PAN, PAN-PAN” (pronounced
PAHN-PAHN) - Used when a person or vessel is in some
jeopardy less than indicated by a Mayday call.
• Safety - “SECURITY, SECURITY, SECURITY” (pronounced
SAY-CURE-IT -TAY) - Used for navigational safety or weather
warning.
An emergency situation will be hectic and there will not be time to learn prop er
radio procedure. LEARN WHAT TO DO BEFORE YOU NEED TO DO IT.
If you hear a distress call, stop all radio transmissions. If you can direclly assist,
respond on the emergency frequency. If you cannot assist, do not transmit on
that frequency. However, continue to monitor until it is obvious that help is being
provided.
Emergency Procedures - 55
Distress Signals
Consult your national boating law enforcement agency.
Visual Distress Signals
• Coast Guard regulations require boats in coastal waters and the
Great Lakes to carry visual distress signals for day or night use,
as appropri ate for the time of operation. Exempt from the day
signals requirement, but not night signals, are boats less than 4.8
meters (16 feet), open sailboats less than 7.9 meters (26 feet),
boats participating in organized events, and manually propelled
boats.
• If you are required to have visual distress signals, at least three
safe ty-approved pyrotechnic devices in serviceable condition
must be read ily accessible. They must be marked with a date
showing the service life, which must not be expired.
• Carry three signals for day use and three signals for night use.
Some pyrotechnic signals, such as red ares, meet both day and
night use requirements.
• Store pyrotechnic signals in a cool, dry location. An orange
or red watertight container prominently marked “Distress
Signals” is recommended.
Other recognized visual distress signals include:
• Code ags November and Charlie
• Square ag and ball
• Black square and ball on orange background ag
• Orange ag (certied)
• Electric distress light (certied) - for night use only
• Dye marker (any color)
• Person waving arms
• U.S. ensign own upside down
Audible Distress Signals
Coast Guard regulations require one hand, mouth or power-operated whistle or
horn, audible for at least a half mile.
Other recognized audible distress signals include:
• Radio communication (see Emergency Procedures - Radio
Communication)
• Radio-telegraph alarm
• Position indicating radio beacon
• Morse Code SOS (3 short, 3 long, 3 short) sounded by any
means
• Fog horn sounded continuously
56 - Emergency Procedures

Operational Inspection - 57
Section 5
Operational Inspection
These inspection checklists should be updated/reviewed when equipment is
replaced, updated, or modied.
Before Departure
Weather-Forecast is safe. Evaluate the weather with
consideration of the type of seas (Design category) for which
the boat is assessed to be suitable. Category A, waves over 4
meters (13 feet), Category B, waves up to 4 meters (13 feet),
Category C, waves up to 2 meters (6.5 feet), Category D,
waves up to 0.5 meters (1.5 feet).
Required documents on board.
Navigation charts and equipment on board.
Safety equipment on board, including PFD for each person,
throwable life saving device, re ghting equipment, anchor
and lines.
Emergency stop lanyard operational.
Safety training-passengers and crew instructed on safety
proce dures and use of safety equipment and abandon ship
procedures.
Proper loading of passengers and gear according to Capacity
Label and for proper trim.
Engine(s) running and shifting properly.
Drain plug(s) installed.
Seacocks and thru hull hatches shut or open as appropriate.
Portlights and hatches shut or open as appropriate.
Bilge pumps working - suction and discharge clear.
Bilge blower (Engine compartment ventilation) working properly -
intakes and exhausts clear and hoses proper.
Navigation lights working.
Horn working.
Fuel tank(s) - lled to less than rated capacity to allow for
expansion.
Fuel system checked for leaks and fumes.
Fuel lter(s) tight and clean.
58 - Operational Inspection
Power steering or hydraulic steering uid checked.
Steering system checked and working properly.
Engine oil level or oil mixture is proper.
Battery terminals clean and connected properly and electrolyte
level proper.
Float plan led with friend or relative - include destination, route
and boat identication.
Boat and equipment operational check lists - completed.
Carbon monoxide monitor - operational.
Trailering (if applicable):
Boat position - secure on trailer
Tiedowns - tight
Winch - locked
Trailer hitch - connected
Engine clearance - in trailering position
Safety chains - attached
Electrical - lights, brake lights, turn signals working
Mirrors - adjusted for trailering
After Return
PFDs and other safety gear - dry, stowed for next use
Fuel tanks - lled (allow for expansion) to prevent condensation
Fuel system - no leaks
Bilge pump - operating properly
Bilge - clean, no leaks
Float plan - notify person with whom you led plan
Hull and deck exterior - washed with fresh water

Operation - 59
Section 6
Operation
Fueling
EXPLOSION/FIRE HAZARD
• Shut all engine compartment openings and accesses to cabin
while fueling.
• Store ammable material in safety-approved containers. Keep
containers in a locker designed by the boat manufacturer for that
purpose. Never store ammable material in a non-vented space.
• Never smoke while fueling.
• Keep exhaust blower o while fueling.
• Keep ventilation system free of obstructions. Never modify the
vent system.
• Fill to less than rated capacity of tank. Allow for fuel expansion.
• Do not let fuel overow through the tank vent.
• If fuel enters bilge, do not start engine. Determine cause and
severity. Contact a knowledgeable marine service to remove
fuel. Do not pump bilge overboard. Contact the boating law
enforcement agency for additional advice. (See Environmental
Considerations - Fuel & Oil Spillage.)
• Inspect fuel system regularly for leaks.
WARNING
!
CAUTION
!
Follow engine manufacturer’s recommendations for types of fuel and
oil. Use of improper products can damage the engine and void the
warranty.
NOTICE
• Use fresh fuel. Fuel that has been in a tank too long can form gum
and varnish, which may aect performance.
• Inspect diesel fuel lters regularly. Diesel fuel must be kept as
clean as possible.

60 - Operation
General
• Fuel during daylight.
• Check fuel ll plate label to ensure fuel is placed only in fuel tank
and that the proper type of fuel is being used.
• Avoid spills.
• Know your fuel capacity and consumption. Record the amount of
fuel used since your last ll-up, and compute the engine’s hourly
fuel usage. As a backup check to your fuel gauge, deduct the
average hourly fuel usage from fuel tank capacity.
• Observe the “rule of thirds”: one-third fuel for trip out, one-third for
return, one-third for reserve.
• Allow an additional 15 percent fuel reserve when operating in
rough seas because of greater fuel usage.
Before & During Fueling - Checklist:
Fire extinguisher - close at hand
Mooring - boat tied securely to fueling pier
Crew - at least one knowledgeable person present
Passengers - unnecessary people o boat
Engines - stopped
Electrical equipment, including blowers - power o
Windows, doors, hatches - closed
Smoking material - extinguished
Inboard tanks - grounded
Portable cans - placed on pier during lling
Fuel ll deck tting - marked “gasoline” or “diesel” or with ISO symbol
Fuel nozzle - in contact with can or ller pipe to prevent static sparks
Fill level - ll less than rated capacity of tank; allow for fuel expansion
Trim - fuel weight distributed equally if more than one tank
After Fueling - Checklist:
Windows, doors, hatches - open
Blower - operate at least 4 minutes before starting engine
Sni test - if fuel fumes remain, operate blower until fumes are gone. If
fuel odor remains, determine cause and correct before starting engine.
Fuel tank - secure ller cap
Spills - wipe up spillage and dispose of rags ashore

Operation - 61
Boarding (Wear a PFD!)
• Board only one person at a time.
• Step or climb into the cockpit. Never jump into a boat.
• Load gear after you are on board. Carrying heavy items while
climbing aboard can cause you to lose your balance and injure
yourself and/or others.
• Distribute weight evenly.
• Instruct passengers where to sit during on-plane operation
to reduce possibility of falling overboard during high speed
maneuvers.
• If gear is not immediately needed, stow it in secure area.
• Safety gear must be immediately and readily accessible at all times.
• Children and non-swimmers must wear properly sized personal
o tation device (PFD} at all times while on board. All passengers
and crew should wear a PFD, since an unworn PFD is often
useless in an emergency. Federal law requires that PFDs if not
worn, must be readily accessible. This means removed from
storage bags and unbuck led, not stored in a locker or other
area that is dicult to access. Throwable devices must be
STABILITY HAZARD
• Load boat properly. The manufacturer’s load rating is the max
imum allowed under normal conditions. Reduce the load if weather
conditions are adverse (high winds, rough seas, fog, storm
warnings, or small craft advisories).
• Allow passengers to ride only in areas that do not pose a hazard
to themselves or the boat. Do NOT allow passengers to ride on
the bow of a closed bow boat. Do NOT allow several passengers
to ride in the bow of a small, open-bow boat, causing the boat to
“plow” into the water. Do NOT allow passengers to ride on the
stern cushion or gunwales. Do NOT overload the stern.
• Observe manufacturer’s recommended on-plane seating
locations.
• Passengers should remain seated while boat is moving.
PERSONAL INJURY HAZARD - Stay alert. Use of drugs, alcohol or
other substances which impair judgment poses a serious threat to
yourself and others. The boat operator is responsible for the behavior
of passengers.
DROWNING HAZARD - Boats must carry one USCG approved properly-
sized, wearable personal otation device (PFD) for every person on
board. Boats must also have at least one throwable life preserver.
SLIPPING HAZARD - Wet decks are slippery. Wear proper footwear and
use extreme caution on wet surfaces.
WARNING
!

62 - Operation
conveniently located to make their use in an emergency easy
and eective. The boat operator is responsible for instructing
everyone onboard in the location and use of all life-saving
equipment. The best precaution is to wear a PFD while boating.
Reboarding - Unassisted
All Barletta Pontoon Boats are equipped with a stern ladder that is deep and
ergonomically designed for easy re-boarding into the boat from the water. The
stern ladder is mounted on the starboard side of the boat so that the captain does
not have to approach anyone in the water from their “blind” side.
Starting, Stopping
!
DANGER
EXTREME HAZARD - When engine is running, boarding ladder and
swim platform must not be used, and transom door (if equipped) must
be closed and locked.
EXPLOSION/FIRE HAZARD
• Run exhaust blower at least 4 minutes before starting engine.
• Check bilge and engine compartment for fumes before
starting engine.
• Remove accessory canvas/curtains that could obstruct the
ow of air into or out of the ventilation system.
CARBON MONOXIDE HAZARD - Operate the engine(s) only in a
well-ventilated area. Other boats and/or other obstructions to air ow
could cause an increase of Carbon Monoxide around and/or in your
boat. Carbon Monoxide is extremely toxic and could kill you or your
passengers.
• Attach emergency stop switch lanyard to operator.
WARNING
!
PERSONAL INJURY HAZARD
• Keep hands and ngers away from ladder hinge to prevent
injury
• Never approach or use ladder when the motor is running.
Severe injury or death will result from contact with rotating
propeller.
• Shut o motor when near swimmers. Severe injury or death
will result from contact with the rotating propeller.
• To prevent injury, swim platform and transom entry area
must not be occupied while engine is running and/or boat is
underway.
WARNING
!

Operation - 63
• See the engine operator’s manual for detailed instructions.
• Do not ignore any alarm from the engine, generator, or any
onboard alarm system. Seek out the source of the alarm and
correct the problem before casting o.
Starting Engine - General Checklist:
Fuel - supply adequate, including reserve
Oil - level adequate
Battery(s) - power adequate
Drain plugs - installed
Gear - neutral
Bilge blower - run at least 4 minutes before starting
“Sni test” - no leaks or fumes
Emergency stop switch - attached to operator and stop switch
Gauges (after engine warm-up) - readings normal (see engine
opera tor’s manual for normal range of gauge readings)
CAUTION
!
Stop engine immediately if oil pressure is too low or engine
temperature rises above normal. Do not restart engine until problem
is corrected.
NOTICE
Operate starter for 10 seconds maximum. Wait 2 minutes for the starter
and battery to recover and cool down before trying to start the engine
again.
OPERATION HAZARD
• The operator must be in correct position - facing forward,
hands on controls - when the engine is running.
• Ensure all gear is secured. Loose objects can be hazardous
when sliding or ying around onboard a boat.
PERSONAL INJURY HAZARD
• Shift to neutral before starting.
• Keep all parts of your body and clothing away from the
engine and propulstion system.
• Attach emergency stop switch lanyard to operator.
WARNING
!

64 - Operation
Stopping Engine General Checklist:
Gear - neutral
Mooring lines - secure
Engine - idle 5 minutes to cool
Ignition - o
Shifting
• Shift to neutral and allow boat to lose almost all headway before
shifting into forward or reverse.
• Reversing gear acts as a braking mechanism. Use caution.
Sudden slowing of forward motion may cause following sea to
swamp the boat.
• Become thoroughly familiar with the boat’s response to
movement of the controls. (See Systems - Controls.)
Casting Off
Procedures vary depending on wind, current and
other boat trac. Some general guidelines are as
follows:
• Start engine and allow time for it to warm-
up before casting o.
• Put adequate space between the boat and
the dock by “shoving o” before trying to
move away using the engine(s).
• Three secrets to successful maneuvering
are:
CAUTION
!
Turn o engine at idle speed. Racing the engine before switching o
can draw water into the engine through the exhaust, causing internal
damage.
If boat is equipped with an emergency stop switch, wear the lanyard
at all times when operating the boat but use it to stop only in an
emergency. Do not use it to shut o the engine during normal
operation.
CAUTION
!
Pause in neutral while shifting, wait for the boat to lose headway
(forward motion), and then shift quickly. Easing into or out of gear can
cause damage to gears or drive mechanisms.
Do not shift into or out of forward or reverse with th engine above idle
speed. Severe damage to the drive mechanism could result.

Operation - 65
- Operate the boat slowly and deliberately after planning your
maneuver.
- Since a boat turns at its stern, the stern must have enough
clearance to move back toward the dock as the bow moves
away from the dock.
- Use wind and current to move a boat whenever pos sible,
aided by spring lines as needed.
• Power slowly ahead about 1 meter (3 feet) with the after bow
spring line fastened. (See Operation -
• Handling Dock Lines.) At the same time, turn the wheel toward
the dock. The combination of rudder/propeller action and the
spring line will swing the stern away from the dock.
• Bring the spring line and fenders aboard.
• Check for loose or trailing lines that could foul the propeller and
secure them onboard.
• Back the boat with rudder/propeller centered until well clear of
the dock.
• Swing the bow away from the dock. The stern will move toward
the dock. Allow enough space between the boat and the dock so
that the boat will not hit the dock as the stern swings around.
• Proceed slowly, sounding a long horn blast to alert other boats.
Leaving Mooring
• When a boat is secured to a mooring (anchoring buoy) it is
heading into the wind or current and the stern is already clear.
Departing the mooring is easier than casting o.
• Start the engine(s) and allow for warm-up. Untie from the buoy
and back slowly away for several boat lengths. Be certain that the
area behind the boat is clear before moving.
• When you can see the mooring buoy, it is safe to move forward,
giving the buoy wide clearance.
Approaching Dock
Procedures vary depending on whether you tie up at a:
• Pier (parallel to shore) or wharf (not parallel)
• Slip (between pilings, at right angle to pier or wharf)
• Mooring (anchoring buoy away from shore)
66 - Operation
Some procedures apply in all situations:
• Move slowly.
• Plan maneuvers ahead of time.
• Use wind and current whenever possible to move or slow the boat.
• If there is more than one way to approach a berth, use the most
con servative maneuver:
High Wind/Current - Approach against the wind or current.
Mild Wind/Current - Approach against the stronger of wind or
current.
• Boats do not have brakes. Begin your approach in an open
area, before maneuvering room is restricted, to test the eects
of the wind and cur rent on your boat operation at the slower
maneuvering speed. To slow forward motion, back o on the
throttle. After the boat slows and the engine idles, shift to reverse
and gradually increase throttle until the boat stops. (See Systems
- Controls - Gear Shift & Throttle.)
• Use fenders to protect the boat. Never use arms or legs to try to
stop a boat’s movement. Boat materials are more easily repaired
than broken bones.
Pier/Wharf
• Approach at a 45 degree angle.
• When the boat is a few feet from the dock, bring the stern closer
by turning the wheel away from the dock, keeping the engine at
idle. Then shift to reverse and turn the wheel toward the dock.
Remember that some boats do not steer well in reverse, and tight
turns are dicult.
• Have adequate docking gear ready for use. Put fenders out and
attach lines on side of boat that will be next to the dock.
• If possible, station experienced crew at the bow and stern, each
with dock lines.
• When the boat is fairly close, throw the rst line under-handed to
a person on the dock, aiming it over his head and upwind. The
bow line is usually the rst line.
• If no one is on the dock, get as close as you can and loop any
line over a piling or cleat.
• Wait for boat to lose headway before securing lines. Secure the
after bow spring line rst.
• Keep engine running at idle and in neutral until all lines are
secured.
Slip
• Put out fenders.
• Turn the stern toward the slip, much like preparing to back a car
into a garage.
• Shift to reverse and maneuver slowly into slip.
• Shift to forward as you enter, turn wheel to other side and give
throttle a short burst of power to align the boat with the slip.
• Shift to reverse. Back slowly.
• When almost completely in, shift to forward to stop.
Operation - 67
• Keep engine running at idle and in neutral until all lines are
secured.
• In conditions of high wind and/or heavy current, it may be safer
and easier to enter the slip bow rst and follow the same safety
procedures as you secure the boat.
Mooring
• Moor only in designated areas. Never moor to a navigational
buoy.
• As you approach, note how other boats lie at mooring buoys.
Since they are heading into the wind/current, approach your
mooring at the same heading. If there are no other boats,
estimate the wind/current direction as best you can.
• Shift to neutral when you think you have enough headway to
reach your buoy.
• Station a crew member at the bow with a boat hook to pick up
the moor ing line. As the boat gets closer, you will lose sight of
the buoy from the helm so the crew member forward must signal
direction and distance.
• Keep engine running until the crew member signals that the
mooring line is secured.

68 - Operation
• When securing to a mooring buoy, use only an anchor bitt or
anchor cleat.
Handling Dock Lines
• Dock lines secure a boat in its berth and help maneuver the boat
close to the pier.
• Dock lines for recreational boats are usually made of nylon
because it stretches, is durable and is easy on the hands. Dock
lines may be twisted strands or braided. Dock lines are subject to
degradation by exposure to the sun. Inspect lines periodically.
• The number and size of dock lines increase as the size of the
boat increases.
• Bow Line - Fastened to the boat’s forward cleat and run forward
at about a 45 degree angle to a dock cleat or piling to prevent the
boat from moving astern. (Dock line 4 in the picture below).
• Stern Line- Fastened to the boat’s after cleat and run astern at
about a 45 degree angle to a dock cleat or pile to prevent the
boat from moving forward. (Dock line 1 in the above picture).
• Spring Lines - As many as four, but generally two:
• After Bow Spring - Fastened to the after bow cleat (Dock
line 3 in the above picture) and run aft to a dock cleat or
piling;
• Forward Quarter Spring - Fasten near the stern and run
forward to a cleat on the dock or piling (Dock line 2 in the
above picture).
• Spring lines are especially valuable when tide movement is
signicant. They also help in controlling the boat when leaving a
dock.
• If there are changes in water level from tidal eects, or even if the
mooring is a oating dock, there should always be allowance for
some movement of the boat when it is secured.

Operation - 69
Anchoring
The rhode is the line connecting the anchor to the boat.
• Nylon line is ideal because it is light, strong, stretches, can be
stowed wet and is easy to handle.
• Add a short chain between the anchor and the nylon line to
prevent abrasion of the line. The length of the chain will vary
depending on the boat size and the anchoring condition.
The scope is technically dened as the ratio of the rhode length to the verti cal
distance from the bow to the sea oor.
Scope = Rhode Length
Bow Height + Water Depth
• Scope depends on the type of anchor, type of bottom (mud, sand,
rock, etc.), tide, wind and sea conditions.
• Minimum is 5:1 for calm conditions; norm is 7:1; severe
conditions may require 1O:1.
Since you want to know how much rhode to use when anchoring, the formula Is:
Rhode Length = (Bow Height + Water Depth) x Scope
Example:
Rhode Length = (3 feet + 10 feet) x 7*
Rhode Length = 13 feet x 7*
Rhode Length = 91 feet
* Scope factor may range from 5 to 10 or more. Less than 5, the anchor
breaks out too easily.

70 - Operation
Lowering Anchor
• Be sure there is adequate rhode.
• Secure rhode to both the anchor and the boat.
• Stop completely before lowering anchor.
• Be sure the anchor line is clear and not entangled in other gear
or knotted up.
• If using windlass, refer to windlass operator’s manual.
• Be sure the end of the anchor line is secured to the boat and that
the line is removable from this attachment point in case of an
emergency or if the anchor is not recoverable.
• Keep feet clear of coiled line.
• Turn on anchor light at night and in reduced visibility.
Setting Anchor
• There is no best way to set an anchor. Experiment to see how
your anchor performs.
• One method is to turn the rhode around a bit and slowly pay out
as the boat backs from the anchor site. When the proper scope
has been reached, snub the rhode quickly, causing the anchor to
dig into the bottom.
• Reverse engine slowly to drive the anchor in and prevent it from
dragging.
• Secure the rhode to the anchor bitt or the anchor cleat.
Weighing Anchor
• Run the boat slowly up to the anchor, taking in rhode as you go.
• The anchor will usually break out when the rhode becomes vertical.
• Coil lines to let them dry before stowing. Clean the anchor and
rhode before stowing.
• Be careful that trailing lines do not foul in the propeller.
SINKING HAZARD - Anchor from the bow. A small current can make
a stern-anchored boat unsteady; a heavy current can drag a stern-
anchored craft under water.
COLLISION HAZARD - Anchor only in areas where your boat will
not disrupt other boats. Do not anchor in a channel or tie up to any
navigational aid. It is dangerous and illegal.
WARNING
!

Operation - 71
Clearing a Fouled Anchor
A fouled anchor can test your patience and ingenuity. One of the best meth ods
of breaking free is to set a tripline before you lower anchor.
• Attach a line to the crown or head of the anchor and the other
end to a oat.
• The line should be just long enough to reach the surface of the
water, allowing for tides.
• A 9.5 mm (3/8-inch) polypropylene line is a good choice because
it is light, strong and oats.
• If the anchor snags, pull vertically on the tripline to lift the anchor
by the crown.
A Final Word
An anchored boat is aected by wind and sea conditions. Because there is no
headway, there is no control. Be alert! Never leave an anchored boat without
a knowledgeable operator in board. If you must leave the boat unat tended, be
sure that the anchor will hold under all circumstances.
We suggest you read this section on anchoring again and fully understand rode
and scope and their eect on anchor performance.

72 - Operation
Maneuvering/Maintaining Control
!
DANGER
EXTREME HAZARD
Ensure adequate ventilation. Gasoline powered engines produce
odorless, colorless carbon monoxide gas (CO). Prolonged or brief
exposure, depending onthe concentration of CO, can cause serious
injury or death. Symptoms include dizziness, nausea, drowsiness. To
reduce accumulation of CO, increase air movement by opening windows
or adjusting canvas. The following conditions require special attention:
• Operating at slow speed or not moving through the water
(dead in the water).
• Operating with the bow high.
• Operating engine in conned spaces. Be aware of possible
CO from nearby boats in a conned docking area.
• Using canvas curtains that hinder proper ventilation.
• Blocking the intake or exhaust openings of the ventilation
sys- tem with improper position of fenders or rafting too
close to other boats.
• Winds blowing exhaust toward boat occupants.
• The danger of carbon monoxide poisoning is complex
because it is dependent on the concentration of the gas. Be
aware that high concentrations can cause injury or death
very quickly.
MANEUVERING HAZARD
• Always operate within maneuvering speed limitations.
• Exercise constant attention to the direction of the boat when
underway.
• Always keep a rm grip on the steering control and be ready
to adjust the throttle and/or shift controls.
PERSONAL INJURY HAZARD
• When underway, keep passengers clear of areas not
designed for riding. Especially hazardous areas include seat
backs, bow, gunwale, transom or forward platform and aft
sundeck.
• Passengers in bow rider seats must exercise constant
caution. When water is rough, move from bow rider area to
aft passenger seats.
• Remain alert. Use of drugs, alcohol or other substances
which impair judgement posses a serious threat to yourself
and others. The boat operator is responsible for the
behavior of passengers.
• Ensure emergency stop switch lanyard is always attached to
operator while boat is in operation.
WARNING
!

Operation - 73
General Considerations
• You are responsible for passengers’ actions. If they place
themselves or the boat in danger, in1n1ediately correct them.
• Know how your boat handles under dierent conditions.
Recognize your limitations and the boat’s limitations. Modify
speed inkeeping with weather, sea and trac conditions.
• Instruct at least one passenger on the proper operation of
your boat in case somethin should happen to you. At least one
passenger must know how to override the emergency stop switch
and restart the engine if the operator should fall overboard with
the stop switch lanyard attached.
• Instruct passengers and crew on location and use of safety
equipment and procedures.
Note: When underway, be sure all passengers are seated in
designat ed “seated while underway” positions. Improper seating
is considered illegal in some states.
SPEED HAZARD
• Operate boat at speeds within the operator’s ability to
maintain control and react if an emergency occurs.
• Reduce speed in congested waterways.
• Avoid showboating! Turning suddenly, jumping waves, or
steer ing close to other boats, docks or obstacles can cause
personal injury and boat damage.
• Observe and obey speed limits and all NO WAKE areas.
COLLISION HAZARD
• Turn on navigation lights at dusk and when visibility is
reduced in low light situations. Cruise at a reduced speed to
allow more time to avoid dangerous situations.
• Use extra caution when underwater/oating objects
may be present. Hitting an object at high speed or severe
angle can seriously injure people and damage your boat.
Use extreme care when operating in shallow water or when
operating in reverse.
• Scan the water continuously for swimmers and other boats.
WARNING
!
CAUTION
!
If stern drive or outboard engine is equipped with power tilt for
trailering, use it only for that purpose. Tilting drive unit into the
trailering zone while underway may damage the drive unit or engine.

74 - Operation
Visibility
• Federal Law requires the operator to maintain a proper lookout
by sight and hearing.
• Operator must insist on unobstructed vision, particularly to the
front. Move passengers if they block the view when boat is above
idle speed.
• Post a lookout to watch for obstacles when visibility from the
helm is limited due to operating conditions.
Steering
• Boat steering diers from automobile steering in several
important ways:
• Turn the boat steering wheel in the direction you want the
bow to go, but remember that the boat actually turns at the
stern.
• Boat steering is not self-centering.
• Boat steering is aected by engine and propeller torque, trim
setting, waves, current, and the speed of the hull through the
water.
• Boat steering is usually less precise in reverse. Some single
engine boats have very limited control when backing. Learn
how to back up your boat by practicing in a safe and open
area.
CONTROL HAZARD
• Boat steering usually is not self-centering. Steering is
aected by engine and propeller torque, trim plane, wave
and current action, and the speed of the hull through the
water. Constant attention and control of the boat’s direction
is required for safe operation.
• Some steering systems are especially sensitive to engine
torque, operator seating, passenger and gear loading and
gear stowage locations. Practice operating the boat under
varying load conditions to prevent accidents from loss of
steering control.
WARNING
!
VISIBILITY HAZARD
• Designate a lookout to watch for obstacles and other
vessels when the eld of vision from the helm is limited due
to operating conditions.
• It is the responsibility of the boat operator to keep the eld
of visibility from the helm clear. It may be necessary to move
passengers, gear, bimini tops, weather curtains or any other
obstacles that obstruct the operator’s eld of vision.
WARNING
!

Operation - 75
• Boats need headway for proper control. At low speed on some
boats, steering tends to veer from side to side. Keep steering
wheel centered to avoid overcorrecting. Make small corrections
and observe how your boat reacts, to avoid weaving to the left
and/or right.
• Under certain engine trim positions and/or bow-up attitude,
such as when getting up on plane, there may be a noticeable
pull on the steering wheel. This steering torque may be only
temporary, such as when planing o. The eect may be
eliminated or reduced by chang ing engine trim so that the
propeller shaft is more parallel to the water surface. In any case,
the operator must always keep a rm grip on the steering wheel.
Trimming
MANEUVERING/CONTROL HAZARD
• Ensure continuous visibility of other boats, swimmers, and
obstacles during bow-up transition to planing.
• Adjust engine to an intermediate trim setting as soon as the
boat is on plane or at your desired operating speed. This
procedure will avoid possible ejection of passengers due to
loss of control of the boat.
• Maximum control for turning, maneuvering, and cruising is
achieved when the boat is in the intermediate trim position.
WARNING
!

76 - Operation
• Most stern drive and outboard engines have a power trim which
enables you to change the angle of your drive unit by pressing
a but ton. See your engine operator’s manual for a complete
discussion of characteristics resulting from dierent trim settings.
• Power trim is designed to give quick acceleration with minimum
time in the bow-up transition to planing. This is most easily
accomplished by trimming the engine fully down/under/in and
setting the throttle at moderate to maximum.
• Once on plane, trimthe engine up/out slightly to avoid abow-down
con dition called “plowing.” Plowing can cause inecient and
unpredictable “bow steering” or “oversteering.” In this condition,
attempting to turn or encountering a moderate wave may result in
an abrupt turn or loss of control.
• Trimming the engine too far up/out can cause a bow-up condition
lead ing to “porpoising” (bouncing) or propeller overspeeding.
If you notice a sudden increase in propeller speed, reduce
engine RPM and trim the drive unit down/under/in until propeller
overspeeding stops.
• In most cases, best performance is obtained with the drive unit
positioned so that the boat runs at a 3 to 5 degree angle to the
water (front of hull just slightly out of the water).
• Some boats have planes (tabs) at the transom to control trim.
Use short bursts of rocker switches to adjust trim planes.
Pushing switches too far at once may cause sudden steering
problems. Adjusting one trim plane more than the other will
correct list caused by improper storage, too many people on one
side, or a strong cross wind.
• Outboard engines may have a trim tab to compensate for
steering torque which causes the boat to pull to one side. Torque
is a result of the propeller shaft not being parallel to the water
surface. See your engine operator’s manual if adjustment is
necessary.
Operating In Shallow Water
• Shallow water presents obvious hazards including insucient
water depth, sand bars, stumps, or other unmarked obstructions.
• Other hazards in shallow water include mud, sand, weeds, rocks,
logs, and debris. These hazards can damage your boat hull or
underwater gear and can foul your engine cooling water intakes,
which could cause overheating.
COLLISION HAZARD - Use extra caution in shallow water or where
underwater/oating objects may be present. Hitting an object at high
speed or sever angle can seriously injure people and damage your
boat.
WARNING
!

Operation - 77
• Know the area in which you are operating. Consult charts and
ask local boaters. If you know or suspect shallow water, post a
lookout and pro ceed slowly.
• When beaching, be aware how tide can aect the boat. Never
leave a beached boat unattended or unanchored.
Water Skiing, Swimming & Diving
Water Skiing
• Always have at least two people in the boat, one at the controls
and one who can easily and continuously look at the skier.
• Insist that anyone who water skis must know how to swim.
• Insist that skiers wear an approved personal otation device.
SWIMMING/DIVING HAZARD
• Keep clear of areas designated only for swimmers and skin
divers. Recognize markers used for such areas.
• Never swim or dive when there are approaching storms or
lightning in the area.
SKIING HAZARD
• Skiers must use a safety-approved personal otation device.
• Ski only during daylight when visibility is good.
• Avoid shallow water, other boats, navigational aids and
other obstructions.
• Keep at least 30 meters (100 feet) from other objects.
• Never drive directly behind a water skier. If the skier falls,
you will not be able to react quickly enough to avoid hitting
the fallen skier. The result could be severe injury or death.
• A competent observer must watch the skier at all times.
A com petent observer is a person who has the ability to
assess when a skier is in trouble, knows and understands
water skiing hand signals and is capable of helping a skier.
• Keep a downed skier in sight constantly.
• Turn o engine in gear before you get close to a person in
the water. This practice stops the propeller quickly to reduce
the risk of injury to the skier you are retrieving.
• Never back up to anyone in the water.
• Passengers in tho boat should use caution while towing
a skier. Sudden release of the tow rope can cause it to
backlash into the boat and injure a passenger(s).
PERSONAL INJURY HAZARD - Use transom tow ring or tow
pylon to pull skiers (Never use a mooring cleat to tow a skier!)
Unless specied by the manufacturer, any other use, such as
parasailing, kite ying, towing other boats, etc., may create too
much stress on the tow ring, resulting in personal injury and/or
equipment damage.
WARNING
!

78 - Operation
• Ski only during daylight when visibility is good.
• Never drive boat directly behind a water skier. You may hit a skier
with- in seconds after a fall.
• Ski only in areas where skiing is permitted.
• Observe local restrictions on length of tow line.
• Know and use water skiing hand signals.
Turn - Arm raised, circle extended nger
Pick Me Up, or Fallen Skier, Watch Out - One ski extended vertically
out of water
Back to Dock - Pat top of head
Cut Motor - Finger drawn across throat
Slower - Palm or thumb pointing down
Faster - Palm or thumb pointing up
Speed OK - Arm raised with thumb and nger joined to form circle
Stop - Hand up, palm forward, policeman style
Right Turn - Arm outstretched pointing to the right
Left Turn - Arm outstretched pointing to the left
Skier OK After Fall - Hands clenched together overhead
• Boat will handle dierently when towing a skier; experiment
carefully to learn the dierences.
• Skiers may start from shore or dock if boat trac allows. When
return ing, pick up skiers from water; do not ski back to shore or
dock.
• Give immediate attention to fallen skier.
• Approach skier in the water from helm side so operator can keep

Operation - 79
skier in sight.
• Turn o engine in gear (to prevent propeller “windmilling”) before
pick ing up skier.
• Never back up to anyone in the water.
Swimming
• Do not swim from a moving boat.
• Many areas prohibit swimming from boats except in designated
areas.
• Turn o engine and leave in gear (to prevent propeller
“windmilling”) while swimming.
• Be sure that the boat reboarding means (swim ladder or swim
step) is deployed before leaving the boat, or that the reboarding
means is deployable by the swimmer from the water.
Diving
Recognize and respect diving ags. Keep at least 30 meters (100 feet) away.
• Sport Divers Flag - Red ag with diagonal white stripe marks a
diver in the water.
• Code Alpha Flag - Blue and white pennant designates boat
being used in dive operations.
80 - Operation

Maintenance - 81
Section 7
Maintenance
This section contains information that requires use and disposal of oils, fuels,
and chemicals. Pay particular attention to the environment during the use and
disposal of these materials. Some geographical areas have special requirements
regarding the use of chemicals mentioned in this section. Check local codes for
proper use and disposal of these chemicals, including possible required permits.
Service Schedule
The manufacturer of each system in your boat should provide a recom mended
service schedule, listing items requiring routine attention, type of maintenance,
and frequency.
The schedule is a guide based on average operating conditions. Under severe
operating conditions, shorten service intervals.
Maintenance Log
Keep a record of all maintenance performed on your boat, using a form similar to
the following:
Date Component or System Description of Maintenance Engine Hours

82 - Maintenance
Maintaining Hull & Deck
Fiberglass/Gelcoat
• The hull and deck consist of a molded shell and exterior gelcoat.
Gelcoat is the nished outer surface with the shiny appearance
associ ated with berglass.
• Wash berglass surfaces regularly with clean, fresh water. Wax
gel coated surfaces to maintain luster. In northern climates,
semiannual waxing may suce. In southern climates, quarterly
waxing is required.
• If waxing does not restore shine, power bu with a quality rubbing
compound or use a heavy duty color restorer and boat cleaner/
polish. If gelcoat is heavily oxidized, sand lightly before bung.
Use care when bung and/or sanding because the nished
surface of the gelcoat can be damaged if this process is not done
properly. Seek the help of a professional boat service person if
you are not sure about your abilities in renishing berglass.
• Remove common stains with diluted detergent that is ammonia
and chlorine-free. Never use gasoline, acetone or any ketone
solvents.
Aluminum
• Wash aluminum with clear water and mild detergent. Protect
surface with liquid cleaner or wax. Do not use harsh chemicals or
abrasives.
• Remove stains with metal polish or ne rubbing compound.
• Use a rubber mallet or auto body tools to repair small dents.
More extensive repairs require special skills and equipment. See
your marine dealer.
• To minimize corrosion from contact between dissimilar metals,
use high quality caulking compound when mounting non-alumi-
num metallic hard ware.
SLIPPING HAZARD
• Gelcoat surfaces are slippery when wet. Use extreme care when
walking on wet surface.
• Use care in waxing to ensure walkways are not made dangerously
slippery.
EXPLOSION/FIRE HAZARD - Cleaning products may be ammable
or explosive and may cuase personal injury. Read cleaning product
directions before use.
WARNING
!

Maintenance - 83
Inatables
• Wash inatables with clear water and mild detergent. Use a mild
abra sive scrubber for stains.
• Patch minor holes and abrasions, following patch manufacturer’s
instructions. Extensive repairs must be done by a professional.
• Clean valves regularly with mild detergent and a toothbrush. Do
not use silicone, petroleum jelly or petroleum distillates.
• Replace 0-rings if cracked or pitted.
Bottom Paint
• A slight algae or slime forms on all vessels. The painted hull can
be wiped o with a coarse turkish towel or a piece of old rug
while the boat is in the water. Do not use a sti brush or abrasive
material.
• Service bottom paint seasonally. If painting is necessary, consult
your marine dealer.
• Do not paint zinc used to protect underwater hardware from cor-
rosion. Do not paint the metal that zinc contacts.
Wood
• Clean teak occasionally with teak cleaner, available at your ma-
rine dealer.
• Use bronze wool, not steel wool, on teak.
• A penetrating coating like teak oil will help protect teak.
• Read directions before using any cleaner. Some products will
damage gelcoat and aluminum. Follow manufacturer’s disposal
instructions for application equipment.
• Treat interior wood trim like household furniture, dusting and
polishing occasionally.
• To repair scratches in lacquered wood surfaces, sand lightly with
very ne sandpaper. Apply sealer and let dry. Sand lightly again
with very ne sandpaper, feathering adjoining surface. Apply as
many coats of moisture resistant lacquer as required.
EXPLOSION/FIRE HAZARD - Ventilate when painting or cleaning.
Ingredients may be ammable/explosive.
WARNING
!
NOTICE
Environmental regulations govern painting the hull. Some areas have
regulations regarding the use of pesticides and metals contained in
some bottom paints. Check your local codes for required permits and
restrictions.

84 - Maintenance
Deck Hardware
• Clean frequently with soap and water. A glass cleaner is usually
safe for stainless.
• Remove rust spots as soon as possible with a brass, silver or
chrome cleaner.
• Never use an abrasive like sandpaper or steel wool on stainless.
Acrylic Plastic Windshields
• Flood acrylic with water to wash o as much dirt as possible. Use
bare hand and water to dislodge caked dirt. Next, use a soft cloth
and non abrasive soap. Blot dry with a clean, damp chamois.
• Remove ne scratches with ne automotive acrylic rubbing and
polish ing compound.
Upholstery
• Clean fabrics with sponge or very soft brush, mild soap and warm
water.
• Rinse with cold, clean water and allow to air dry in a well ventilat-
ed area away from direct sunlight.
• Mildew can occur if ventilation is inadequate. Heat alone will not
pre vent mildew.
Housekeeping
There is a reason any well organized and cared for area is said to be “ship
shape.” Order and cleanliness are important elements of boating safety and
pleasure.
• Put items in their proper place to ensure you can nd them when
you need them.
• Coil or emish lines to keep them snarl-free and reduce the pos-
sibility of tripping.
• Clean and inspect systems to nd and x loose or damaged parts
before they become a critical need.
CAUTION
!
Use care when cleaning acrylic. A dry cloth and many glass cleaners
will scratch. Solvents will attack the surface.
CAUTION
!
Remove sun pads from deck when not in use. They may cause the
gelcoat nish to discolor and/or blister and crack.

Maintenance - 85
Lifting
• Pump water from bilge before hoisting boat.
• Keep bow higher than stern when lifting to allow water to drain.
• Use at, wide, belt-type slings and spreaders long enough to
keep pressure from gunwales to avoid squeezing the boat.
• Do not place slings where they may lift on underwater ttings.
Winterizing/Storing
Refer to the owner’s manuals for boat, engine, and trailer to obtain details in
preparation for winter storage.
Storing Boat on Land/Trailer - Checklist
• Boat:
o Bow - store higher than stern
o Bilge sump pump - pour in approximately 1/2 liter (1 pint) of
50/50 water/antifreeze solution
o Cover - support to prevent pooling of water
o Ventilation - allow air ow to prevent mildew
o Tiedowns - slack o to reduce hull strain
o Inspection - regularly during storage
o In-Floor Storage - The oor from the in-oor storage
compartment should be removed. Vacuum the compartment
to insure there is no moisture prior to storage or shrink wrap.
• Engine:
o Cooling system - drained
o Exhaust system - drained
• Batteries:
o Batteries - remove from boat; remove negative (-) cable,
then positive(+) cable
o Surface - clean
o Terminal bolts - apply protective corrosion inhibitor
o Storage site - wood pallet or thick plastic in a cool, dry place;
do not store on concrete
o Trickle charge - on. Do not keep the charger on and hooked
up continuously. Cycle it on and o periodically during
the storage period.
CAUTION
!
Do not use cleats, stem eye or stern eyes for lifting unless manufactur-
er labels them for such use.
CAUTION
!
Remove battery(ies) when boat is in long-term storage

86 - Maintenance
• Generators:
o Generators - ush with fresh water
o Drain plugs - remove from generator and muer
o Petcocks, seacocks - open
o Some raw water pumps require removal of the end cover to
drain properly. Check your owner’s manual for proper draining
procedure.
• Air Conditioner:
o Seacock - close
o Sea water pump - remove hoses
o Water lines - blow out with air pressure
o Pump - loosen screws on pump head, allowing water to drain
o Condenser - remove hoses
o Strainer - remove plug
o Circulate a 50/50 antifreeze/water solution throughout the system
after all of the above is completed and the system reassembled.
Check for leaks.
• Fuel System:
Gasoline:
o Fuel tank - lled with gasoline and a gasoline stabilizer/conditioner
o Engine - run for 10 minutes to ensure that gasoline in carburetor
and fuel lines is treated with gasoline stabilizer/conditioner
Diesel:
o Fuel treatment - add biocide to prevent bacteria and fungi
from contaminating diesel
o Fuel treatment - use petroleum distillate additive to help
assimilate water in fuel and prevent freezing
o Fuel tank - ll with treated diesel fuel
o Engine - run for 10 minutes to ensure that diesel fuel in
injectors and fuel lines is treated
• Fresh Water System:
o Faucets - all open
o Lines - open connection at lowest point to completely drain
lines; blow out lines to clean
o Water pump - turn on until lines are clear of water, then
turn o; remove hoses from both sides of pump
o Head(s) - drained
o Water heater - drained; hoses removed. Some water heaters
require pump out in order to remove all contained water.
EXPLOSION/FIRE/POLLUTION HAZARD - Fill to less than rated
capacity of tank. Filling until fuel ows from vents can cause
explosion, re, or environmental pollution. Allow for fuel expansion.
WARNING
!

Maintenance - 87
o Shower sump - pour approximately 1/2 liter (1 pint) of 50/50
water/ antifreeze solution in shower drain and run the shower
pump to be sure that the solution is circulated throughout the
drain system.
• Head System:
o System - ush with fresh water D Holding tank - pump out
o Water lines - remove
o Antifreeze - ush approximately 7-1/2 liters (2 gallons) of
50/50 water/antifreeze solution through toilet and let pump
run for 1 to 2 minutes
o Holding tank - pump out again
• Trailer (if used):
o Security - protect against theft; install a lock on the trailer
o Support - jack up trailer and install blocks to take weight o
wheels and springs
o Bolsters - add as necessary to support entire hull
o Trailer frame - ensure there is no trailer frame distortion,
which can distort the hull
• Cradle:
o Size - be sure it ts your boat
o Design - each cradle cross member (bunk) should be just
forward of the sling tags on the deck
o Support - ensure there are no gaps along the entire length
of supports
Recommissioning
Boat Stored on Land/Trailer - Checklist
• Boat:
o Components - inspect and clean
o Hull drain plugs - install
• Engine:
o Refer to engine operator’s manual for detailed information
on tting out after winter storage
• Batteries:
o Terminal posts - clean with wire brush or steel wool
CAUTION
!
Use an automotive or commercial propylene glycol base antifreeze. Do
not use alcohol base products.

88 - Maintenance
o Cable clamps - attach positive (+) cable rst, then
negative (-) cable; tighten
o Terminals and clamps - apply protective corrosion inhibitor
o Wiring - inspect for deterioration of insulation and corrosion
of end connections
• Fuel System:
o System - inspect for loose connections, worn or cracked
hoses, especially at the hose clamps, and check for leaks.
Repair as necessary.
• Miscellaneous:
o Thru-hull ttings - check to ensure water passage is
unobstructed and hoses/ttings are serviceable
o Navigation lights - check for proper operation
o Wiring - check for loose connections
o Switches - check for proper operation
o Equipment - check for proper operation
o Bilge blowers - check for proper operation; turn on
blowers and place hand over hull blower vent to make sure
air is coming from vent. Be sure that the ventilation hoses
are not obstructed or collapsed.
o Anchor lines and gear - clean, inspect, and replace as necessary
o Hull drain plugs - installed
o Bilge - clean thoroughly
o Engine and generator uids - check for proper levels
Troubleshooting
Problem Possible Solutions
Performance
Goes too slow • Change load distribution
• Adjust propulsion trim
• Clean hull, drive unit, propeller
• Change propeller
• Check engine*
Rides Rough • Slow down
• Adjust propulsion trim
• Change load distribution

Maintenance - 89
Passengers get wet • Change load distribution
• Lighten load
• Adjust propulsion trim
Vibrates • Reverse propeller to clear debris
• Have dealer check for bent propeller/shaft
• Check engine mounting or part hitting boat structure
Engine*
Coughs and sputters • Check fuel supply
• Turn on tank valves (if equipped)
• Clear obstructed or pinched fuel line
• Replace fuel pump
• Clean fuel lters/strainers
• Check fuel lter/sediment bowl for water in fuel
• Free choke movement
• Clean or replace spark plugs
Runs hot • Check oil level
• Replace broken/stretched cooling system belt
• Clear raw water intake
• Replace raw water pump
• Replace thermostat
• Replace pump impeller
Stops suddenly • Check ignition wiring and fuse
• Check battery connections
• Tighten distributor and spark plug wires
• Replace cracked distributor cap
• Replace rotor
• Do not attempt to modify or repair electronic
control modules. Check with your dealer.

90 - Maintenance
Steering
Steers erratically • Clean and adjust cable(s)
• Adjust propulsion trim
• Tighten cable brackets
• Tighten steering wheel
*Check engine operator’s manual for more detailed information.

Systems - 91
Section 8
Systems
Controls
Steering
Controls vary by manufacturer. Consult your owner’s information packet for
specic precautions and procedures for your boat.
• In a hydraulic system, steering wheel movement pumps hydraulic
uid through lines to a cylinder which transfers movement to the rud
der, stern drive or outboard drive. A reservoir holds extra uid; a valve
protects against overpressure.
• In a mechanical system, the steering wheel connects to a cable which
transfers movement to the rudder, stern drive or outboard drive.
• The operator must inspect the entire steering system frequently for
smooth, free, full-range operation. Steering cables, lines, and connec
tions are critical to safe operation. It is important to thoroughly check
all hardware, especially the self-locking nuts used to fasten the
steer ing link rod between the steering cable(s) and the engine. Never
replace these nuts with common or non-self-locking nuts, which
can vibrate o. A loose connection can result in sudden loss of
steering and control.
CONTROL HAZARD
• See engine operator’s manual and warning label posted on boat
if maneuvering speed is less than top speed. Maneuverability is
limited above specied speed. Sudden turns may cause loss of
control.
• Inspect and maintain steering system regularly. An improperly
maintained system may fail, causing sudden loss of steering
control, resulting in personal injury and property damage.
WARNING
!
CAUTION
!
• Follow instructions in owner’s information packet for
hydraulic steering system operation, lling and bleeding
procedures, alternative means of operation, maintenance
procedures, troubleshooting, uid specications, systems
or piping diagrams and replacement parts list.
• Follow instructions in owner’s information packet for me-
chanical steering system inspection and lubrication.

92 - Systems
Gear Shift & Throttle
• With common single lever control, gear shift/throttle lever controls
engine thrust direction and speed.
• Moving the lever forward to the rst detent position engages
the forward gear and then further movement increases the
throttle. To reverse propeller direction, move the lever back to the
neutral (middle) posi tion, and then move the lever back to the rst
detent position to engage the reverse gear. Increase the throttle
with fur ther aft movement of the lever.
• A release on the lever prevents accidental shifting.
• The “throttle only” option disengages the throttle from the shift
mech anism for starting.
• Some engine manufacturers recommend NOT stopping engine in
gear. See your engine operator’s manual.
• Test operation of system before getting underway. Visually
inspect condition of cable or hydraulic lines at least twice a year.
Ignition
• Key-operated switch at the helm or control box allows engine
startup.
• A buzzer may indicate power is ready before ignition.
• Start-in-gear protection prevents engine ignition unless gear is in
neutral. Inspect and test periodically to ensure system works.
• Key or toggle switch at the helm starts engine.
Emergency Engine Stop Switch With Lanyard
PERSONAL INJURY HAZARD - Shift to neutral before starting.
WARNING
!
CAUTION
!
• Shift only when engine is running. Some manufacturers
recommend NOT stopping engine in gear.
• Pause in neutral while shifting, wait for boat to lose head-
way, and then shift quickly. Easing into gear can damage
transmissions.
• Handle throttle and shift cables with care when performing
maintenance to avoid kinking or twisting.
PERSONAL INJURY HAZARD - Wear the lanyard at all times when
operating the boat but use it to stop only in an emergency. Do not use
it to shut o the engine during normal operations.
WARNING
!

Systems - 93
• An emergency engine stop switch turns o the engine when the
operator leaves the helm in an unsafe situation, for exam ple by
falling. Familiarize yourself with its operation and always use it.
• Before operating boat, attach
one end of the lanyard to the
operator and the other end
to the stop switch, usually
located on the control or near
the helm.
• The lanyard should be long
enough to prevent inadvertent
activation. Do not let lanyard
become entangled.
• Accidental loss of power can
be hazardous, particularly
when docking or in heavy
seas, strong current, or high winds. Passengers and crew may
lose balance and the boat may lose steering control.
• Should the operator fall out of the boat while it is moving and
the safety stop switch turns the engine o, it will take several
seconds for the pro peller to stop turning. The boat will continue
to coast for some distance and may cause injury to anyone in its
path and/or cause damage to other boats or property.
Power Trim & Tilt
• Power trim and tilt adjusts a stern drive or outboard propeller’s
angle to the hull. The switch is often on the gear shift/throttle
lever. (See Operation - Manuevering/Maintaining Control -
Trimming and Systems - Instruments - Trim Gauge.)
• Trim generally refers to an approximate 20-degree range used for
normal in-water opera tion. Tilt refers to more extreme angles of
adjustment.
• Tilt may be used at low idle speed when operating in shallow
water. See engine operator’s manual for precautions regard ing
shallow water operation.
• Tilt is also used to raise the engine for trail ering. Turn o engine
rst. Support out board engine; do not rely on tilt support lever for
trailering. (See Trailering - Using Trailer.)
CAUTION
!
Operating boat with the outboard engine tilted up may expose
cooling water intake holes, causing engine to overheat or the
water pump to fail. To avoid damage due to overheating, keep
water intake holes below the water line.

94 - Systems
Instruments
Cockpit layout varies by manufacturer. Gauges and switches at the helm may
include:
Tachometer With Hour Meter
• Tachometer indicates engine speed in
revolutions per minute (RPM). See the
engine operator’s manual for maximum full
throt tle RPM. Do not exceed the maximum
engine RPM.
• Hour meter measures cumulative hours
of engine operation. Use it to log engine
mainte nance, performance data and fuel
consumption.
Speedometer
• The speedometer indicates kilometers per hour
and miles per hour by measuring water pres
sure against a small hole in a device mounted
on the bottom of the transom. Another type
uses the ow of water over a paddle wheel
transmitter mounted on the bottom of the
boat.
• To ensure accuracy, keep the water
pressure hole clear and the paddle wheel
transmitter free of obstructions. Consult the
instructions in the owner’s information packet or
consult your dealer for proper cleaning and calibration.
Oil Pressure Gauge
• Oil pressure gauge monitors the engine’s inter nal
lubricating system.
• Note gauge reading when engine is new; it is
the “norm” to be referenced during the life of
the engine.
• Slight gauge uctuations are common.
Greater uctuations should be investigated.
(Note: Increasing engine RPM causes oil
pressure to increase slightly).
• Check oil level if pressure drops signicantly. If
level is normal, consult your dealer.
CAUTION
!
If oil pressure drops toward zero, stop the engine at once. Do
not restart until the problem has been corrected.

Systems - 95
Water Temperature Gauge
• Water temperature gauge indicates tempera ture
of engine cooling water.
• A thermostat brings water to a
predetermined temperature soon after
starting and maintains it while the engine is
running.
• See the engine operator’s manual for
proper gauge readings.
• Engine temperature readings below normal
while operating the engine can indicate a prob-
lem with the cooling system and should be corrected
to avoid engine damage. Consult your dealer for guidance.
Voltmeter
• Voltmeter indicates battery voltage.
• See the engine operator’s manual for
proper gauge readings. Signicantly higher
or lower readings indicate a battery or
alternator problem.
• This reading should be higher than 12 volts
when the engine is running if the alternator is
functioning properly.
Fuel Gauge
• Fuel gauge indicates amount of fuel in the
tank.
• The most accurate reading is at idle speed
when boat is approximately level.
• Because gauge is approximate, compare
to known fuel consumption rate and hours
of use.
Trim Gauge (Outboard and Stern Drive)
• Trim gauge indicates the angle of the propel
ler to the hull. (See Systems - Controls -
Power Trim & Tilt.)
CAUTION
!
If water temperature indication moves above normal, turn o the
engine at once. Do not restart until the problem is corrected.

96 - Systems
Propulsion
• Propulsion system consists of an engine turning a shaft which
transfers power to a propeller. Mounting may be outboard, stern
drive (inboard engine/outboard propeller), or inboard.
• Propeller pitch and diameter aect performance. Diameter
is often restricted by the engine installation, but pitch can be
changed. Consult your dealer for proper propeller selection for
your particular needs. For example, higher top speed may result
in less acceleration and a longer time to reach planning speed,
while better load-pulling performance may result in a lower top
speed.
• Small electric or single-cylinder gasoline powered motors are
used for trolling. Disconnect when not in use. Do not operate
two-cylinder or larger gasoline engines at trolling speed for an
extended time.
• Consult the engine operator’s manual for operation and
maintenance instructions.
Outboard Motor Installation
• Motor may be installed directly onto transom or onto a mounting
bracket. See engine operator’s manual for instructions.
• Ensure installation is tight before each use.
Bilge
• Bilge systems on deck style boat includes one or more drain plugs
and pumps to remove water.
• Before every use, inspect drain plugs and pumps. Routinely clean
pump strainer, oat switches, intakes and area under pumps.
• It is a violation of federal law to pump overboard bilge which
contains oil or fuel. (See Environmental Considerations- Fuel & Oil
Spillage.)
PERSONAL INJURY HAZARD - Failure to securely install and maintain
outboard motor mounting may cause motor to eject during operation,
causing death, serious injury or property damage.
WARNING
!
CAUTION
!
• Boat power capacity has been rated for maximum perfor-
mance and safety. Do not exceed the engine rating posted
by the manufacturer. Exceeding power capacity is illegal
in many areas.
• Never use a propeller which allows the engine to exceed
recommended RPM under normal wide-open throttle
operations.

Systems - 97
Drain Plugs
• At least one plug is located in the transom to allow water to drain
before trailering or storing. In larger boats, other plugs may be
located forward.
Bilge Pumps
• Bilge pumps are wired to the battery through a fuse or breaker
and operated by a switch at the helm.
• If the pump is not automatic, check bilge periodically for rising
water. Turn bilge pump switch on until water is pumped out, then
switch o.
• A oat switch on an automatic bilge pump activates the pump
when the bilge water reaches the switch level. The bilge pump
will turn o when the water level decreases below the switch
level. An automatic pump must also have a readily accessible
manual switch, usually located at the helm.
Ventilation
• Ventilation systems on stern drive or inboard boats remove
gasoline fumes from the bilge and engine compartment.
• Keep vents free from obstructions.
Bilge Blowers
• Blowers remove fuel fumes from the bilge.
• No ventilation system can remove the vapors of liquid fuel in the
bilge. (See Operation - Fueling.)
• Run blowers before starting, when the boat is idling, stopped
or oper ating below cruising speed, and when the generator is
SINKING HAZARD - Install drain plugs before launching.
WARNING
!
SINKING HAZARD - Ensure proper bilge pump operation.
WARNING
!
CAUTION
!
Run bilge pump only as long as necessary to remove water. Running
dry can damage bilge pump motor.
EXPLOSION/FIRE HAZARD - Run blower at least 4 minutes before
starting engine. Check bilge and engine compartment for fumes.
WARNING
!

98 - Systems
running.
• Check periodically to ensure hoses and wires are fastened.
• Do not move blower hoses or modify the ventilation system in
any manner.
Other
• Store ammables only in approved, vented containers securely
fastened in a locker sealed from the interior of the boat and
vented overboard. Storing ammables in areas not designed for
vapor removal creates a hazard.
• Be aware of carbon monoxide from your own or other boats.
Allow air movement to dissipate fumes. (See Emergency
Procedures.)
Fuel System
• See engine operator’s manual for ll locations and recommended
types of fuel and oil.
• Stop engine before refueling.
• Fill tank less than rated capacity. Allow for fuel expansion. (See
Operation - Fueling.)
• Stop engine, disconnect battery and drain fuel before servicing
fuel system.
• Lines, tanks, lters and pump are critical to safe operation.
Inspect integrity regularly. Look for rust, abrasions, loose ttings
and dry, cracked or mushy hoses. Replace with comparable
marine parts, not automotive parts.
Outboard
• Fuel tank(s) may be installed or portable.
• Remove portable fuel tanks from boat before refueling.
• Open portable fuel tank vent before operating.
• Connect fuel line to outboard engine according to engine
manufac turer’s recommended procedure.
• Primer bulb or choke lever prepares fuel system for starting.
Models with electronic fuel injection do not require priming before
starting.
• If the fuel tank is permanently installed, it must have a clearly
marked ll tting on the hull or deck, a gauge to indicate fuel level
and a fuel tank vent to the outside of the boat.
EXPLOSION/FIRE HAZARD - Fuel system connections that are too
loose or too tight can leak, resulting in fuel loss, environmental
pollution, and explosion/re hazard.
WARNING
!

Systems - 99
Stern Drive & Inboard
• Tank is usually under the cockpit deck or against the transom.
• Fill plate is located on the deck and is clearly marked for fuel
only.
Fuel Quality
• Follow the engine manufacturer’s recommendations on fuel type.
• Keep tank full (allow for expansion) to reduce condensation and
contamination.
Engine Exhaust
• Exhaust system removes gases created by the engine and vents
them aft.
• Inspect entire system for tightness before each use. Leaks may
permit carbon monoxide exposure.
• Many areas require a muer. Do not change the standard
system.
• On inboard engines, raw water is pumped through exhaust
manifolds, hoses, and muers and then overboard through hull
ttings. Make sure that water is owing from exhaust outlets while
the engine is running,
Engine Cooling
• Most marine engines circulate raw seawater around compo-
nents or through a heat exchanger on the engine to reduce
• temperature. To ensure system is working, look for water
owing from exhaust while engine isrunning (cannot do this with
stern drive). See the engine operator’s manual for ow diagrams
and thermostat replacement.
• Additionally, marine engines used in saltwater or in fresh
water may have an internal coolant system to dissipate heat.
Recirculating coolant must be replenished periodically with a
water/antifreeze mixture. See the engine operator’s manual for
coolant mixture, capacity and loca tion of the heat exchanger/
coolant reservoir.
CARBON MONOXIDE HAZARD - Ensure engine exhaust system is
working properly. Carbon monoxide poison is extremely toxic and can
kill.
WARNING
!

100 - Systems
Electrical
• The battery powers the direct current (DC) electrical system.
• An engine-driven alternator, or an AC battery charger, or an
inverter/ charger, or a converter recharges the battery(s).
• A voltage regulator controls alternator output to protect the
battery and accessories.
• Ask the marine dealer to analyze power needs if you add
accessories.
• Do not exceed rated amperage of electrical circuits.
• Fire can result from an overloaded electrical circuit.
Batteries
• The manufacturer selects batteries for their ability to furnish
power for starting and operating the DC system. Refer to the
manufacturer’s specication when replacing a battery.
• Battery switches, usually located near batteries, allow you to turn
on/ o battery current to the engine and accessories except bilge
pumps. Switch must be on to start the engine. To extend battery
life, turn o switch when leaving the boat for an extended time.
!
DANGER
EXTREME HAZARD
• Never use an open ame in battery storage area.
• Prevent sparks near battery.
• Battery will explode if a ame or spark ignites the free
hydrogen gas given o during charging.
SHOCK/FIRE HAZARD
• Disconnect electrical system from its power source before
performing maintenance. Never work on the electrical
system while it is energized.
• Electrical appliances must not exceed the rated amperage of
the boat circuits.
• Observe the electrical system carefully while it is
energized. The only electrical components which can be left
unattended are the automatic bilge pump, re protection and
alarm circuits.
• Only a qualied marine electrical technician may service the
boat’s electrical system.
WARNING
!
CAUTION
!
• Turn o engine before inspecting or servicing battery.
• Disconnect battery cables before working on electrical
system to prevent arcing or damage to alternator.
Disconnect negative (-) cable rst, then positive (+) cable.

Systems - 101
• Some boats have battery equalizers to balance voltage applied
between the batteries, cross over charging to send current from
the engine alternators to the low battery, or emergency start
systems to parallel batteries when one battery does not have
sucient crank ing amps to start the engine. See your owner’s
information packet or check with your dealer for the operation of
the particular system that may be installed on your boat.
• The battery must be in a well-ventilated area. If necessary, open
the battery compartment while charging the battery.
• Disconnecting battery:
• Turn o items drawing power.
• Turn o battery switch, if equipped.
• Remove negative (-) cable rst, then positive (+) cable.
• To replace cables, replace positive (+) rst, then negative(-).
• Battery maintenance includes:
• Inspect battery and charging system before every use.
• Inspect cell uid level monthly, more often in hot weather.
Replenish with distilled water.
• Coat terminal posts with corrosion inhibitor.
• Keep battery clean and dry.
• Remove battery during cold weather or long term storage.
• See engine operator’s manual for safeguards if boat is equipped
with battery switches.
Ignition Protection
• All electrical components in the bilge are ignition-protected to
avoid creating sparks in a gasoline environment. Replacement
parts must be marine-rated for ignition protection.
• Prevent sparks in the engine compartment. Cover battery
terminals with a nonconductive boot or install the battery in a
vented battery box or install the battery in a separate dedicated
compartment.
Breakers and/or Fuses
EXPLOSION HAZARD - Gasoline vapors can explode. Use only marine-
rated, ignition-protected parts when replacing engine components.
WARNING
!
SHOCK/FIRE HAZARD - Replace breaker or fuse with same amperage
device. Never alter overcurrent protection.
Note - Fuse size is especially critical in motor circuits like bilge
blowers and bilge pumps.
WARNING
!

102 - Systems
• Breakers and/or fuses are usually located under or near the dash
panel.
• Bilge pump fuses are usually located in the bilge adjacent to the
battery or at the main electrical distribution panel.
• If a breaker trips, determine and correct the fault, then reset by
pushing the breaker button.
• If a fuse blows, determine and correct the fault, then replace the
fuse.
Corrosion & Zinc Anodes
• Engines have zinc anodes to protect underwater hardware from
corro sion.
• Do not paint over zinc or between zinc and metal it contacts.
Fresh Water
Owner’s information packet will explain operation and maintenance of fresh water
system (if equipped).
Head
Owner’s information packet will explain operation and maintenance of head
system (if equipped}. Read the information supplied before operating or
maintaining the head or holding tank system installed on your boat.
CAUTION
!
Do not place facial tissue, paper towels, or sanitary napkins in
head. Such material can damage waste disposal system and the
environment.
NOTICE
There is a possibility of being ned for having an operable direct over-
board discharge system in some waters. Close discharge seacock and
remove handle, or take other security measures to avoid being ned
for breaking the law.

Systems - 103
EXPLOSION/FIRE/ASPHYXIATION HAZARD
• Open ames demand constant attention.
• Open ame cooking applicances consume oxygen. This can cause
asphyxiation or death. Maintain open ventilation. If not sure of
ventilation openings, ask manufacturer or dealer.
• Liquid fuel may ignite, causing severe burns.
• Use fuel appropriate for type of stove.
• Turn o stove burner before lling
• Do not use stoves for comfort heating.
• Never use ames to check for leaks
• Know the location of all emergency cut-o valves or switches and
how to use them.
WARNING
!
Galley
• The owner’s information packet will explain operation and
maintenance of your galley systems. Read it and understand it
before you operate or maintain your galley systems.
• Several types of galley stoves or appliances are available:
• Alcohol stoves often have an integral tank and pump to
pressurize system.
• Electric stoves and microwave ovens have a breaker at the
main distribution panel. Turn breaker o when not in use.
• Liquied petroleum gas (LPG) and compressed natural
gas (CNG) stoves have an external fuel tank and a valve to
provide fuel to the stove and to ignite the burner.
• LPG/CNG systems: Never leave these systems unattended while
in use.
• Do not obstruct access to LPG/CNG system components in
any way.
• Turn o fuel cylinder supply valve when stove is not in use.
• Close appliance valves before turning on fuel cylinder supply
valve.
• Keep valves on empty cylinders closed and disconnected.
Keep protective covers, caps or plugs in place. Store reserve
or empty cylinders on open decks or in gas-tight lockers
vented overboard in the same way that the cylinders in
use are stored. Do not use LPG/ CNG cylinder housings or
lockers for storage of any other equip ment.
• Do not smoke or use open ames when replacing LPG/CNG
cylinders.
CAUTION
!
Do not use solutions containing ammonia for leak-testing.

104 - Systems
• Test regularly for leaks. With appliance valves shut, open the cylin der valve
and observe the reading on the cylinder gauge. Shut the cylinder valve and
check the cylinder gauge after 3 minutes. If the reading is less than initially
observed, there is a leak. Discontinue use and repair. Additionally, with
cylinder and system valves open and appliance valves shut, apply soapy
water solution to all joints and ttings and look for bubbles to indicate leaks.
If leaks are present, discontinue use and have a qualied person repair the
system.
Alarms & Monitors
Some boats have alarms to indicate problems with high engine. water tem
perature, low oil pressure, carbon monoxide, ooding, or explosive fumes. The
manufacturer will provide information on those features, if available, as well as
on monitors or gauges not provided as standard equipment. (See Systems -
Instruments.)
Carbon Monoxide Monitor
• Carbon monoxide (CO) monitor systems are required equipment
when a boat has gasoline engine(s) or a gasoline generator and
has accom modation spaces.
• The CO monitor system will monitor the air in the main cabin
and each sleeping area. Its alarm will be heard in each of these
areas.
• The electronic sensor detects the presence of CO and an
increasing concentration of CO and ashes a visual and emits an
audible signal.
• There is no switch for this system, but the breaker or fuse for it
will likely be near the helm or electrical distribution panel.
• If there is a breaker, it will require the removal of a cover or strap
in order to turn it o.
• Always keep the CO monitor on.
Navigational Equipment
Compass
• A marine compass is optional on some boats. However, a
compass is invaluable in determining position and course.
• A qualied technician must adjust the compass for errors caused
by nearby iron, steel, magnets, or electric wires.
• Since a compass seldom can be corrected to zero deviation on
all headings, the technician who adjusts your boat’s compass will
give you a deviation card showing the correction to be applied in
naviga tional calculations. Keep this card at the helm at all times.
PERSONAL INJURY HAZARD - Alarm systems are intended to warn of
unsafe conditions. Do not ignore any alarm!
WARNING
!
Systems - 105
Horn
• A horn is considered an accessory, but is often included as
standard equipment. The horn button or switch is usually at the
helm.
• Test the horn periodically to ensure proper operation.
• Avoid spraying water directly into the horn.
Other
• If the boat is equipped with navigational equipment, such as
Depth Sounder, Radar, Loran, or Global Positioning System,
the manufacturer of that equipment will provide operation and
maintenance information.
Communication Equipment
• Communication equipment is optional but an important safety
feature.
• VHF-FM is the primary short-range (32 kilometers [20 miles])
radio telephone service.
• Some areas may require a license to operate radiotelephone
equipment. Consult your marine dealer.
• The radio/telephone manufacturer provides information on its
operation and maintenance.
Anchor
• Anchors are available in dierent shapes, sizes and weights to
suit dierent boats, uses and conditions. Consult your marine
dealer.
106 - Systems

Trailering - 107
Section 9
Trailering
Choosing Equipment
Choosing a Trailer & Tow Vehicle
• Trailer must match boat and load. Consult your marine dealer.
• Check area requirements for brakes, lights, emergency break-
away system and registration.
• Ensure tow vehicle has adequate power, cooling, transmission,
tires, brakes, wheelbase and suspension.
• Tow vehicle should weigh at least as much as the load it will pull.
Choosing a Hitch
• There are three basic hitch types:
• Weight-Carrying - The simple, relatively inexpensive
bumper hitch supports the entire trailer tongue weight at the
hitch. It is adequate for towing light trailers, but is banned in
some areas.
• Weight-Distributing - This hitch distributes the load to all
wheels of both the tow vehicle and the trailer. It can handle
heavier loads safely with less wear on the tow vehicle. Some
hitches have anti-sway bars to improve control by minimizing
trailer shtailing.
• Receiver Hitch - This hitch has greater capacity than a
bumper hitch, but less capacity than a Weight-distributing
hitch. This hitch has a square tube receiver, a hitch ball
insert, and a securing pin.
• The hitch ball is a critical component and must be the right size.
• Consult your marine dealer to select the right hitch, hitch ball and
weight capacity. For example, all 2-inch hitch balls are not rated
for the same weight capacity.
Using Trailer
Hooking Up
• To maintain control, ensure tongue weight is 5 to 10 percent of
the total weight.
Example:
2587.6 kg (3500 pounds) Total weight of boat and trailer
x5%
79.38 kg (175 pounds) Maximum tongue weight
158.76 kg (350 pounds) Maximum tongue weight (10%)

108 - Trailering
• To determine tongue weight:
• Use commercial truck scale to determine total weight of boat
and trailer.
• Park loaded trailer on a level, paved surface.
• Place bathroom scale on the ground under the coupler.
• On the scale, place a sturdy box to support the tongue jack
so that the trailer tongue is exactly parallel to the ground.
• Read tongue weight on the scale.
• If the tongue weight is not between 5-10 percent, adjust equip-
ment on the boat, the position of the boat on the trailer or the
placement of the axle on the trailer frame.
Securing Outboard When Trailering
• Place outboard in vertical operating position if ground clearance
is adequate.
• If additional ground clearance is needed, use an outboard
support bar to secure engine. Do not rely on tilt support lever for
trailering.
• Shift outboard to forward gear to prevent propeller from spinning
freely in wind while vehicle is moving.
• See engine operator’s manual for other pre cautions and instruc-
tions related to trailering.
Securing Boat to Trailer
• Attach bow to trailer with safety chain or U-bolt. Winch line should
be tight, but do not rely on winch line to fasten bow to trailer.
• Use at least two nylon web tiedowns to secure transom to trailer.
• Add tiedowns on side of boat if load or road conditions require.
Place sidetiedownsnear the stern where most of the boat’s
weight is located.
• Pad tiedowns where they contact the boat to prevent damage to
the nish.
• If boat cover is used, ensure drawstring is drawn tight. Add ropes
if necessary.
• Stow any loose gear whether or not you use a boat cover.
NOTICE
Use outboard support bar if engine must be tilted up for ground clear-
ance. Outboard tilt support lever is not intended to support the engine
when trailering.
CAUTION
!
Use adequate tiedowns for load and trip conditions.

Trailering - 109
Pre-trip Checklist:
q Trailer wheel bearings - greased
q Trailer and tow vehicle tires - correct pressure
q Trailer and tow vehicle lights and brakes - operating
q Spare tires, jacks, parts - usable
q Boat steering mechanism - lubricated
q Boat connections and linkages - tight
q Tongue weight - 5 to 10 percent of total boat and trailer weight
q Tiedowns - secured
q Winch line - taut
q Winch anti-reverse gear - engaged
q Turnbuckle/safety hook - secured
q Motor - up in traveling position
q Coupler - tight
q Hitch ball - greased lightly to reduce friction and secured to the
trailer with the latching mechanism
q Safety chains - crossed under trailer tongue and secured
q Tongue jack- raised
q Spring bars and/or stern tie downs - adjusted
q Boat canvas - down and secured
q Boat cover - secured
q Boating gear - secured
q Electrical connection to tow vehicle - plugged in and lights checked
q Registration, proof of insurance, other documentation - present

110 - Trailering
Pre-launch Checklist:
q Drain plugs - installed
q Boat cover - removed
q Wheel chocks - available
q Equipment - loaded for proper trim
q Bow and stern lines - fastened
q Fenders - rigged
q Tiedowns - removed
q Fuel and water tanks - lled
q Live/bait wells - lled
q Outboard or stern drive - tilted up
q Electrical connection to tow vehicle - unplugged
q Trailer wheel bearings - cooled
q Ramp conditions, water depth, current - checked (watch other boats)
q Drain plugs - check again to be sure they are installed
Launching
• Station someone to help direct.
• Back straight down the ramp.
• Stop with trailer wheels at water’s edge.
• Set brake and place chocks behind wheels of tow vehicle.
• Station helper to hold bow and stern lines from the ramp.
• Tighten winch brake and release anti-reverse lock. Do not dis-
connect winch cable.
• Release tilt latch (if equipped).
• Allow boat to slide o trailer.
• Unhook winch cable from bow and rewind or secure to trailer. Use
gloves to handle cable.
• Pull bow of boat to pier or oat and secure.
• Return trailer tilt to horizontal and lock.
• Remove chocks and drive tow vehicle and trailer from ramp.
• Lower outboard or stern drive unit.
• Connect fuel lines (outboard engine).
• Start engine and allow to warm up.
• Depart launch area slowly. (See Operation- Casting O.)
•
CAUTION
!
Allow trailer wheel bearings to cool before submerging.
PERSONAL INJURY HAZARD - Severe injury is possible if winch
system malfunctions or cable breaks. Do not let anyone stand near the
winch or cable.
WARNING
!

Trailering - 111
Hauling Out
• Prepare before approaching ramp.
• Secure fuel lines (outboard).
• Tilt outboard or stern drive unit up.
• Back trailer down ramp.
• Set brake and place chocks behind wheels of tow vehicle.
• If trailer has tilt mechanism, move it to up position.
• Guide boat onto trailer. Use bow and stern lines to help.
• Hook winch cable to boat’s stem eye. Use gloves to handle cable.
• Keep clear as boat is cranked onto trailer.
• Open drain plugs while boat is tilted.
• Rig sucient tiedowns to temporarily secure boat to trailer.
• Remove chocks and drive tow vehicle and trailer from ramp.
• If in salt water, wash down hull and trailer with fresh water as soon as
possible.
• Inspect propeller for nicks or other damage.
• Wipe hardware, including canvas snaps, with clean, soft cloth.
• Complete tiedown and secure gear for road. (See Using Trailer - Pre-
Trip Checklist.)
Maneuvering With Trailer
• Start with the basics - accelerating, slowing, stopping smoothly and
steadily.
• Increase distance from vehicle ahead. More stopping distance is re-
quired because of the added weight of the boat and trailer.
• Do not pass other vehicles until you feel comfortable pulling trailer.
• Maintain steady control in the wake of large trucks and buses.
• When turning, signal your intention well ahead of time.
• Swing a little wider than you would turn without a trailer.
• Stop every hour or so to inspect wheel bearings, connections, tie
downs, cover and other fastenings.
• Back up slowly with a trailer:
• Practice with an empty trailer in an empty parking lot.
• Get the feel of backing straight. Small, S-shaped steering correc-
tions will be needed.
• When you’re ready to turn while going backward, put your hands on
the bottom of the vehicle’s steering wheel. The trailer turns opposite
the towing vehicle’s direction. By moving the bottom of the steering
wheel in the direction you want the trailer to go, the towing vehicle
will go the opposite way.
• As the trailer starts to turn, move the bottom of the steering wheel
back to center. The trailer will continue to turn. Move the bottom
of the steering wheel opposite the direction of the trailer motion in
PERSONAL INJURY HAZARD - Severe injury is possible if winch
system malfunctions or cable breaks. Do not let anyone stand near the
winch or cable.
WARNING
!

112 - Trailering
order to slow the turning rate.
• If the trailer turns too sharply (“jackknifes”) or does not turn enough,
stop, pull ahead and try again.
• General Rule - Start the trailer in the direction you want it to go and
then follow it with the tow vehicle.
• Practice, practice, practice!

Trailering - 113
NOTES

114 - Trailering
NOTES

Trailering - 115
NOTES

116 - Trailering
NOTES

51687 County Road 133, Bristol, IN 46507
574.825.8900 BarlettaPontoonBoats.com
