
Installation Instructions Contents
File Formats 03
Ableton Live Pack 03
Apple Loops 04
EXS24 (Logic) 05
Logic Pro X Patches 06
Native Instruments Kontakt 07
Halion 08
Maschine – Maschine Packs 09
Maschine 2.0 Video Installation Guide 09
Maschine 2.0 Installation Guide 10
Maschine 1.8 Video Installation Guide 12
Maschine 1.8 Installation Guide 12

NN-XT 15
Reason Refills 16
Rex Files 17
MIDI Files 18
VST Presets 19
Absynth 19
FM8 21
Massive 23
Predator 25
Serum 27
Sylenth 29
SubBoomBass 30
Installing Bank Folders 31
Installing Individual Preset Files 34
MIDI Files 37
Vengeance Sound - VPS Avenger 38
MIDI Files 39
Loading VST and Plug-In Synth Instruments 40
Z3TA+2 Presets 44
Mac Installation 44
Windows Installation 45

Thank you for purchasing your Wave Alchemy product. Please follow
this step-by-step installation guide to get your specific software ready
for use!
(Note: These are general installation instructions and you may not find
all of the below formats within your purchased pack).
File Formats
Ableton Live Pack
1. Download the .zip folder provided, and double-click it to extract the
main folder to a computer location of choice e.g ‘Documents’ or on an
external hard drive.
2. Create a folder on your computer to install your live packs to.
3. Within Ableton Live click the ‘Add Folder’ option on the left pane
and locate the folder you have chosen. This shortcut will enable you to
load sample packs quickly and easily.
4. Double-click the ‘.alp’ file that you have downloaded, and you will
then be prompted to choose a location for the install > select the
folder path that you linked to Ableton in the previous step (3).
5. The files are now ready for use!

Apple Loops
1. Download the .zip folder provided, and double-click it to extract the
main folder to a computer location of choice e.g ‘Documents’ or on an
external hard drive.
2. Open Logic and locate your Apple Loops folder (press ‘O’ on your
computer’s qwerty keyboard) > your newly purchased Apple Loops can
be dragged and dropped/copied here, as shown in the picture below:
3. Select the ‘Move to Loops Folder’ option, and the loops will be
added to your Apple Loops Library.
Note: If you have a high number of sample packs, make a note of the
specific prefix that you wish to use e.g ‘FC2’ - this will enable you to
filter the results when searching for specific samples.
4. The files are now ready for use!

EXS24 (Logic)
1. Download the .zip folder provided and double-click it to extract the
main folder to a computer location of choice, e.g ‘Documents’ or on an
external hard drive.
2. Copy the Sampler Patches and Sounds & FX folders to Logic’s
‘Sampler Instruments’ folder- located via - username/Library/
Application Support/Logic/Sampler Instruments
3. You may wish to create a ‘User’ folder like the one shown above >
open Logic, as well as the EXS24 sampler to a software track, before
selecting the ‘…’ tab loading the EXS24 patches window (as shown
below).

4. The files are now ready for use!
Logic Pro X Patches
(Note: CFA Sound: Logic Pro X Deep House Patches is used as the
example)
1. Download the .zip folder provided and double-click it to reveal its
contents.
2. Copy the folder entitled ‘CFA-Sound Logic Pro X Deep House Patches’
into the following directory, as shown below:
•
Audio Music Apps/Channel Strip Settings/Instruments/...
3. Open/restart Logic Pro X and create a new instrument channel.
4. Click on the ‘Settings’ button of the created instrument channel and
load the patches through the patch list.
5. The presets are now ready for use!

Native Instruments Kontakt
1. Download the .zip folder provided and double-click it to extract the
main folder to a computer location of choice, e.g ‘Documents’ or on an
external hard drive.
2. Load an instance of Kontakt, and click the ‘Files’ browser tab to
navigate to your purchased sample pack.
3. Locate the main Kontakt sub-folder within the ‘Sampler Patches’
folder > you can locate and select the patch that you wish to use via
the lower window tab (as shown in the image above e.g
‘DRT_Kicks.nki’).
4. The software is now ready for use!

Halion
1. Download the .zip folder provided and double-click it to extract the
main folder to a computer location of choice, e.g ‘Documents’ or on an
external hard drive.
2. Open Halion within your DAW and navigate to the ‘Browser’ tab,
which will display your computer’s file system. Locate your purchased
sample pack from the computer destination that you saved it to, and
select the desired patch within the Halion ‘Sampler Patches’ folder.
Note: It is advisable to resave the patch, so that you will not have to
repeat this procedure.
3. The files are now ready for use!

Maschine – Maschine Packs
Maschine has a slightly different install process depending on the
version you have. Please follow the guidelines below and see the
additional notes if you are experiencing difficulties.
Note: Pop-up windows must be allowed within your web browser's
Settings area to allow the opening of the green hyperlinks below,
which enable you to watch the tutorial videos.
Maschine 2.0 Video Installation Guide

Maschine 2.0 Installation Guide
(Note: Post Dubstep & Future Garage is used as the example).
1. Download the .zip folder provided and double-click it to extract the
main folder to a computer location of choice, e.g ‘Documents’ or on an
external hard drive.
2. Open Maschine and select the ‘File’ > ‘Preferences’ and then
‘Library’ options, before clicking the ‘User’ tab.

3. Click ‘Add’ to open the file browser and locate the main pack folder
which contains the pack’s Projects, Groups and Samples, for example
‘Post Dubstep & Future Garage’.
4. Once the folder has been located, you will need to add an alias
name for the pack > click under ‘Alias’, and type the exact name of
the pack including numbers, capitals and symbols.
Important Notes:
•
The alias should be written as: Post Dubstep & Future Garage
•
The alias should not be written as: post dubstep and future
garage
5. Now close the Preferences window and you will see the pack within
your user library!
6. The files are now ready for use!

Maschine 1.8 Video Installation Guide
(Note: Skip to 2.02 mins)
Maschine 1.8 Installation Guide
1. Download the .zip folder provided and double-click it to extract the
main folder to a computer location of choice, e.g ‘Documents’ or on an
external hard drive.
2. Open Maschine and select the ‘File’ > ‘Preferences’ and then
‘Library’ options, before clicking the ‘User’ tab.
3. Click ‘Add’ to open the file browser and locate the main pack folder
which contains the pack’s Projects, Groups and Samples, for example
‘Post Dubstep & Future Garage’.
Important Notes:
•
The alias should be written as: Post Dubstep & Future Garage
•
The alias should not be written as: post dubstep and future
garage
4. Click under the ‘Alias’ tab alongside the pack and type in the exact
name of the pack including numbers, capitals and symbols.

5. Now close the Preferences window and you will see the pack within
your user library!
6. The files are now ready for use!
Install Problem?
If you have previously installed a Maschine Pack and the groups or
projects are not loading, please ensure that you have installed the
correct pack for your version of Maschine.
Also check that you have created an alias to the sample pack, so that
Maschine can locate the projects:
•
The alias should be written as: Post Dubstep & Future Garage
•
The alias should not be written as: post dubstep and future
garage
Note: If you do not type the exact name of the pack, it will not install
correctly.
1. You may need to uninstall the pack entirely from Maschine before
reinstalling it, to prevent any cross-referencing.

2. To do this, go to Maschine’s ‘Preferences’ area before selecting the
‘Library’, and then ‘User’ tabs.
3. Remove any previous location path to the Maschine pack (s) and
then close Maschine, before creating a new project (to clear the
history).
4. Quit Maschine, re-open it and then re-follow the instructions from
step 2. of the ‘Maschine 1.8 Installation Guide’.

NN-XT
1. Download the .zip folder provided and double-click it to extract the
main folder to a computer location of choice, e.g ‘Documents’ or on an
external hard drive.
2. Locate and open NN-XT within Reason and click the ‘Load Patch’
option > navigate to your new sample pack and load the desired patch
from the NN-XT ‘Sampler Patches’ folder.
3. The files are now ready for use!

Reason Refills
1. Download the .zip folder provided and double-click it to extract the
main folder to a computer location of choice, e.g ‘Documents’ or on an
external hard drive.
2. It is recommended to create a ‘Refills’ folder on your computer
before copying/saving all the purchased Refill files into it. Once
Reason is open, load a device and open the instrument/effect browser
window.
3. Locate the ‘Refills’ folder and drag and drop it from the browser
window to ‘Locations and Favourites‘, which is located within the
left-side section > you will now need to move your purchased Refills to
this folder.
4. The files are now ready for use!

Rex Files
1. Download the .zip folder provided and double-click it to extract the
main folder to a computer location of choice, e.g ‘Documents’ or on an
external hard drive.
2. Rex files can be loaded in Reason’s ‘Dr. OctoRex’ player. Simply
click the ‘Browse Patch’ tab and locate the file you wish to use. You
can load up to 8x Rex files into Dr.OctoRex’s available slots.
3. The files are now ready for use!

MIDI Files
1. Download the .zip folder provided and double-click it to extract the
main folder to a computer location of choice, e.g ‘Documents’ or on an
external hard drive.
2. MIDI files are note sequences which can be imported, edited and
transposed in your DAW. Importing MIDI files will vary between
programs - some will allow you to drag-and-drop directly into the
sequencer, e.g Ableton, Studio One. If this is not the case, you will find
that ‘File > Import MIDI File’ option will allow you to load each MIDI
file within Ableton Reason, Cubase, Logic, FL Studio, Renoise and most
other popular DAW platforms.
3. Assign an instrument or VST a MIDI track and then you will then be
able to use the file (s) as you wish.
4. The MIDI files are now ready for use!

VST Presets
Absynth
1. Download the .zip folder provided and double-click it to extract the
main folder to a computer location of choice, e.g ‘Documents’ or on an
external hard drive.
2. Open Absynth within your DAW, and click the ‘File’ tab that is
located at the top-left of the plug-in’s interface.
3. Select the ‘Browser’ tab, and look in the ‘Directories’ window to
locate your computer’s ‘User Library Directories’.
Note: The library folder locations should look as shown below:

Macintosh:
•
HD:Users:John:Documents:Native Instruments:Absynth
5:Sounds
Windows:
•
C:\Users\John\Documents\Native Instruments\Absynth 5
\Sounds
4. Locate the above (related Mac/PC) directory on your computer, and
place your presets within the folder.
5. Click ‘Rebuild DB’ located at the bottom right, and you will then
see the Bank Name of the product appear on the left-side of the
‘Attributes/Browser’ windows.
6. The presets are now ready for use!

FM8
1. Download the .zip folder provided and double-click it to extract the
main folder to a computer location of choice, e.g ‘Documents’ or on an
external hard drive.
2. Open FM8 within your DAW > click the ‘File’ option that is located at
the top of plug-in’s interface.
3. Select the ‘Options’ tab > click the ‘Database’ tab and look at
‘User Library Directories’.

Note: The folder location should look like the folder paths shown
below:
Macintosh:
•
HD:Users:John:Documents:Native Instruments:FM8:Sounds
Windows :
•
C:\Users\John\Documents\Native Instruments\FM8\Sounds
4. Locate the above (related - Mac/PC) directory on your computer,
and place your presets within the folder. Click the ‘Rebuild DB’ option
that is located at the right-hand side, and you will then see the Bank
Name of the product appear on the left-side of the ‘Attributes/
Browser’ windows.
5. The presets are now ready for use!

Massive
1. Download the .zip folder provided and double-click it to extract the
main folder to a computer location of choice, e.g ‘Documents’ or on an
external hard drive.
2. Open Massive within your DAW and click the ‘File’ option that is
located at the top of the plug-in’s interface.
3. Select the ‘Options’ tab.

4. Click the ‘Browser’ option to locate your computer’s ‘User Library
Directories’ area.
Note: The folder location should look as shown below:
Macintosh:
•
HD:Users:John:Documents:Native Instruments:Massive:Sounds
Windows:
•
C:\Users\John\Documents\Native Instruments\Massive\Sounds
5. Locate the above (related Mac/PC) directory on your computer, and
place your presets within the folder. Click the ‘Rebuild DB’ option that
is located at the right-hand side, and you will then see the Bank Name
of the product appear on the left-side of the ‘Attributes/Browser’
windows.
6. The presets are now ready for use!

Predator
1. Download the .zip folder provided and double-click it to extract the
main folder to a computer location of choice, e.g ‘Documents’ or on an
external hard drive.
2. Locate the Rob Papen VST folder on your computer; by default, this
is installed within the ‘Application’ folder on Mac systems, and in the
‘Documents’ directory on PC stations (as shown in the screenshots
below).
Mac
PC

3. Drag and drop/copy the extracted preset pack folder into the Rob
Papen ‘Bank Folder’ directory, and once this has been performed you
will be able to load the patches via the ‘Preset’ > ‘Quick Browse’
options that are located at the top-left corner of Predator’s user
interface.
4. The presets are now ready for use!

Serum
1. Download the .zip folder provided and double-click it to extract the
main folder to a computer location of choice, e.g ‘Documents’ or on an
external hard drive.
2. Open Serum within your Daw > you need to begin by loading the
patches into the ‘Serum Presets’ folder which can be located by
clicking ‘Menu’ tab.
3. Click ‘Show Serum Presets folder’ > this will open the location of
Serum’s entire available content.
4. Locate the ‘Presets’ folder, then the ‘User’ folder contained within
it > now you will need to move the purchased presets to the ‘User’
folder before reopening Serum.

5. Once Serum has been reloaded, click the ‘Browser’ folder icon/tab
(as highlighted by the yellow arrow below) on the left-side of the
‘Menu’ tab and you will then see your presets in the list (as shown
below). Double-click your preferred preset to load it into Serum.
6. The presets are now ready for use!

Sylenth
1. Download the .zip folder provided and double-click it to extract the
main folder to a computer location of choice, e.g ‘Documents’ or on an
external hard drive.
2. Open Sylenth within your DAW > click the ‘Preset’ option within the
interface’s central screen, and then select ‘Load’ to locate the
individual preset within the extracted folder (once it has been un-
zipped).
Note: You can now select multiple presets and import them
simultaneously, by using the left/right arrows to change between
them.
3. To load a preset bank, click the ‘Bank’ option then choose ‘Load’
within the interface’s central screen to locate your chosen bank.

4. The presets are now ready for use!
SubBoomBass
1. Download the .zip folder provided,!and double-click it to extract its
contents.
Note:!Multiple sub-folders exist within the main extracted folder,
which contain the inclusive various file formats.
Mac
PC

2. Save the folder to a memorable computer location of choice, e.g
‘Documents’ or on an external hard drive.
Installing Bank Folders
1. Open SubBoomBass within your DAW, and click within the slim tab
that is located on the right-side of the 'Presets' option to reveal the
drop-down selection (this can be found at the top-left corner of
SubBoomBass' main user interface).
2. Select the 'Load Bank' option from the drop-down selection.

3. Navigate to the computer location (e.g ‘Documents’) where you
saved the main expansion pack folder to, and locate the
'PW98_Suboom_Bank File' sub-folder.
4. Double-click on the 'PW98_Suboom_Bank File' sub-folder, and select
the 'Ultimate House Basses Vol One.fxb' file > once the file is selected,
click on the 'Open' or 'Choose' option that is displayed within your
computer's web browser to upload the bank file.

5. The preset bank folder is now available via the 'Preset > Quick
Browse' tabs.
6. The individual files are located and available for selection when
clicking the preset pack name e.g 'Ultimate House Basses Vol 1', before
choosing a particular preset from a preset bank.
Note:!The 'Ramirez' preset has been selected in this example.

The Chosen Preset is now Uploaded and Ready for Use Within
SubBoomBass!
!

Installing Individual Preset Folders
1. Open SubBoomBass within your DAW, and click within the slim tab
that is located on the right-side of the 'Presets' option to reveal the
drop-down selection (this can be found at the top-left corner of
SubBoomBass' main user interface).
2. Select the 'Load Preset' option from the drop-down selection.
3. Navigate o the computer location (e.g ‘Documents’) where you
saved the main expansion pack folder to, and locate the
'PW98_Suboom_Single Presets' sub-folder.

4. Double-click on the ''PW98_Suboom_Single Presets' sub-folder', and
select a .fxp file name/preset of choice e.g 'Classic House Bass.fxp' >
once the file is selected, click on the 'Open' or 'Choose' option that is
displayed within your computer's web browser to upload the preset
file.
The chosen preset is now uploaded and ready for use within
SubBoomBass!

MIDI Files
1. Once you have downloaded and extracted the main folder from
the .zip file, copy/save the extracted folder to a memorable computer
location e.g 'Documents' or to an external hard drive - open the 'MIDI
Files' sub-folder to locate the MIDI files, which are displayed like
so...'001_Left_wing.mid'.
2. To Load the included MIDI files within most DAWs, you will need to
either go to the file open tab whilst in your chosen software
environment and use the 'Import Midi File option', or alternatively drag
and drop any of the '.Mid' files onto a new track (in your arrangement/
session window). To be able to hear anything at this stage, you now
need to assign a software instrument of choosing to the track that the
MIDI file pattern has been copied to (be it a software or hardware
synth of choice) > please check the instructions/user manual of your
relevant DAW, if you are unsure on how to perform this.

Vengeance Sound - VPS Avenger
1. Download the .zip folder provided.
2. Double-click the .zip folder to open and reveal its contents.
MAC
PC

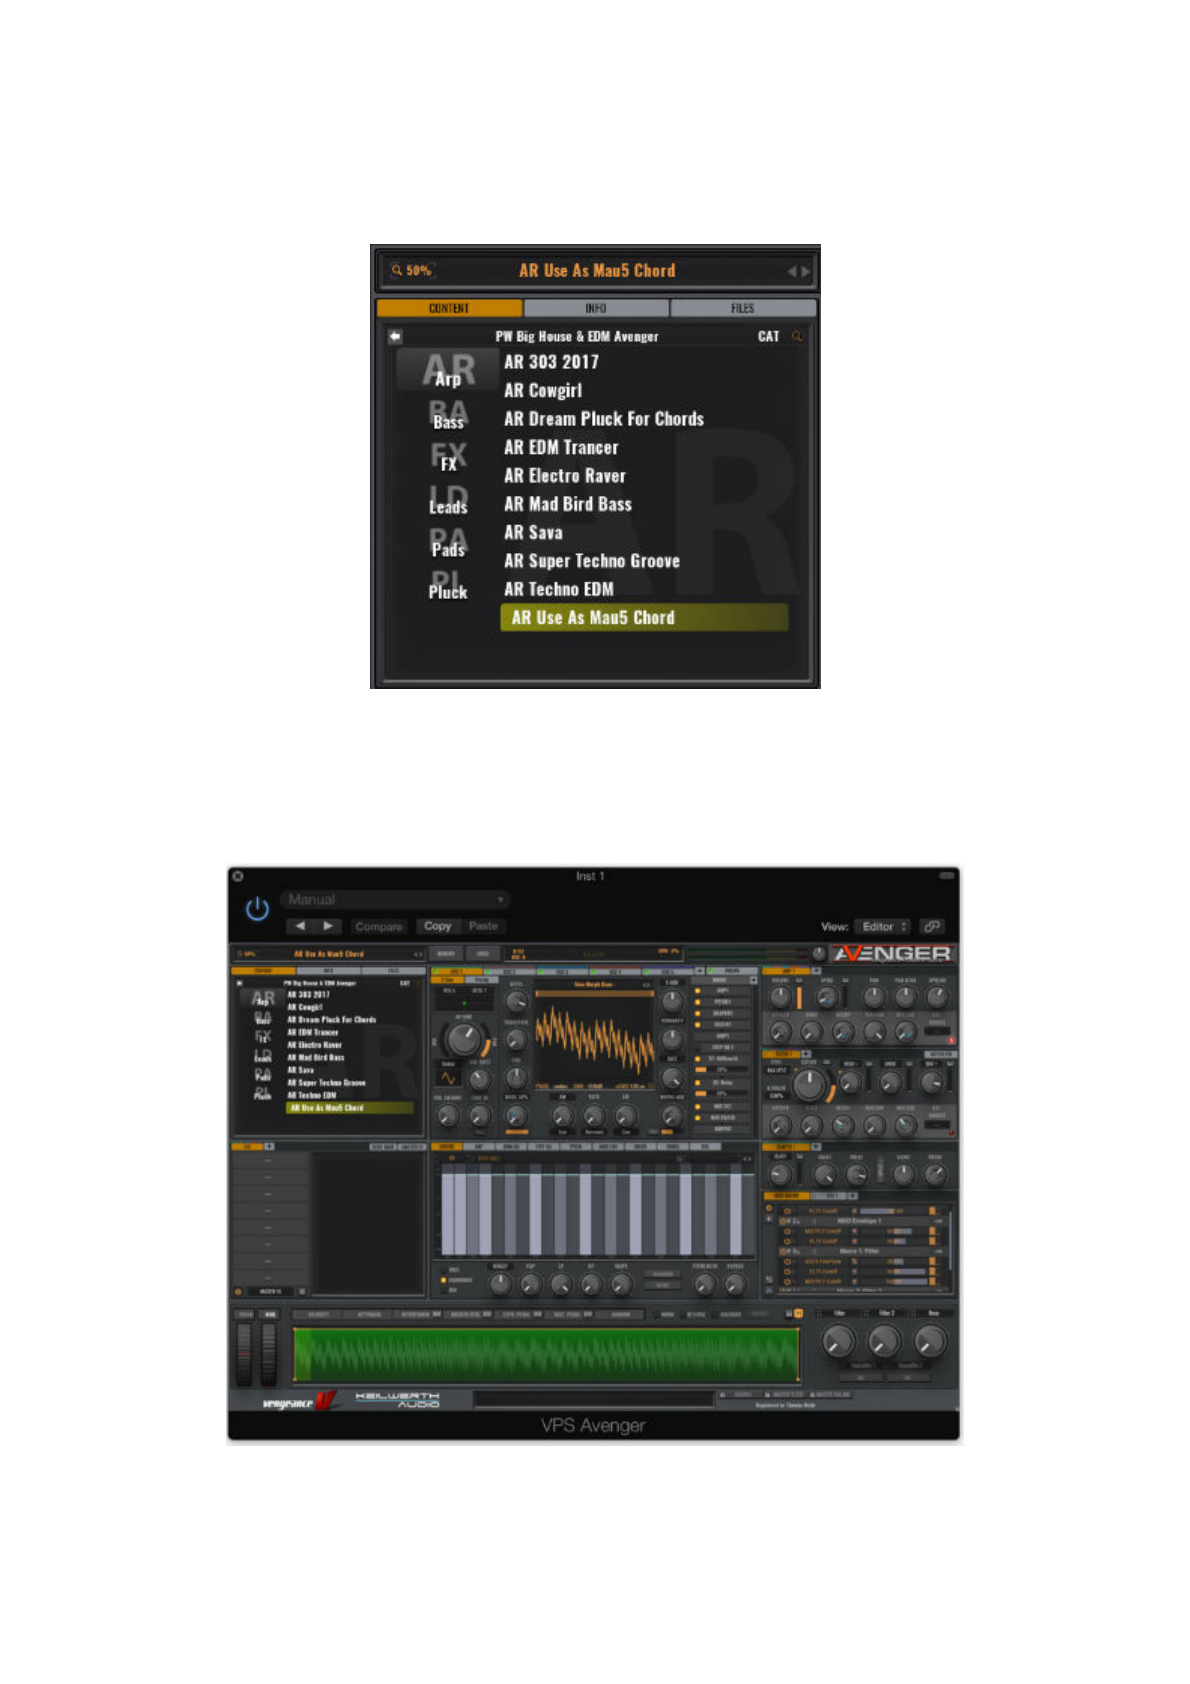
MIDI Files
1. Once you have downloaded and extracted the main folder from
the .zip file, copy/save the extracted folder to a memorable computer
location e.g 'Documents' or to an external hard drive - the prefix
needed starts with 'AR/BS_' etc, and is followed by a number as well as
the pack's full name e.g 'AR Use As Mau5 Chord D.mid'.
2. To Load the included MIDI files within most DAWs, you will need to
either go to the file open tab whilst in your chosen software
environment and use the 'Import Midi File option', or alternatively drag
and drop any of the '.Mid' files onto a new track (in your arrangement/
session window). To be able to hear anything at this stage, you now
need to assign a software instrument of choosing to the track that the
MIDI file pattern has been copied to (be it a software or hardware
synth of choice) > please check the instructions/user manual of your
relevant DAW, if you are unsure on how to perform this.
3. The name of the MIDI file includes the type of instrument that would
sound best and the original key of any melodic MIDI loops, but feel free
to experiment with Instrument types and/or alter the programming to
fit your tracks.

Loading VST and Plug-In Synth Instruments into VPS
Avenger
1. Once you have downloaded and extracted the main folder from
the .zip file, copy/save the extracted folder to a memorable computer
location e.g 'Documents' or to an external hard drive - the prefix
needed starts with 'PW_' and is followed by a number as well as the
packs full name e.g 'PW Big House & EDM Avenger.avengercontent'.
2. Open your DAW and load an Instance of VPS Avenger to an
instrument track.
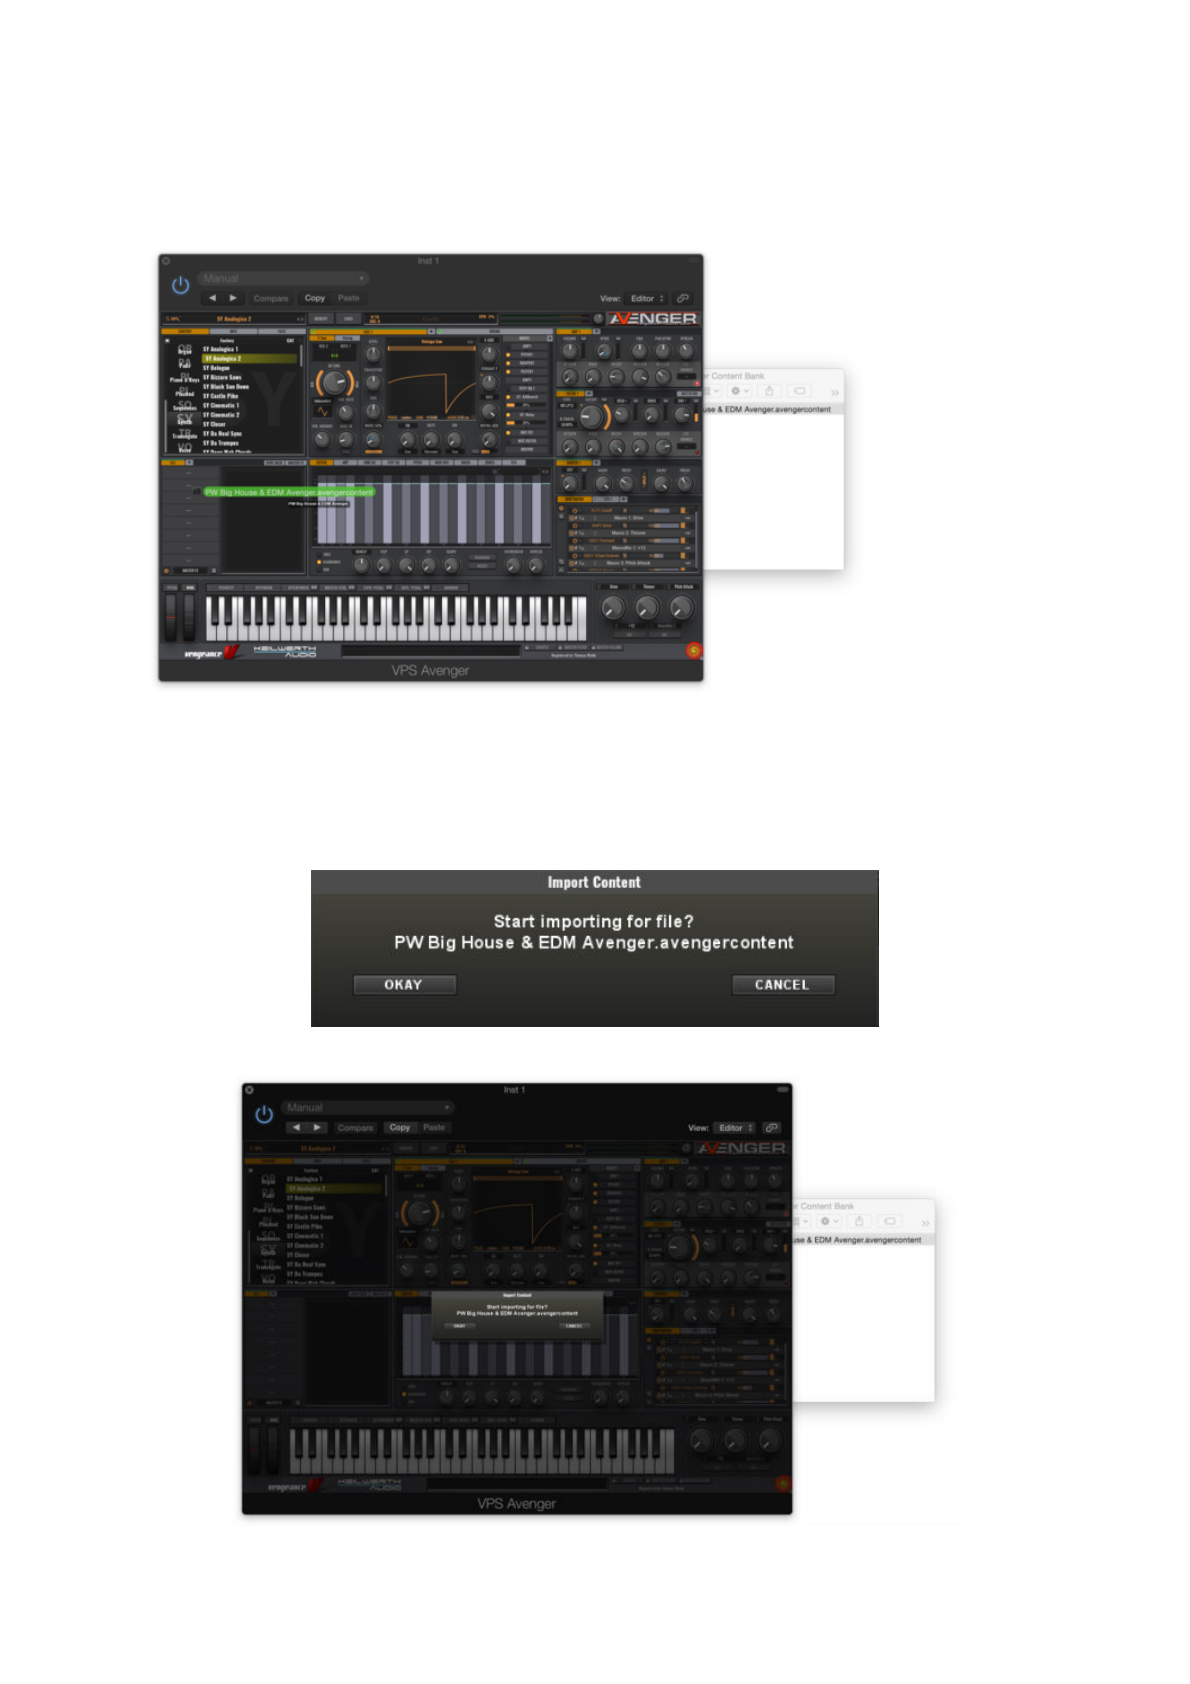
3. Drag the 'PW Big House & EDM Avenger.avengercontent'. file into the
browser of VPS Avenger.
4. Avenger will ask you if you want to import the file click 'Okay'.

5. Once the software file has successfully imported click 'Finish'.
6. To browse the presets, simply click on the 'Content' tab of Avengers
browser and select the 'House & EDM Avenger (A)' icon > you will then
be able to browse the presets that are available in the displayed list.
7. Select the preset name that you wish to use, and double-click it to
upload it to VPS Avenger.
The Software is now Ready for Use Within VPS Avenger!

Z3TA+2 Presets
Mac Installation
1. Download the .zip folder provided and double-click it to extract the
main folder to a computer location of choice, e.g ‘Documents’ or on an
external hard drive.
2. Navigate to your Z3TA+ 2 programs folder, the default locations!are
shown below:
•
Macintosh HD/Cakewalk Content\Z3TA 2\Programs
•
Macintosh HD/Library/Audio/Cakewalk Content\Z3TA
2\Programs
3. Decide which Bank you'd like to put this program into, such as User
Content. !If you don't wish to copy and place your new preset into an
existing bank, you can simply create a new folder > for!example!if you
want to keep all of your downloaded presets in one bank, you can
create a folder entitled 'Downloads'.
4. Double-click a bank to open it - the factory content!included
with!Z3TA+ 2 organizes programs by types such as 'Sequences',
'Keyboards' and 'Basses'. !You can create a folder to organise your
programs by category.
5. Drag and drop/copy and paste your new preset into the appropriate
category folder.
6. Restart your DAW and open Z3TA+2 onto a new software instrument
track > select your bank, category, or program and enjoy!

Windows Installation
Installing a Z3TA+2 Preset (.fxp)
1. Download the .zip folder provided and double-click it to extract the
main folder to a computer location of choice, e.g ‘Documents’ or on an
external hard drive.
2. Navigate to your Z3TA+ 2 programs folder, the folder path location is
shown below:
•
C:\Cakewalk Content\Z3TA 2\Programs
3. Decide which Bank you'd like to put this program into, such as User
Content. !If you don't wish to copy and place your new preset into an
existing bank, you can simply create a new folder > for!example!if you
want to keep all of your downloaded presets in one bank, you can
create a folder entitled ‘Downloads'.
4. Double-click a bank to open it - the factory content!included
with!Z3TA 2 organises programs by types such as 'Sequences',
'Keyboards' and 'Basses'. !You can create a folder to organise your
programs by category.
5. Drag and drop/copy and paste your new preset into the appropriate
category folder.
6. Restart your DAW and open Z3TA+2 onto a new software instrument
track > select your bank, category, or program and enjoy!
