
Ericom AccessNow
™
HTML5 Access for Microsoft Remote
Desktop Protocol (RDP)
Administrator’s Manual
Version 10.0

2
Legal Notice
This manual is subject to the following conditions and restrictions:
This document provides documentation for Ericom AccessNow™.
The proprietary information belonging to Ericom
®
Software is supplied
solely for the purpose of assisting explicitly and property authorized
users of Ericom AccessNow™.
No part of its contents may be used for any purpose, disclosed to any
person or firm, or reproduced by any means, electronic and
mechanical, without the prior expressed written permission of Ericom
®
Software.
The text and graphics are for the purpose of illustration and reference
only. The specifications on which they are based are subject to change
without notice.
The software described in this document is furnished under a license
agreement. The software may be used or copied only in accordance
with the terms of that agreement.
Information in this document is subject to change without notice.
Corporate and individual names, and data used in examples herein are
fictitious unless otherwise noted.
ANAdminMan20220519JL
Copyright © 1999-2022 Ericom
®
Software.
Ericom is a registered trademark and AccessNow is a trademark, of Ericom
®
Software. Other company brands, products and service names, are
trademarks or registered trademarks of their respective holders.

3
Table of Contents
LEGAL NOTICE ................................................................................................... 2
1. ABOUT THIS DOCUMENT ......................................................................... 5
2. OVERVIEW .................................................................................................. 6
RDP Compression and Acceleration ........................................................................................... 6
Getting Started in 5 Minutes ........................................................................................................ 7
3. ERICOM ACCESS SERVER ....................................................................... 9
Ericom Access Server Requirements .......................................................................................... 9
Installing Ericom Access Server ................................................................................................ 10
Using Ericom Access Server ..................................................................................................... 12
Keep Alive Settings .................................................................................................................... 17
Gateway (Jump) Architecture .................................................................................................... 18
Built-in Login Scripting ............................................................................................................... 19
Whitelist RDP Host Access ........................................................................................................ 20
Headers for web requests and security ..................................................................................... 21
Uninstalling AccessServer ......................................................................................................... 21
4. LICENSING OVERVIEW ........................................................................... 22
Evaluation (Demo) Period .......................................................................................................... 22
Licensing Modes ........................................................................................................................ 22
Central Server Configuration ..................................................................................................... 23
5. ACCESSNOW WEB CLIENT .................................................................... 26
Installing the AccessNow Web Client Component..................................................................... 26
6. HTML5 USER ACCESS ............................................................................ 28
Supported Browsers .................................................................................................................. 28
Connection Web Page ............................................................................................................... 28
Connecting to a Desktop ............................................................................................................ 33
Connecting to an Application ..................................................................................................... 34
Connecting to an Application in Kiosk Mode ............................................................................. 34
Automatic Session Display Resize ............................................................................................ 35
Special Key Handling ................................................................................................................. 36
AccessNow Toolbar ................................................................................................................... 37
Clipboard Support ...................................................................................................................... 38
File Transfer ............................................................................................................................... 39
Built-in Universal Printing ........................................................................................................... 42
URL Redirection ......................................................................................................................... 45
Ending a Session ....................................................................................................................... 46
Automatic Reconnect ................................................................................................................. 47
Fixing Typing Issues (Enable Scan code Input) ........................................................................ 47
Google Chromebooks ................................................................................................................ 48

4
Touch Devices (Tablet/Smartphone) ......................................................................................... 49
Windows Multi-touch Gesture Redirection ................................................................................. 50
7. ADVANCED CONFIGURATION ............................................................... 53
Modifying the AccessNow interface ........................................................................................... 53
Modifying the connection’s name ............................................................................................... 53
Static Configuration of Config.js ................................................................................................. 54
Passing URL Query Strings ....................................................................................................... 54
Define Configuration Groups ..................................................................................................... 55
Passing settings using Cookies ................................................................................................. 55
Passing Encrypted Parameters ................................................................................................. 56
Settings Precedence .................................................................................................................. 56
Passing settings using Form POST ........................................................................................... 57
Modifying the SSO path ............................................................................................................. 57
Settings Table ............................................................................................................................ 58
Embedding AccessNow in an iframe ......................................................................................... 65
Sample HTML - Passing Cookies into AccessNow ................................................................... 66
AccessNow File Transfer API .................................................................................................... 69
Server initiated AccessNow file uploads .................................................................................... 71
Keyboard Locale Value Table .................................................................................................... 73
Auto Keyboard Locale Switching ............................................................................................... 75
8. SECURITY ................................................................................................. 77
Using a Trusted Certificate ........................................................................................................ 77
9. SSL VPN CONFIGURATION .................................................................... 80
Configuring the AccessNow link ................................................................................................ 80
SSO Using Cookies ................................................................................................................... 81
SSO Using POST....................................................................................................................... 82
Support for multiple bookmarks in portal ................................................................................... 82
10. HTTPS MODE ........................................................................................... 83
Forcing HTTPS Mode ................................................................................................................ 83
11. TECHNICAL SUPPORT ............................................................................ 84
Release Notes............................................................................................................................ 84
Warning on using TS/RDS per-Device CAL with AccessNow ................................................... 86
Browser Extension Conflicts ...................................................................................................... 86
AccessNow Printing with Foreign Languages ........................................................................... 86
HTTPS and SSL Encryption ...................................................................................................... 87
Right Click on Mac ..................................................................................................................... 87
Blocking Scan Codes ................................................................................................................. 87
Demo Site to Verify Connectivity ............................................................................................... 88
Requesting Support ................................................................................................................... 88
ABOUT ERICOM ................................................................................................ 90

5
1. ABOUT THIS DOCUMENT
This manual provides instructions on how to install and use Ericom AccessNow
to connect to virtual desktops and Terminal Servers from within HTML5
compatible web browsers. Follow the instructions in this manual and start
enjoying the benefits of Ericom AccessNow within minutes!
This manual includes the following information:
Overview of Ericom AccessNow
Preparation and installation procedures
Usage instructions
Troubleshooting and FAQ
This manual assumes that the reader has knowledge of the following:
Enabling RDP on Windows operating systems
Firewall configuration
Web server administration
Important terminology used in this document:
RDP – Remote Desktop Protocol. A remote display protocol
developed by Microsoft. RDP is a standard component of Microsoft
Windows.
RDP Host – a Windows system that can be remotely accessed
using Microsoft RDP, such as a Terminal Server (RDS Session
Host) or Windows workstation with remote access enabled.
HTML5 – a new update to the HTML specification. Extends HTML
with new features and functionality for communication, display,
etc.
WebSocket – a bi-directional, full-duplex communication
mechanism introduced in the HTML5 specification.
SSL – Secure Sockets Layer is a cryptographic protocol that
provides communications security over the Internet.

6
2. OVERVIEW
Ericom AccessNow provides end-users with remote access to Windows
desktops and applications from any HTML5 compatible web browser. Any
browser that supports HTML5 canvas can be used as the client. HTML5
WebSockets is typically required for AccessNow, however, this requirement is
removed when AccessNow is used in conjunction with the Ericom Secure
Gateway.
AccessNow provides the following benefits:
End-users can access and interact with Windows desktops and
applications from any device that has an HTML5 compatible web
browser
No need to install or configure any software on the end-point device
No need to perform updates or patches on end-point devices
Works on platforms that only support web applications, and do not
allow application installation, such as Google Chrome OS
Consistent look-and-feel on any platform that has a HTML5
compatible browser
Remote Windows desktop and applications can be seamlessly
integrated with other web-based applications and portals
As of version 3.0, Access Server includes Ericom PowerTerm™
WebConnect’s Terminal Server component package: Load balancer
agent, Remote browser agent and Terminal Server agent
Ericom AccessNow is comprised of three installable components:
Ericom Access Server (WebSocket server) that is installed on, or next
to the RDP hosts
(Optional) A collection of web resources (HTML files, CSS, JavaScript,
images, etc.), which are installed on a web server
(Optional) Ericom Secure Gateway enables access from outside the
organization
RDP Compression and Acceleration
Ericom AccessNow contains Ericom’s technology for RDP compression and
acceleration. This enhances remote desktop performance over the Internet.
There are three main features in this technology:
Image compression
Packet shaping

7
Whole frame rendering
Image compression compresses images before transmitting them to the
browser for rendering. The level of compression is dependent on the
acceleration/quality level selected by the user (a default value can be
configured by the administrator).
Packet shaping optimizes the network messages to improve network utilization
and performance.
Whole frame rendering means that the display is updated as a whole rather
than in blocks, as performed by standard RDP. This is especially noticeable
when watching video or over slow network connections. Coupled with the
other optimization features, it results in a smoother display that more closely
resembles the functionality on local desktops.
Getting Started in 5 Minutes
Ericom AccessNow is a feature rich and flexible application. The manual
covers all available features in detail to help customers best configure
AccessNow to fit their environment.
The AccessNow application is very quick and easy to install. The basic
installation will take approximately five minutes and will make a Windows RDP
host (server or workstation) accessible from most HTML5 compliant web
browser. Here are the steps to install and use AccessNow in about five
minutes:
1) Download the Ericom Access Server MSI installer from the Ericom website
(since download speeds vary, the time to download the MSI is not counted
in the five minutes)
2) Verify that the system that Access Server will be installed on is not using
port 8080. If it is, either reconfigure the current application or Ericom
AccessNow to use a different port to avoid a conflict.
3) Run the MSI installer and click Next through all the dialog boxes and then
Finish at the last one
4) Configure (or disable) the Windows Firewall for use with AccessNow.
a. Go to the Windows Control Panel and open Windows Firewall
b. Click “Allow Program or Feature …”
c. Click “Allow another program …”
d. Click Browse and navigate to <drive>:\Program Files (x86)\Ericom
Software\Ericom Access Server\AccessServer32.exe
e. Click Add and then OK

8
5) Once the Access Server is installed, it is ready for use. The Access Server
contains a built-in web server to allow users to connect its URL:
http://machineaddress:8080/
This URL will automatically redirect to the full URL:
http://machineaddress:8080/accessnow/start.html
The AccessNow port must be specified in the URL to tell the browser to
use the web server that is built-in to the Access Server service. HTTPS
may also be used.
6) Once the AccessNow web page appears, click the Connect button to
connect to the desktop where the Access Server is installed. The empty
fields will automatically use the address of the server specified in the URL.
Enter the user credentials if desired and it will be passed to the RDP
session.
7) The connection dialog will appear momentarily while the web browser
connects to the RDP host where the Access Server is installed.
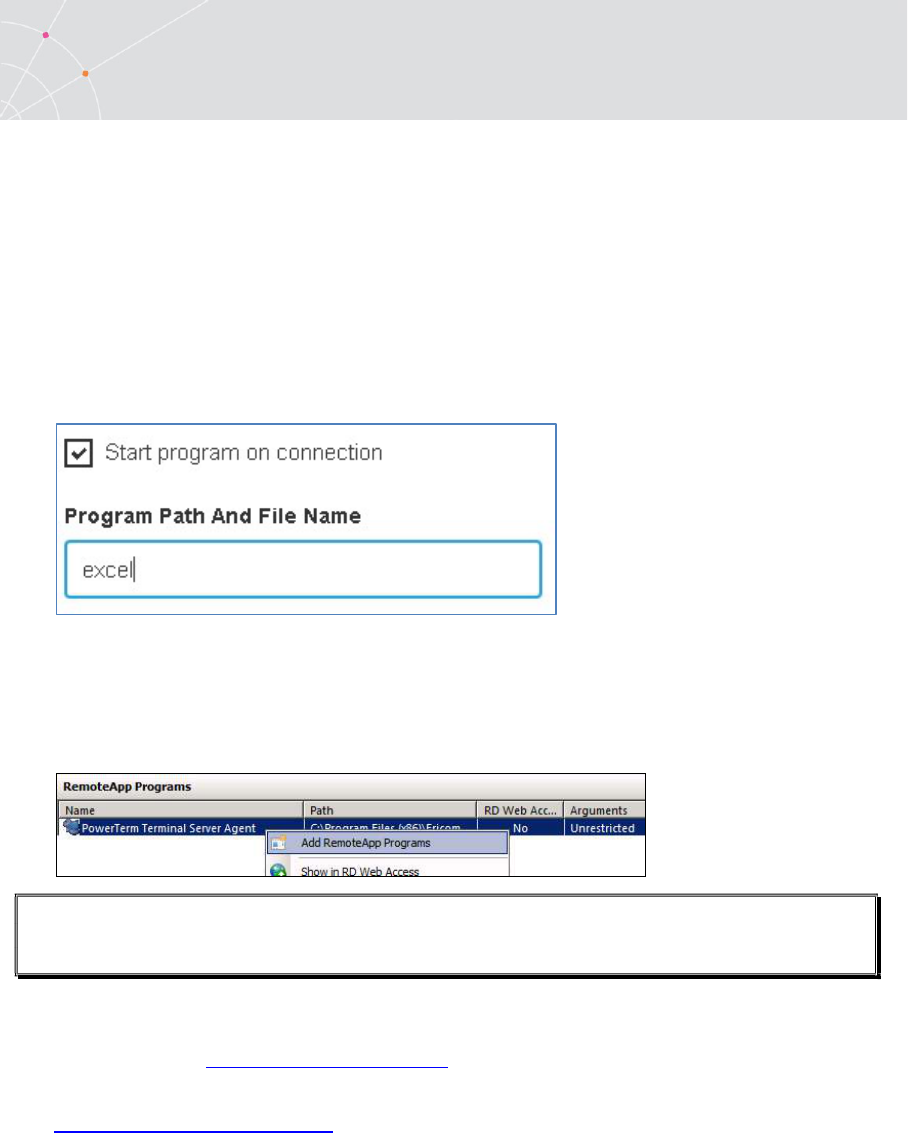
To launch an application (instead of the desktop) click the three dots for
the Settings button before clicking the Connect button and check Start
program on connection. Enter the path to the desired application under
Program path and file name.
8) Click OK and Connect to use AccessNow to connect just to an application.

9
3. ERICOM ACCESS SERVER
Ericom Access Server provides AccessNow HTML5 access and Blaze RDP
compression and acceleration features. All features are enabled during the
trial period, and each feature is unlocked using an activation key after the trial
period ends. The host may be any Windows system that has RDP access
enabled, such as a Windows Terminal Server or a Windows workstation. The
Access Server uses a customizable port – by default this is port number 8080.
Port 3399 is also enabled for backward compatibility with installations using
older versions of Blaze.
The Access Server may be installed on the RDP host or on a dedicated system
to serve as a proxy. It is recommended to install the Access Server on the
RDP host directly. Some features such as file transfer may only available when
the Access Server is installed on the RDP host directly. The Access Server has
a small footprint and will have minimal impact on the RDP host’s performance
and scalability.
Ericom Access Server Requirements
Windows operating system (7/2012 and higher)
Incoming RDP connections enabled on the Host OS (e.g. Terminal
Server)
80 MB of free Hard-Disk space
MMX and SSE2 capable CPU
Firewalls are configured for Access Server traffic 8080 (or 3399) port
The Access Server should be installed on each server/host that requires
accelerated or HTML5 access. Terminal Servers only require one installation
to accelerate all user sessions. Each workstation / desktop (physical or
virtual) requires an installation. It is possible to include Access Server as part
an image that will be deployed using Microsoft
®
Sysprep or Symantec
®
Ghost.
Bind Service to All Network Interfaces
In a virtual network environment - it is recommended to bind the Access
Server to use all virtual network interfaces, rather than just one virtual NIC.
Always ensure that the network interface(s) that Access Server is using is
accessible by the desired group of end-users.
Host Firewall Configuration
Make sure to allow traffic communication from the end-user device to the
Ericom Access Server host. Firewall configuration may be necessary.

10
On Windows operating systems, ensure that the Windows Firewall is
configured to allow traffic to the Access Server port (by default 8080). This
port value may be changed using the Access Server Configuration utility.
NOTE Disable the Windows Firewall temporarily to troubleshoot any connectivity
issues. If the connection is only successful with the firewall disabled, then
there may be a rule that is blocking the Access Server port.
To add a rule to allow the Ericom port, perform the following
Go to Control Panel and then Windows Firewall. Select Advanced
settings and select Inbound Rules. Click New Rule.
Select Port and click Next. Enter the specific port: 8080
Click Next and select Allow the connection
Click Next and select the networks to apply the rule (Select All)
Click Next and give the rule a name (Ericom) and click Finish.
Port Forwarding Configuration
When configuring a firewall for port forwarding to a Blaze enabled host, make
sure that it is directed to the Access Server port (default: 8080). Do not
forward to 3389 (default RDP port).
If a custom port is being used, configure the firewall to forward to the port
value configured under the Communication page.
Installing Ericom Access Server
Run EricomAccessServer.msi using Administrator privileges and
follow the instructions of the installation wizard.
i. EricomAccessServer may be installed with non-Administrator
privileges, however, the auto-restart service and the Windows

11
firewall will not be automatically configured (this should only
be performed as an upgrade from a previous version).
Review and accept the License Agreement.
Click Install (if prompted, accept the security elevation request). Click
Finish at the last screen to complete the installation
Verify that the Access Server port is available and accessible to the
host system. Access Server will automatically add the necessary
rules to Windows firewall, however additional firewall configuration
may be necessary on the network.
Once installed, the Access Server will run as a service on the system.
o The service is configured to run automatically on system
startup.
o If the service is stopped or is unable to listen on its default
ports (8080), the client will not be able to connect to that
host. Verify that there are no other applications using the
same port.
Access Server can be automatically and silently installed using a management
application such as Microsoft System Center.
To perform a silent install run: msiexec /I "EricomAccessServer.msi"
/q
EricomAccessServer.msi represents a valid path to the .msi file
This command may need to be performed with elevated
Administrator credentials.
Run MSIEXEC without any parameters to view the help dialog.

12
NOTE Access Server may not be compatible with certain systems where the
hostname contains non-English characters.
Using Ericom Access Server
To modify Access Server settings: Go to Start | Programs | Ericom Software |
Access Server Configuration. On systems that do not have a Start menu, the
GUI may be launched using the command line:
<drive>:\Program Files (x86)\Ericom Software\Ericom Access
Server\ServerConfiguration.hta
NOTE Access Server is used by both the AccessNow HTML5 and Blaze RDP
Acceleration products.
Access Server Configuration
The Server Configuration console presents a series of tabs that allow the
administrator to configure various settings for the server service.
HINT When installing Access Server on a Terminal Server, it is recommended to
block access to the Server Configuration application from end users to
prevent unexpected changes to the configuration settings.
General
This page provides functions to restart and stop the Access Server service.
For certain configuration changes, a service restart is required. This page also
displays the number of active Blaze sessions to this system.
NOTE When the Access Server service is restarted, all AccessNow and Blaze
sessions on the server will be disconnected.

13
Licensing Information
This page displays licensing information for AccessNow and Blaze. The
Connected to licensing server field indicates the license server that is currently
in use.
NOTE In a production VDI or Terminal Server environment, the licensing server
must be centralized on a robust system. See the section on Central
Server Configuration for additional details.
By default, Access Server uses DNS lookup to locate the Licensing Server. The
DNS entries used are ericom-license-server.<domain-name> or _ericom-
license-server._tcp.<domain-name>. If the DNS entries do not exist, the
Access Server attempts to connect to a Licensing Server that is running on
the same computer as itself.
The other option is to explicitly specify the address of the Licensing Server in
the Access Server Configuration under: Licensing server address. After
changing the Licensing Server address, restart the Access Server service using
the General tab.
If no valid license is found, Access Server will continue to run if the grace
period has not expired. Once the grace period expires, Access Server will not
allow user sessions. A “grace period” lasts up to 10 days within a 30 day
period.
Changing the License Server Port
The license server communicates over port 8888 by default. If there is
another application on the same system already listening on port 8888, the
license server port value may be changed in the Registry.
Use the Registry Editor and navigate to HKLM | SOFTWARE | Ericom Software
| LicenseServer | ListeningPort
If this key does not exist, create a new ‘String Value’ named ‘ListeningPort’.
In the example above, the port has been changed to 9999. Once the value is
set, restart the Ericom Licensing Server service. For each Access Server that
will be connecting to the central license server on a custom port, the custom
port value must be specified after the address with a colon. For example:

14
Licensing Activation
Click on: Licensing | Activation to enter the serial number and activation key
into the product’s configuration. To activate an installation from an
evaluation, send the “key to send to Ericom” along with the serial number to
ca@ericom.com for processing. An activation key will be returned. Once the
activation key is entered, click on the Activate License button. The Access
Server does not have to be restarted for the license to take effect.
To extend an evaluation, send the “key to send to Ericom” to an Ericom sales
representative for processing. A standard two week extension key will be
returned once the request is approved.
Performance
This page displays current Server performance statistics.
Communication
This page provides functions to change the Access Server listening port and
the address of the host running RDP.

15
When using a listening port other than the default (8080), the port number
must be explicitly specified in the Access Server address or the Blaze Client
Computer field (e.g., rdpdemo.ericom.com:22).
AccessNow web client:
The RDP host address is used when the destination system is not the system
running Access Server. In this scenario, the Access Server is acting as a
gateway proxy between the end user and the destination host system. This
type of configuration is not recommended as it may adversely impact
AccessNow and Blaze performance.
Changes to both settings require a service restart (under General tab).
When running Access server on a machine with multiple network cards,
change the RDP host address from localhost to the IP or DNS address of the
network card that has RDP access to the system.
Acceleration
This page provides functions to force the Acceleration/Quality level and disable
dynamic compression. When the Override client acceleration / quality settings
checkbox is checked, all sessions will use the configured setting, and all client
settings will be ignored. When checking or unchecking this setting, the
service must be restarted for the change to go into effect. When the setting is
enabled, changing the acceleration level does not require a service restart, but
active users must reconnect to use the new setting.

16
Dynamic Compression identifies small graphical objects on the screen (such as
toolbar icons, taskbar icons, Start Menu icons, etc.) and compress them using
High quality when the Blaze Quality setting is Low; and at Best quality when
the Blaze Quality setting is higher than Low. All other graphical objects are
compressed at the chosen quality. This provides the visual impression of a
high quality remote desktop session. By default, this feature is enabled. To
disable, uncheck the “Use dynamic compression” box.
For sessions that require true accuracy with no compression, add this setting
to the blaze.txt file: true lossless type:i:2
Security
This page configures the Access Server security settings.

17
Ericom Access provides integrated 128-bit SSL encryption. For better
performance, set the host’s RDP Security Encryption level to Low and change
the Encrypt Blaze communication to Always. Using this configuration, Ericom
SSL encryption will be used instead of the RDP encryption. See the Ericom
Optimization chapter in this document for more details.
To use a custom or trusted certificate, enter the thumbprint ID into the
Certificate Thumbprint field and click the Apply button. The certificate’s
properties will be displayed in the GUI, represented by the black boxes in the
image above. Restart the service to apply the changes. If the certificate is
not valid on the system, the Access Server service will not start (starting in
8.4).
NOTE When installing a trusted certificate, the DNS address of the Access Server
must match the certificate name. If a wildcard certificate is being used,
the domain must match. For example, if the certificate is for *.acme.com
the server name must end with acme.com.
Logging
This page provides functions to enable/disable certain logging features.
Ericom Support may request a debugging log for diagnostic purposes. The
debugging log is enabled here.
Starting in version 9.2, AccessNow no longer produces any console output by
default. Console output can be enabled by adding localStorage variable
"EricomLogging" with the value "true".
Advanced (For Administrator Use Only)
This page provides access to advanced Ericom Access Server settings that are
stored in the system’s Registry.
Export Settings – exports the Access Server Registry key to the user’s home
folder (i.e., My Documents).
Import Settings – imports previously saved Registry settings.
Advanced Configuration – Launches regedit.exe and opens the Access Server
registry keys. By default, only settings that are changed from the default
value are saved into the Registry.
Keep Alive Settings
Blaze Setting Description Usage Default
session
heartbeat
seconds:i:
The interval in
seconds where the
AccessServer uses the
heartbeat to identify a
client disconnect and
3

18
client sends
heartbeats.
offset any third-party
idle settings. Works
with load balancers
and secure gateways.
(Requires
AccessServer 7.3 or
higher)
session
heartbeat
probes:i:
The number of
missing heartbeats
where the server
considers the client
as disconnected.
AccessServer uses this
setting to determine
when to classify a
connection as
Disconnected.
(Requires
AccessServer 7.3 or
higher)
5
Blaze settings are saved in C:\Program Files\Ericom Software\Ericom Access
Server\WebServer\AccessNow\resources\blaze.txt
Gateway (Jump) Architecture
Access Server may also be deployed as a ‘gateway’ server where the
destination (RDP) host is separate from the system running Access Server.
Several gateway servers may be configured behind a load balancer for high
availability. The benefits of using AccessServer as a gateway are:
Nothing to install on the RDP host
AccessServer overhead is offloaded from the RDP host
Installing the Access Server in a gateway architecture is the same as in an
on-host deployment.
Windows Core Containers
Starting in version 8.3, Access Server has been tested on Windows 2016 Core
with Docker containers. To deploy Access Server on a container, perform
the following:
Copy EricomAccessServer64.msi to c:\build\msi folder on Windows
Server 2016 core container.
Create c:\build\Dockerfile where the contents of the Dockerfile are:
FROM microsoft/windowsservercore
ADD MSI /MSI

19
RUN msiexec /i msi\ericomaccessserver64.msi /qn
Create an image named as-dockerfile based on windowsservercore
with Access Server installed in it: docker build -t admin/as-
dockerfile c:\build
Create and run a container: docker run -d --name ascontainer -p
8080:8080 admin/as-dockerfile ping -t localhost
Test the connection by connecting to the container using:
<container-address>:8080
Known Limitations
It is recommended to install Access Server on the RDP host whenever
possible. When Access Server is used as a Gateway to RDP hosts, it becomes
a point of failure for multiple users. The following features may also not be
available:
File Transfer Upload and Download
Keyboard Auto-Sensing is unavailable on mobile devices
Per-Named Licensing (TSAgent is required on the RDP Host)
TSAgent auto-logoff detection
AccessNow printing if the Lexmark driver is not installed on the
target host
Built-in Login Scripting
This product includes the PowerTerm TSagent. The TSagent supports the
ability to launch a .vbs script during certain RDP session events. This adds an
additional layer of functionality to run certain commands when an application
is launched or when a session is connected/disconnected.
Post-Startup Login script (_login)
Create a file named _login with the appropriate extension, for example a
script file called _login.vbs or an executable called _login.exe, and place this
in a folder named scripts under the Access Server installation folder. If this
folder does not exist, create it. This script will execute when a new session
starts, after the TS/RDS session processes the Startup folder.

20
Pre-Startup Login script (__login)
Similar to _login, __login is executed at session startup, but it is executed
before the TS/RDS session processes the Startup folder.
Session connection script (_connect)
Create a file named _connect with the appropriate extension, and place this in
a folder called scripts under the Access Server installation folder. If this folder
does not exist, create it. This script will execute upon connection into an
existing TS/RDS session.
Session disconnection script (_disconnect)
Create a file named _disconnect with the appropriate extension, and place
this in a folder called scripts under the Access Server installation folder. If this
folder does not exist, create it. This script will execute upon disconnection
from a TS/RDS session.
Sample VB Script to create a new file
Set objFileToWrite =
CreateObject("Scripting.FileSystemObject").OpenTextFile
("newfile.txt",2,true)
objFileToWrite.WriteLine("hello world")
objFileToWrite.Close
Whitelist RDP Host Access
Starting in v9.4 a registry configuration in Access Server configures a whitelist of
RDP hosts that can be connected to:
HKEY_LOCAL_MACHINE\SOFTWARE\Ericom Software\Access Server\SERVER
Side\AllowedDestinationsInNonManagedMode
This is a semi-colon separated list of machines that can be connected to a
(optional) port value (default is 3389). Use a * for any port.
Machine names can have a * in the middle of their names to represent a
wildcard. The value is read at every use. If this value is missing, then it allows for
localhost. Configuring this feature will prevent against unauthenticated SSRF.
For example:
localhost;127.0.0.1;192.168.1.2:3389;*.ericom.com

21
Under HKEY_LOCAL_MACHINE\SOFTWARE\Ericom Software\Access
Server\SERVER Side an optional string value called AllowedClientAddresses is a
semi-colon separated of list of machines can connect to AccessServer. The value
is read at start time, so restart the service whenever the value is changed. If the
value is missing or not configured, then all hosts are allowed. Only IP addresses
are supported.
Headers for web requests and security
For enhanced security, optional headers in
HKEY_LOCAL_MACHINE\SOFTWARE\Ericom Software\Access Server\SERVER
Side\CustomHttpHeaders will be added to all web requests and headers under
HKEY_LOCAL_MACHINE\SOFTWARE\Ericom Software\Access Server\SERVER
Side\CustomCacheControlHeaders are added to cacheable requests.
Value for CustomCacheControlHeaders:
Cache-Control: no-cache, no-store, must-revalidate
Values for CustomHttpHeaders:
X-Content-Type-Options: nosniff
X-Frame-Options: SAMEORIGIN
X-XSS-Protection: 1; mode=block
Uninstalling AccessServer
Uninstall Ericom Access Server using Control Panel | Add/Remove Programs
Select Ericom Access Server and click Uninstall to begin the uninstall process.

22
4. LICENSING OVERVIEW
Evaluation (Demo) Period
Each Access Server installation includes a Licensing Server that is installed on
the same device. By default, the license server includes an evaluation period
of 30 days. During this period, the Licensing Server allows up to 50
Concurrent User licenses. The evaluation period can be extended by
contacting an Ericom sales representative.
Licensing Modes
The Ericom License Server service manages licensing for Ericom AccessNow
and Blaze. Any connection made with an Ericom Blaze Client or AccessNow
HTML5 requires an Ericom license. A single licensing server can manage
licensing for multiple Ericom Access Servers.
There are two modes of licensing:
Concurrent User – Ericom licenses are counted based on the number of active
users that are currently connected to all the Access Servers utilizing the same
Licensing Server. In this licensing mode:
There is no licensing limit on the number of Ericom sessions that the
same user can open concurrently on a single client device. Only one
license will be consumed regardless of the number of sessions the
user opens on the device.
The same user opening Blaze sessions concurrently from several
devices will consume the same number of licenses as the number of
devices used.`
Several users using the same device (i.e. using Fast User Switching)
will take the same number of licenses as the number of users that
have active Blaze sessions
Named User – Ericom licenses are counted based on the number of names
registered that have ever connected to any Access Servers utilizing the same
Licensing Server. In this licensing mode:
A license is allocated for a name when it is first used by any user
The license is automatically released after a period of 14 days during
which the name has not been used for running Blaze Clients at all. A
license allocated to a name cannot be released prior to the end of the
14 day period

23
The Access Server must be installed on the RDP host (as the TSagent
is also required for this method). If the Access Server is used as a
Gateway, then only the Concurrent license will be available.
Central Server Configuration
The Access Server can be configured to use a remote Licensing Server so that
a single pool of licenses may be shared among multiple Access Servers.
For example, a 10-user license would be activated once on a central server.
All Access Servers on the network would then be directed to use the pool of
licenses on the central server. Ericom recommends that in an environment
with more than two RDP hosts (Remote Desktop Servers, Terminal Servers,
VDI, etc.) that a dedicated server is assigned to host the licenses to prevent
disruptions and conflicts. Guidelines for the central license server are as
follows:
The central license server must be hosted on a server that is highly
available so that it can distribute licenses.
In a VDI environment, do not install the license server on a cloned
desktop or the gold image template. It should be installed on a static
machine that does not experience system changes.
In a TS/RDS environment with two or more servers, avoid installing
the license server on the Terminal Server if possible.
Minimize the amount of reboots and disruptions on the server. Apply
updates only during off-peak times.
When no valid license is found, Access Server will continue to run if the grace
period has not expired. Once the grace period expires, Access Server will not
allow user sessions. A “grace period” lasts up to 10 days within a 30-day
period. When there is an issue with the license server, it should be rectified
before the grace period expires.
Implementation
Step 1: Install Access Server on the desired system and activate it (using the
Licensing | Activation tab). Although Access Server will be running, the main
role of this installation is to create a central license server. Enable the
incoming port 8888 on the Windows firewall of this system. Verify that this
port is available over the network between the central license server and the
any Access Servers that will connect to it.
Step 2: Configure all Access Servers to use the central license server address
for licensing. There are two methods to configure the address of the central
license server, see the next section for details.

24
Step 3: Once the Access Server service starts, it will connect to the configured
central license server to obtain a license when an Ericom AccessNow or Blaze
session is established.
There are three methods to use a central license server:
Use DNS Lookup
When using this setting, Access Server will always attempt to find a
centralized Licensing Server before using the local one that was installed along
with it. If a central license server is found and used, the local one will be
ignored. When the Ericom Access Server service starts, it looks for the central
licensing server address (IP or DNS name) in the following order.
1) DNS-SRV Entry
Access Server will look for the Licensing Server address in a DNS-SRV
entry: _ericom-license-server._tcp.<domain>
For example, _ericom-license-server._tcp.ericom.local
2) DNS Entry
If the DNS-SRV record does not exist, Access Server will look for the
Licensing Server address in a DNS entry: ericom-license-server.<domain>
For example, ericom-license-server.ericom.local
3) Localhost
If the DNS entry does not exist, the locally installed Licensing Server will
be used (i.e. localhost will be used as the address of the Licensing
Server).
Manual Entry
The administrator may also explicitly specify the license server that will be
used at the Licensing page in the Access Server Configuration application.

25
Use with Managed Ericom Broker
When the Ericom Connect
®
or PowerTerm™ WebConnect broker is used, all
licenses are obtained from the broker. Access Server licensing is ignored;
expiration messages will not apply to brokered connections.

26
5. ACCESSNOW WEB CLIENT
The web component contains the resources that are used by the web browser
to display an interface for users to use to connect to their remote application
or desktop. These resources include HTML pages, JavaScript and CSS files and
graphic images. Review the chapter on Advanced Configuration to modify the
appearance and behavior of the web component interface.
Installing the AccessNow Web Client
Component
Included with the Access Server
The AccessNow web components are automatically installed along with the
Access Server (Windows edition). The web components may be found in the
Access Server folder:
<drive letter>:\Program Files\Ericom Software\Ericom Access
Server\WebServer\AccessNow
Installation on Microsoft IIS web server
The web server component for IIS servers is provided as an installer named
EricomAccessNowWebComponent.msi. During the installation, a virtual
directory named AccessNow will be automatically created in IIS. The
Start.html page will be set as the default document for this virtual directory,
so there is no need to explicitly enter the file name in the URL. The actual
pages will be placed into C:\Program Files (x86)\Ericom Software\Ericom
AccessNow Web Component\.

27
Once the web server files are installed, direct the users the appropriate URL:
http://webserver/accessnow or http://webserver/accessnow/start.html
Installation on web server
The web server component is also provided as a zip file named
EricomAccessNowWebComponent.zip.
On the target web server, create a virtual directory and extract the contents
of the zip to that location. Once the web server files are installed, direct the
users the appropriate URL. (i.e. http://webserver/accessnow/start.html).
Some web servers are case sensitive so make sure the correct URL is provided
to the end users.

28
6. HTML5 USER ACCESS
With Ericom AccessNow, users can access remote Windows desktops and
applications from HTML5 compatible web browsers. To start a session, users
browse to the start.html file that is installed in the AccessNow virtual
directory. This virtual directory is included with every Access Server
installation and may also be installed separately on a third-party web server.
Supported Browsers
Supported browsers include HTML5 compliant web browsers such as Google
Chrome, Apple Safari, Firefox, Microsoft Edge, and Microsoft Internet Explorer
11. Older versions of Firefox and Opera require WebSocket support to be
manually enabled in the browser configuration.
Multiple AccessNow sessions may be opened in different tabs within the web
browser, or in different browser windows. When a session is not in use (its
tab or window is not displayed) it will reduce its CPU and memory utilization.
Connection Web Page
When the user navigates to the URL, a login form will be displayed.
Enter the connection parameters and press the Connect button to initiate the
connection.

29
Main Page Components
Function Description
User name The user’s credentials to login to the RDP host. Can
optionally contain domain specification, e.g.
domain\user.
When using Ericom Secure Gateway this field is
mandatory. Otherwise this field is optional – if not
specified then user will be prompted for credentials
by the RDP host.
Password Corresponding password for the user name. For
security reasons, this value should not be saved for
future connections.
When using Ericom Secure Gateway this field is
mandatory. Otherwise this field is optional – when
not specified then user will be prompted for
credentials by the RDP host.
Connect button Starts the connection based on the entered
parameters. When the user clicks the Connect
button, all configured settings are saved for future
sessions.
Settings button Press the Settings button to configure various session
settings.
Settings
Press the three dots (settings) to configure various session settings.
Function Description
Connection
Ericom Access
Server
The address (host name or IP address) of the Access
Server. If not specified, the web server host address
(as it appears in the browser address line) will be
used.
When connecting on a non-default port, it must be
specified by appending a colon and port number. For

30
example, 192.168.1.1:8585. The default port is
defined by the wsport value in config.js.
RDP Host The address of the destination system that has RDP
enabled. Leave this field blank if the Access Server is
installed on the RDP host itself.
Connect to
Console
Connect to the remote system’s console session.
Start program on
connection
Select this to only launch the specified application
upon connection to the RDP host. The remote
desktop will not be displayed.
Program path
and file name
Full path to the desired application to be launched.
Only the application will appear and desktop access is
disabled. Requires “Start program on connection” to
be enabled.
Start in the
following folder
Specifies the “Start In” folder for the application
specified in “Start program on connection”
Security
Enable SSL
encryption
When checked, the client utilizes SSL encrypted
WebSocket communication to the Access Server.
Use Secure
Gateway
Select this to use the Ericom Secure Gateway to
connect to the RDP host.
Gateway Address Enter the address and port for the Ericom Secure
Gateway(s) in this field. To specify a custom port,
add a ‘:’ and the port number to the address (i.e.,
gateway.com:4343). If no port value is specified, 443
with be used by default.
Multiple ESG’s can be specified for failover. Separate
each address with a comma (,) or semicolon (;). An
asterisk (*) will shuffle the items after it. For
example, if the following is specified:
aaa;*;bbb:4433;ccc:4343
ESG aaa on port 443 is used to initially connect. If
aaa is unavailable, then bbb:4433 is used followed by
ccc:4343 OR ccc:4343 followed by bbb:4433.
Language & Audio
Display Language Changes the language used by the AccessNow start
page

31
Keyboard locale Select the keyboard region to be used in the
AccessNow session (keyboard_locale)
Keyboard scan-
codes
Enables scan codes. Certain applications use scan
codes and will require this setting to be enabled.
Remote Audio
Playback
Configure where the session’s sound will play at:
local computer, remote computer, or do not play.
Audio playback is not supported with IE 10 and 11.
AccessNow supports audio compression for improved
performance.
Display
Acceleration
Quality
Controls the degree of acceleration that is enabled in
the session. Faster acceleration will result lower
quality images.
Screen resolution Display resolution for the session. If the remote
desktop is larger than the browser window then
scrollbar will be displayed, the browser window will
not be resized.
Select “fit to browser window” (default) to utilize the
current browser window size. Select “fit to screen” to
create a session that can cover the entire local
screen; enable the browser’s full screen mode to
cover the entire local display.
Automatic
session resize
Enabled by default, this setting will resize the
displayed application or desktop to fit the browser
window upon resize. Supports full-screen mode.
Note: Automatic session resize is only enabled if the
“Screen resolution” is set to “Fit to browser window”.
Click Animation Enables the click animation for the mouse pointer on
touch devices
Use Client Time
Zone
Check this box to enable local time zone redirection
(the remote session will use the time of the user’s
“local” system.
Open links on
client (URL
Redirection)
Will open URL links launched in the RDP session to
open using the local browser.

32
Force Virtual
Keyboard
(Default: Auto) Manually configure the
enablement/disablement of the virtual keyboard
feature for the session. Added in version 8.3.
Force
Touchscreen
(Default: Auto)Manually configure the
enablement/disablement of touchscreen related
features for the session. Added in version 8.3.
Reset All Settings
Will reset all settings in all categories back to factory
defaults
About
Version The version number of the version
Moving Settings to Root Level
NOTE: Customizations to the start.html page are not supported by Ericom
engineers. When technical support is required, Ericom will use the original
files to diagnose reported issues.
Settings under the ‘Settings’ menu may be moved to the root level where the
username and password fields are located. The following instructions will
move the ‘Address’ field to the root level:
Backup the original start.html file
Open the start.html file and search for the desired field. For example,
search for address and look for this line:
<input id="address">. This setting is part of a <section> block.
Cut the entire <section> ... </section>, for example:
<section>
<label class="label">STR_ERICOM_ACCESSNOW_SERVER</label>
<label class="input">
<input type="text" name="address" id="address"
placeholder="STR_ERICOM_ACCESSNOW_SERVER"
autofocus="autofocus" spellcheck="false" autocapitalize="none"
autocomplete="off" autocorrect="off" >
</label>
</section>
Search for ` name="username" `. This is an <input> block also part
of a <section> block and has a <fieldset> parent. A <fieldset>
contains multiple <section> blocks.

33
Paste the <section> that was copied above the username <section>
(and just below the <fieldset> tag).
Refresh the browser to see the changes.
Alternatively, paste copied <section> at the end (after the
"password" section, just before the closing </fieldset>)
Optional, if the section that was copied has a <label class="label">
element this can be removed.
Start.html before changes:
Start.html after changes:
Connecting to a Desktop
The default configuration of AccessNow connects the end-user to a desktop
session based on the parameters that are entered into the start.html page.
As long as the setting Start program on connection under the Advanced
button is unchecked, the Connect button will start a desktop session.
After a successful login, the user is connected to the specified desktop; the
content of the remote/virtual desktop is displayed within the browser window.
To disconnect the session, close the browser tab. To log off the session,
use the Windows Start menu Log off function.
34
If the user closes the launched application (by pressing the application’s ‘X’
button), and the logoff session is non-responsive, the TSagent will
automatically terminate the session if there is no activity on the screen for
three (3) seconds.
Connecting to an Application
If an application is enabled and configured under Start program on
connection, only the application will appear once the session is connected,
covering the entire session area. The remote desktop will not be displayed.
On 2012, 2016, and 2019 RDS, the RemoteApps feature needs to be enabled
to allow seamless windows (this is not available in versions prior to 2012).
However, Access Server launches requested applications using its built-in
TSagent component, so these applications do not need to be manually added
to the RemoteApp list.
NOTE When launching applications using AccessNow, on Windows Remote
Desktop Server, the RDS RemoteApps role should be enabled
(recommended) before installing Ericom AccessNow.
Applications can also be defined using the alternate_shell variable in the
config.js file. In this example, Internet Explorer is launched in kiosk mode (-
k) with a URL (http://www.ericom.com) as the parameter:
alternate_shell: '"C:\\Program Files\\Internet Explorer\\iexplore.exe" -k
http://www.ericom.com',
Connecting to an Application in Kiosk Mode
Applications may be displayed in a kiosk mode such that it will cover the
entire monitor (in multi-monitor configurations only the primary monitor is
covered). To create a kiosk mode application using AccessNow and Google
Chrome, perform the following:

35
1) Configure AccessNow to launch an application in “Full Screen” mode:
Edit the config.js file. Uncomment then modify the following parameters:
autostart: true, // sets the session to auto start
address: "rdphost_address" // sets the address of the RDP host
remoteapplicationmode: true, // sets the session to use application mode
alternate_shell:
'"C:\\Program Files\\Ericom Software\\My App.exe"', // sets the
application path
Other parameters may also be modified as desired.
2) Create a shortcut to the Chrome browser (chrome.exe). Edit the shortcut
properties to launch chrome.exe in kiosk mode with the URL to
AccessNow:
chrome.exe -kiosk http://accessnowserver/accessnow/start.html
The shortcut may be placed in the system’s Startup folder to launch it each
time the system is started.
Automatic Session Display Resize
AccessNow supports automatic display resize. This setting is enabled by
default, and is configured under the AccessNow start.html Settings | Display
dialog:
Whenever the browser is resized, the AccessNow session will automatically
adjust itself for the new dimensions. To resize a browser window, drag any
corner of the browser window and release the mouse when the desired
dimensions are reached. If the browser is placed into full screen mode, the
AccessNow session will automatically adjust for the full screen dimensions.

36
NOTE This registry key will affect the resize feature:
HKEY_LOCAL_MACHINE\SYSTEM\CurrentControlSet\Control\Terminal
Server\WinStations\RDP-Tcp\MaxDisconnectionTime. AccessNow will not
resize if the value of this key is between 1 and 10000 milliseconds.
After a session is resized, AccessNow printing may be unavailable for a few
seconds.
Special Key Handling
While it is connected, AccessNow intercepts mouse button and keyboard
events and transmits them to the RDP host. As a result, various keyboard
keys and mouse buttons that are usually handled by the browser will behave
differently. For example, clicking the F5 button usually causes the browser to
reload the current page. When using AccessNow, F5 will not reload the page.
Instead it will be transmitted to the remote application or desktop. Other
function keys, such as the Windows Start key will not be transmitted to the
AccessNow session, but handled by the local system.
Clicking the Back, Forward or Reload browser buttons will cause AccessNow to
display a message asking the user if he/she wishes to leave the current page.
If the users decides to proceed, the remote session will be Disconnected from
the RDP session (not logged off).
Supported RDP Shortcut Keys
AccessNow also supports most RDP hotkey combinations:
http://msdn.microsoft.com/en-us/library/aa383500(v=vs.85).aspx
Except ALT+DEL and CTRL+ALT+MINUS SIGN (-)
Key
combination
Description Supported
Modes

37
ALT+PAGE UP Switches between programs
from left to right.
Remote Desktop
session only
ALT+PAGE DOWN Switches between programs for
right to left.
Remote Desktop
session only
ALT+INSERT Cycles through the programs in
the order they were started.
Remote Desktop
session only
ALT+HOME Displays the Start menu. Remote Desktop
session only
CTRL+ALT+END Brings up the Windows
Security dialog box. Similar
to CTRL+ALT+DEL on a local
system.
Remote Desktop
session and
Application Launch
modes
CTRL+ALT+PLUS Captures a screenshot of the
entire session screen.
Remote Desktop
session and
Application Launch
modes
AccessNow Toolbar
Ericom AccessNow provides a touch friendly toolbar to access built-in features.
Tap or click on the feature once to expand the vertical bar which provides
commonly used function such as file transfer and clipboard.
Tap the horizontal arrow to expand the bar which provides access to additional
features such as system keys and the disconnect feature.
System keys
The horizontal bar provides access to keys that may not be available on
tablets and lightweight keyboards. The following functions are supported:
ESC
TAB
Windows key

38
CTRL+ALT+DEL
ALT+Tab (tap icon again when highlighted to cycle through the active
windows, tap selected window to bring into focus)
NOTE Holding down on a function button will not repeat it. Key combinations,
such as Windows+R to open the Run dialog, are currently not supported.
These may be added to a future version.
Clipboard Support
Ericom AccessNow provides the ability to copy and paste text between the
local device and the remote RDP session using a built-in clipboard.
Clipboard redirection functionality is limited to only text content in the current
version.
NOTE When using Internet Explorer (MSIE) 9, 10, 11, and Chrome the Clipboard
feature is integrated, so there are no AccessNow clipboard icons. Simply
copy and paste text between the local device and AccessNow session using
the traditional copy/paste commands (i.e. CTRL+C and CTRL+V).
Copy Text from Remote to Local
Steps to copy text from the AccessNow remote session to the local desktop:
1) In the remote selection perform a copy function (i.e. CTRL-C) on the
desired text.
2) With Microsoft Internet Explorer and browsers that have Flash enabled,
the text will automatically be copied to the clipboard buffer.
With all other browsers the following dialog will be displayed with the
highlighted text automatically entered:
Press CTRL+C to copy the text to the clipboard buffer.
3) Once the data is copied to the local clipboard, execute a Paste operation
(i.e. CTRL-V) to paste the text to the local application.
39
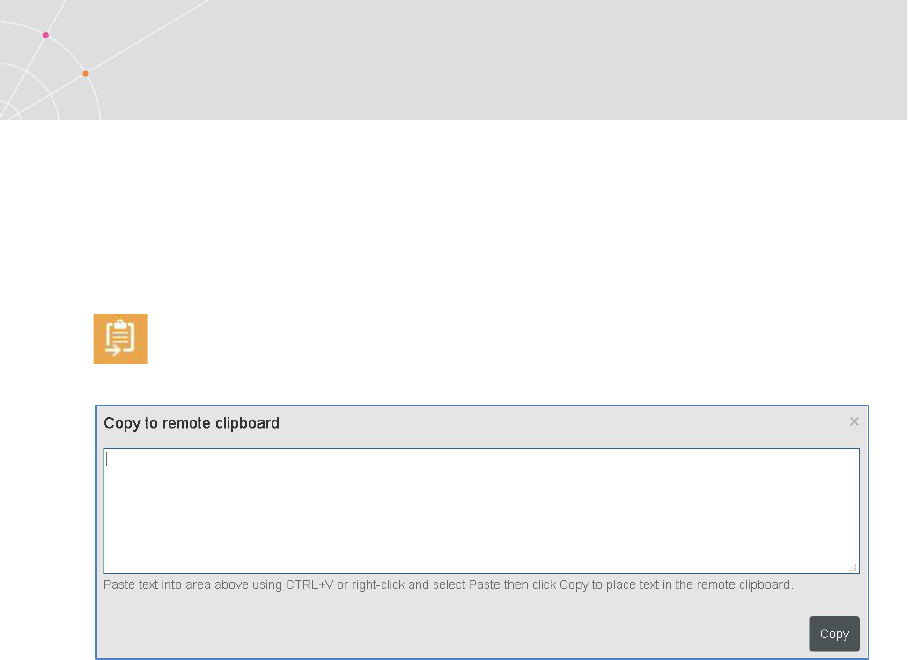
Copy Text from Local to Remote
Steps to copy text from the local desktop to the remote AccessNow session:
1) From the local application, perform a copy function on the desired text.
2) Click on the Copy icon.
3) Paste the copied text into the AccessNow clipboard
4) Click the Copy button
5) Once the data is copied to the remote clipboard, execute a Paste operation
to paste the text to the remote application in the AccessNow session.
File Transfer
Ericom AccessNow provides the ability to transfer files between the local
device and the remote RDP session. When downloading files, ensure that the
Access Server service has permission to read the desired files. When
uploading files, ensure that the Access Server service has permission to write
files to the desired location.
File transfer with local and mapped drives are supported.
If the Access Server detects that the File Transfer feature cannot be
used in the session, the icons will be automatically hidden.
File names with Unicode characters may not be supported.
File transfer functionality requires that the Access Server be installed
on the RDP host; do not use Access Server as a gateway.
File transfer not available when Access Server is used as a gateway.

40
Download files from Remote to Local
There are two methods to download files from the remote AccessNow session
to the local device.
Method 1: Press the Download button in the AccessNow session.
The Open dialog will then appear so that the user can select the desired file(s)
to download.
Method 2: Right click on the desired file(s) and select Send To and Remote
Client.
After using either download method - the selected files will be downloaded to
the browser’s configured Downloads folder.
Open the Downloads folder to view the file. The method to display the
Downloads will vary depending on the browser being used. The Downloads
folder location will also vary based on the path that is configured in the
browser.

41
Download Multiple Files to Local
To download multiple files from the Windows session
Select the desired files (hold CTRL key while selecting files)
Right click on a selected file to open the menu
Select “Send To” | “Remote Client” and all the selected files will be
downloaded.
Multiple file download is not supported by the AccessNow Toolbar download
button.
This feature is supported on Google Chrome, Firefox and Microsoft Edge.
Microsoft Internet Explorer does not support this functionality.
Upload files from Local to Remote
There are two methods to upload files from the local device to the remote
AccessNow session.
Method 1: Press the Upload button in the AccessNow session.
The Save As dialog will then appear for the user can select the desired file(s)
to upload.
Method 2: Drag the desired file(s) from the local device over the browser
where the AccessNow session is running.

42
After using either upload method - the selected files will be uploaded to the
selected folder. A file transfer progress dialog box will appear.
NOTE Apple Safari browser only supports uploading one file at a time, and not
multiple files in one operation.
Built-in Universal Printing
Ericom AccessNow includes a built-in universal printer for redirecting remote
print jobs to the local web browser. Once the print job is received by the web
browser, it can be saved or printed.
AccessNow may also be configured to bypass the PDF verification steps and
send the print output directly to the local browser’s print preview function.
See the section on Direct Print Mode later in this chapter for more details.
NOTE The built-in AccessNow Universal Printer driver users a generic driver and
may not work in certain scenarios. The print output may also differ than
that of one from a native driver.
Requirements
In order for the AccessNow Printer to be added to the remote sessions, the
Access Server Service must have rights to add a printer to the session. In
most cases the Local System account has sufficient rights. If it does not, go
the Access Server Properties and enter a user account that has the rights.

43
Usage
The Ericom AccessNow printer is added to the remote RDP session upon
connection. The AccessNow printer will appear as an available printer while
the session is active. To print to the AccessNow Printer, the user simply
selects it when prompted at the Print dialog window.
The AccessNow printer will be set as the default printer in the AccessNow
session. To prevent the AccessNow printer from being the default printer,
enable the following Group Policy setting: Do not set default client printer to be
default printer in a session
Once the print operation is executed, AccessNow will send the print output to
the local web browser. A ready status dialog will appear when the print
output is ready for viewing and printing with the web browser.
When the user presses the View button to see the print output, the contents
will be displayed in a new browser tab using a one-time use URL. This URL
should not be bookmarked for future use.
Sample printout URL:
Once the print output is displayed, it can be sent to the device’s local printer
or saved as a local PDF file using the web browser. The web browser may
have shortcut buttons for both functions. Here is an example from Chrome:
NOTE If the AccessNow printer is not appearing as an available printer, verify
that the user has permissions to add a printer to the session.
Using AccessNow Printer on Windows 8, 10, 2012, 2016, 2019
Windows 8, 10, 2012, and higher do not include the necessary built-in drivers
to support the AccessNow Printer. This functionality can be added by
installing the Lexmark Universal Postscript (PS) Printing Driver. Download the
appropriate driver from the Lexmark website or Ericom’s Update Center
website.

44
During the installation, when prompted for the Installation Mode, choose
Dynamic Mode. Use default settings for all other selections.
Using AccessNow Printer in Lexmark Mode
https://www.lexmark.com/en_us/support/universal-print-driver.html
Note: this is a third-party link that may change unexpectedly. If the link does not
work, perform a Google search for Lexmark Universal Print driver to search for
the updated link.
Download the “PS”/”PS3” version.
Install it on the RDP host(s).
When prompted, select “Install Only”

45
Direct Print Mode for faster Printing
To speed up the print process, the user verification and option to save as PDF
may be removed by enabling Direct Print Mode.
In the config.js file, set: directprint: true
When Direct Print mode is enabled, the print output sent to the AccessNow
printer will automatically appear in the browser’s local Print Preview dialog.
Modifying the AccessNow Printer name
The AccessNow printer name may be modified with a custom string.
Open the blaze.txt file under C:\Program Files\Ericom Software\Ericom Access
Server\WebServer\AccessNow\resources
Add and configure the setting: AN Printer name:s:<custom printer name>
URL Redirection
URL Redirection allows HTTP and HTTPS URL links that are selected (clicked)
on the remote RDP desktop to be opened using the local web browser. This
enables redirected websites to use the local resources rather than remote
resources to achieve better performance.
URL’s should only be redirected when the local device has access to the
website. If the URL is only viewable from the RDP session, then it should not
be redirected.
To enable URL redirection, click on the AccessNow Settings button (three
dots), Display button, and check Open browser links on client.
When a user logs into a session where URL redirection is enabled, Ericom
AccessNow will instruct the user to select “Ericom Access Terminal Service
Agent” as the default browser.

46
In order to use URL Redirection, the Ericom Agent must be configured as the
default browser. This will allow it to intercept URL addresses and redirect it to
the local system.
During a session where URL redirection is enabled, if the user launches a URL,
a prompt will be displayed to ask the user where to launch the URL from:
On Client – Opens the URL on the local device in a new browser tab
On Server – Opens the URL in the remote RDP session
Cancel – Cancels the request
The URL redirection setting may also be configured via config.js under
“redirect: false,”.
If AccessServer is uninstalled, the original default browser will not be
restored; the operating system will prompt the user to select a new default
application for web usage.
Ending a Session
After the user logs out or disconnects, a “Session ended” message appears.
The browser returns to the connection dialog after the user clicks OK.
No trace of the session will remain on the device once it is ended. For
additional security, close the browser tab or window that previously ran the
AccessNow session.

47
Disconnect button
Users may manually disconnect from the remote session by pressing the
Disconnect button.
Session Idle Auto-logoff
Remote desktop sessions are explicitly logged off using the Log Off option in
the remote desktop’s Start Menu.
Application sessions are logged off when the application is closed. In some
cases the session is not closed immediately or is non-responsive. AccessNow
includes an auto-logoff feature where if nothing is displayed on the screen for
a specified duration of time, the session will be automatically logged off. The
default value is three (3) seconds, this value may be changed by editing the
blaze.txt file in Resources folder and adding the line:
RDP_LogoffDelaySeconds:i:n (n is the duration, default = 3.)
Automatic Reconnect
Active AccessNow sessions will automatically attempt to recover from
temporary network outages by reconnecting to the user’s session. The user
may experience a slight delay during the reconnect attempt, but once the
session is re-established, the user may continue working without having to log
back into the session.
This feature may be disabled by configuring the config.js value:
reconnectOnDropped: false,
Fixing Typing Issues (Enable Scan code Input)
In some cases, while typing within an AccessNow session the keyboard input
will be incorrect or missing in certain applications. The affected applications
may require scan-code input rather than Unicode (which is the default). To
enable scan-code input, click on the AccessNow web page’s Settings button
(three dots). Then check the “Use keyboard scan-codes” setting, click the
three dots again, and test.
Scan-code may also be enabled in the config.js file by modifying this setting:
convert_unicode_to_scancode false (default), set to true when using certain
applications that send characters as
scancodes (i.e. VMware vSphere Client,
Ericom Blaze Client, any application where

48
you may have issues typing text). This
setting will generate scancodes based on the
selected locale.
NOTE Remember to remove the “//” in the beginning of the line (in the config.js
file), these signify “comments” which tell AccessNow to ignore the line.
Once they are removed, the content of the line will become active.
Google Chromebooks
Ericom AccessNow operates on Google Chromebook and Chromebox just like it
does with a Google Chrome browser. Here are some tips to keep in mind
when using AccessNow on a Chromebook or Chromebox:
Function Description
Mouse Left-click Click the Chromebook trackpad with one finger
Mouse Right-click Click the Chromebook trackpad with two fingers
Scrolling a document or
website
Drag two fingers on the Chromebook trackpad
up or down to scroll
Configure Chromebook Enter into the address field: chrome://settings
Most Chromebook shortcut key combinations (i.e. CTRL+T to open a new tab)
are supported during an active AccessNow session. Configured Modifier keys
are also supported within the AccessNow session.
Chromebook Keyboard
The Chromebook keyboard lacks several keys that are used by Windows.
ChromeOS provides standard mappings that use existing keys with the ALT
button to represent certain missing keys. AccessNow supports these key
combinations:
Windows Command AccessNow Key combination
Delete (DEL) ALT+Backspace
Page Up ALT+Up
Page Down ALT+Down
Home CTRL+ALT+Up

49
End CTRL+ALT+Down
In addition, AccessNow provides special non-standard mappings for additional
key combinations on ChromeOS.
Windows Command AccessNow Key combination
F1, F2, … CTRL+1, CTRL+2, …
ALT+TAB ALT+`
ALT+SHIFT+TAB ALT+SHIFT+`
CTRL+Home CTRL+ATL+Left
CTRL+End CTRL+ALT+Right
Touch Devices (Tablet/Smartphone)
Ericom AccessNow will operate on any tablet or smartphone device if used
with an HTML5 browser (i.e. Android Chrome). AccessNow will automatically
detect if the device is touch capable and automatically use the built-in virtual
keyboard for text input and gesture support for display navigation.
The built-in Click Animation feature helps users see where their finger tap
gesture is being applied in the session.
Keyboard Auto-Sense and Display
AccessNow will automatically sense when the mouse focus is in a text entry
field and automatically display the devices virtual keyboard.
To disable this feature, expand the AccessNow toolbar and tap on the “Auto
Keyboard” button until the background highlight is disabled.
Disabled:

50
Enabled:
Enable Default Keyboard
To enable the device’s default keyboard for text input, tap the Keyboard
button
AccessNow Gestures Support
AccessNow supports built-in gesture support when used on a touch device.
This mode is Enabled when “Multi-touch Gesture Redirection” is Disabled:
To use native Windows multi-touch gesture redirection, disable the AccessNow
gesture support.
Tap the Gestures icon in the Toolbar to see the full list of supported
AccessNow gestures.
Windows Multi-touch Gesture Redirection
Starting in version 8.3, AccessNow supports Windows® multi-touch gesture
redirection. All multi-touch gestures are redirected natively into the Windows
session for use by the application(s) inside the AccessNow session. This
feature operates similar to the multi-touch gesture redirection found in the
native Microsoft (mstsc.exe) and Ericom (EricomRDP) clients.
The multi-touch gesture redirection feature is enabled using the AccessNow
Toolbar button or by config.js setting.

51
Activation Criteria
AccessNow multi-touch gesture redirection is enabled and activated based on
the following criteria:
The feature is enabled if all of the following are true:
Touch is supported by the remote host
Touch is supported by the client device
Touch redirection is set to true
The feature is activated if all of the following are true:
Touch feature is enabled
Toolbar icon is set to active
Touch is not suspended by the RDP host
Toolbar button
The Windows multi-touch gesture redirection feature is enabled by default.
The functionality is enabled and disabled by toggling the gesture button in the
AccessNow toolbar:
(Enabled state)
When Windows® multi-touch gesture redirection is disabled, AccessNow
gesture support is enabled.
(Disabled state)
Config.js Settings
The following config.js settings are used to configure the multi-touch
redirection feature:
rdpTouchEnabled
True (default) - Enable remote touch. On the
Server: enable the feature and send RDP client touch
events. On the Client – enable the feature, process
the incoming server touch messages.
rdpTouchActive
False (default) – Sets the default activation state
(ignored when not enabled.) On the Client this is the
initial state of the toolbar button. If active, send touch
events.
rdpTouchAction
0 (default) - Action to be taken if multi-touch is
enabled, but is not supported by the server or client

52
device. Action values:
0 - no action
1 - display an error message
2 - display an error message and disconnect
3 - ask for user confirmation to continue without
touch
Conflict with Local Gesture Usage
When multi-touch redirection is enabled, all gestures are redirected to the
remote session. However, the user may need to use gestures locally on the
device to pan and zoom around the session. When local gesture functionality is
required, disable multi-touch redirection temporarily, and re-enable it when it is
needed again.

53
7. ADVANCED CONFIGURATION
Ericom AccessNow provides flexible methods to set predefined values and
accept custom values that are passed to it. These values can either be
displayed in the AccessNow start page or trigger an automatic connection
without allowing the user to change any settings (for an example of this, visit
Ericom AccessNow online demo at http://demo.ericomaccessnow.com).
Ericom AccessNow may also be integrated with third-party web sites and
portals. Ericom AccessNow can accept configuration settings from external
pages or directly from a web server. These settings may be displayed in the
AccessNow start page for the user to view and modify, or used for an
automatic connection.
Modifying the AccessNow interface
Certain built-in images may be modified to provide a custom look. The path
to the resources folder where the images are stored is similar to:
C:\Program Files\Ericom Software\Ericom Access
Server\WebServer\AccessNow\resources
NOTE Backup the resources folder before making any modifications. To roll-back
to the original files, simply copy the original resources folder back to the
original location.
Any customizations will not be supported by Ericom support as they are
beyond the scope of a standard implementation.
Modifying the connection’s name
The AccessNow connection name uses the RDP Host’s address by default. This
label may be modified to a custom string.
To change the connection’s name:
Open the config.js file and add the name setting if it does not exist.
Set the name setting to the desired string. In this example, testname will be
used as the new connection name when the user starts the session:
The name setting may also be set using the following cookie: EAN_name.
Once the name parameter is set, the new label will appear in the connection’s
browser tab and in the Establishing connection dialog box.

54
Static Configuration of Config.js
An administrator can modify configuration settings for AccessNow by editing
the config.js file that is installed as part of the AccessNow web component.
This is a JavaScript file that can be modified using any text editor, such as
Windows Notepad. Most settings in the file have the following format:
name: value,
The value can be a number, a flag (true or false), or text enclosed in quotes.
Some settings are prefixed by a double slash // which means they are
disabled. Remove the double slash in order to set a value for the setting.
Javascript rules apply in this file, certain characters need to be escaped (i.e.
backslash). Once the settings are configured, save the file and the next user
will have the new settings applied.
Refer to the Settings Table for a description of each setting.
NOTE Backup the original config.js file before saving any changes. This will
ensure easy rollback to the original configuration.
Passing URL Query Strings
AccessNow supports the ability to pass custom settings as parameters in the
URL. For example, the following URL will instruct AccessNow to just launch
the Notepad application from the RDP host, rather than display the entire
remote desktop:
http://app.ericomaccessnow.com/accessnow/start.html?remoteapplicationmo
de=true&alternate_shell=Notepad.exe
To start a URL parameter string add the ‘?’ character to the end of the URL.
Separate each parameter using the ‘&’ character.
If a value contains special characters that cannot be placed in a URL, such as
the space key, these character must be represented using an escape string.
For example, the space character is encoded as %20.
Common variables used in a query string
autostart= (true, false) Starts a session automatically
without the need to press the Connect button
address= (string) Address of the Access Server
full_address= (string) Address of the RDP Host
username= (string) Username to pass into the RDP session

55
password= (string) Password to pass into the RDP session
(Warning: unencrypted in the URL)
domain= (string) User’s domain if not specified in the
username
remoteapplicationmode= (true, false) Launches just the specified
application
alternate_shell= (string) Path of the application when using
application mode (i.e. Notepad.exe)
NOTE Passing parameters in the URL is very simple and easy to use, but is
inappropriate for passing sensitive data such as user credentials. For
secure transmission of AccessNow parameter values, use browser cookies.
Define Configuration Groups
All users share the configuration settings defined in the config.js configuration
file. It is possible to specify special settings that will override the global
settings for certain groups of users. Multiple configuration groups are defined
in the configuration file.
For example, if the Marketing group will have clipboard redirection and
printing enabled, change config.js as follows:
var defaults = { // this already exists in the file
…
"Marketing": { // bold text are new additions
printing: true,
clipboard: true
},
};
NOTE The double quotes surrounding Marketing must be identical. It may be
necessary to delete them and re-type them if the text was copied from
another source.
Also, the last setting of the configuration group should not have a ‘,’ at the
end. This comma will be placed after the closing bracket ‘}’.
In the URL to be used by the Marketing group, add the settings parameter:
http://www.accessnow.com/accessnow/start.html?settings=Marketing
Passing settings using Cookies
Ericom AccessNow Cookies uses the same settings as the config.js file, but
with an additional EAN_ prefix. For example, the gateway_address setting is
56
set using the cookie EAN_gateway_address. Ericom AccessNow erases the
session cookies immediately after reading them.
When using cookies, remember to perform the following:
Use HTTPS to encrypt the cookies so that they can contain
sensitive data, such as user credentials.
Set the Secure option to the cookies to ensure that they are never
transmitted over unencrypted communication.
Do not use HttpOnly cookies because Ericom AccessNow requires
JavaScript access to the cookie values.
Use the Path option to limit addresses to which cookies might be
sent from (Ericom AccessNow cookies should not be sent to any
host-side address.)
Use Session cookies that expire as soon as the session ends
and/or specify a very short expiration duration.
Passing Encrypted Parameters
AccessNow supports the ability to pass multiple settings using a single base-
64 encoded parameter. This is useful when passing settings in the URL in a
fashion where the user cannot easily understand what is being transmitted.
For example: instead of:
http://myserver:8080/?username=me&password=secret
The encrypted base-64 encoded parameter appears as:
http://myserver:8080/?params=dXNlcm5hbWU9bWUmcGFzc3dvcmQ9c2Vjcm
V0
NOTE The same base-64 encoding mechanism may be used with Cookies as well,
using the cookie EAN_ parameters.
Settings Precedence
When the Ericom AccessNow client starts, it reads configuration information
from a variety of sources. If two or more sources contain different values for
the same setting, the value that Ericom AccessNow will use is determined by
the following precedence order:
Lowest Precedence Highest Precedence
config.js | saved settings from previous session | cookies | URL parameters
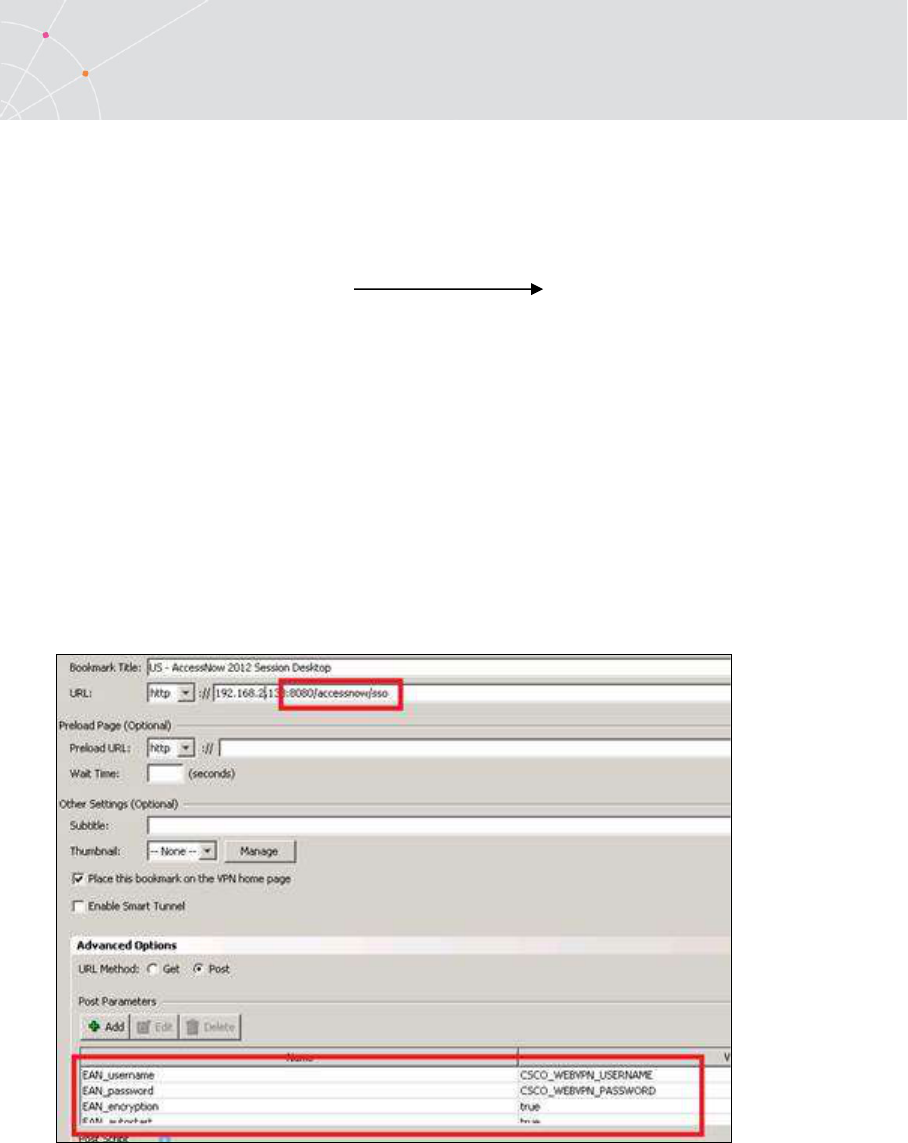
57
For example: if the gateway_address is specified to be “server1” in config.js
but “server2” in a cookie (EAN_ gateway_address), then the value “server2”
will be used.
If the setting overrideSaved is set to true in config.js, any settings predefined
in the config.js file will override previously used settings. Precedence order:
Lowest Precedence Highest Precedence
saved settings from previous session | config.js | cookies | URL parameters
Passing settings using Form POST
Ericom AccessNow supports the passing of variables using Form POST. This is
useful when using a third-party portal to pass credentials and settings to
AccessNow.
To pass desired values to AccessNow, POST the variables to the path
“/accessnow/sso”. Use the EAN_ Cookie prefix to define the settings that will
be passed using POST. Here is an example of passing the username,
password, and encryption setting using POST in a Cisco
®
ASA SSL VPN:
Modifying the SSO path
Starting in version 8.1, the default SSO path “/accessnow/sso” may be
configured with a customizable value. To change this path, perform the
following:

58
After installing AccessServer, a custom SSO path may be configured
via the Windows Registry.
Navigate to HKLM\Software\Ericom Software\Access Server\SERVER
Side
Add a STRING key and label it “SSO Path”
Enter the desired value in the form: “myapp/ssopath"
The SSO URL will now be: http:<host>:<port>/myapp/ssopath
(not required to restart the AccessServer)
Settings Table
The config.js file contains the following configuration settings. Setting names
are case sensitive. When settings are specified using cookies, their names are
prefixed by EAN_.
Setting Value Description
overrideSaved false (default), settings that the user changes
are preserved between sessions and override
values set in config.js. Change to true for
config.js to override previously used settings.
noSaved 1 (default), 0 - always use saved settings; 1 –
disable save in SSL VPNs; 2 - never use saved.
ignoreURLparameters false (default), set this to true to disable the
AccessNow URL parameter feature. This is
useful to lock down the AccessNow login web
page and prevent users from entering custom
parameters to AccessNow.
onlyHTTPS By default, AccessNow first attempts to
connect using WebSockets. If the Ericom

59
Secure Gateway is used with AccessNow, the
connection will fall back to HTTPS when
WebSockets is not available. If this setting is
true, HTTPS is used immediately.
noHTTPS By default, AccessNow first attempts to
connect using WebSockets. If the Ericom
Secure Gateway is used with AccessNow, the
connection will fall back to HTTPS when
WebSockets is not available. If this setting is
true, only WebSockets will be used and HTTPS
fallback will be disabled.
autostart Set to true to force the AccessNow start.html
page to connect automatically upon access.
hidden A comma- or space-separated list of field
names as they appear in config.js. For
example “username,password,domain”. The
listed fields will be hidden so that the user will
not be able to modify them.
To hide a button, such as the Advanced
button, prefix the button text with the word
show. For example,
“showAdvanced,showAbout” hides both the
Advanced and About buttons. “locale” hides
the “Display Language field”.
All hidden variables ignore previously saved settings.
settings (URL parameter only) Name of a Configuration Group to be used
wsport The default WebSocket port that will be used
by the client. The value specified in the file
(8080 by default) will be used for both
encrypted and unencrypted WebSocket
communication.
If the Access Server port is changed, this value
must also be updated manually.
When no port is entered in the Access Server
value of the start.html page, this port value
will be used. The user can provide a different
value by explicitly specifying the port value
after the Access Server address.
gwport The default gateway port that will be used if it
is not explicitly specified in the address field.

60
dialogTimeoutMinutes Timeout period, in minutes, after which an
inactive dialog is automatically closed and the
session is logged off. This is only relevant for
dialogs that have a logoff button.
sessionTimeoutMinutes Timeout period, in minutes, after which an
inactive session is disconnected. This timeout
is reset whenever user clicks on the keyboard
or a mouse button. The default value is 0,
which disables this feature.
specialkeys Enables support for special RDP key
combination commands, such as
CTRL+ALT+END which starts the Windows NT
Security dialog box (similar to local
CTRL+ALT+DEL).See
http://support.microsoft.com/kb/186624 for
the list of key combinations. The following are
not supported: Alt+Delete and
CTRL+ALT+MINUS SIGN (-)
chromeKeys true (default) support special ChromeOS keys
combinations
clipboard
true (default) enables clipboard functionality;
false disables it
clipboardTimeoutSeconds
The delay duration before the clipboard image
automatically fades out
clipboardKey Key to open clipboard paste dialog, set to
false to disable
console false (default) set true to enable RDP console
mode
settingsURL URL of the connection settings file
endURL URL to open to after the AccessNow session
has ended (# value closes window).
If there is a prefix with the symbol ^ then this
sets the value of window.location instead of
top.location. This is useful when the AccessNow
session is embedded in a frame.
For example "^http://www.ericom.com"
address address of Access Server
full_address address of RDP host

61
username Username to pass into the AccessNow session
password Password to pass into the AccessNow session
(entered as clear text in config.js file)
domain Domain to pass into the AccessNow session
false (default) determines whether the user’s
password will be saved in the AccessNow page
for future use. Set to true to enable password
saving (not recommended for kiosk usage).
encryption false determines if encryption will be enabled
from the AccessNow client to the server
blaze_image_quality Sets the quality level using a numeric For
example: 40 (fair quality), 75, 95 (best)
resolution Sets the resolution size of the AccessNow
session. The value set must be a valid option
under the AccessNow screen resolution setting
For example: "1024,768"
use_gateway false (default), set to true to use an Ericom
Secure Gateway for remote access
gateway_address Defines the address and port of the Ericom
Secure Gateway
For example: secure.acme.com:4343
remoteapplicationmode false (default), set to true to use application-
only mode to launch specific applications
instead of a full desktop session.
alternate_shell Defines the path to an application that will be
launched instead of a full desktop session.
When using a backslash, it must be prefixed
with another backslash. When using double
quotes as part of a string, the entire string
must be denoted using single quotes (and vice
versa). Here is an example of a path using
backslashes and double quotes:
‘”C:\\Program Files\\notepad.exe”’
For more information on JavaScript language
string syntax rules, read:

62
http://en.wikipedia.org/wiki/JavaScript_syntax
#String
shell_working_directory Sets the working directory for the application
defined in the alternate_shell parameter.
useScancodes No longer in use, see
convert_unicode_to_scancode
convert_unicode_to_scancode false (default), set to true when using certain
applications that send characters as scancodes
(i.e. VMware vSphere Client, Ericom Blaze
Client, any application where you may have
issues typing text). This setting will generate
scancodes based on the selected locale.
leaveMessage The message displayed to the user after
he/she navigates away from an active session
printing true, enables the printing feature (default)
false, disables the printing feature
fileDownload true, enables the ability to download files
(default)
false, disables the download feature
For Full Screen use “screen”
fileUpload true, enables the ability to upload files
(default)
false, disables the upload feature
audiomode 0, enables audio redirection (default)
1, play audio on remote computer
2, disables audio redirection
name Defines a custom string for the connection
name. By default, the RDP Host address is
used.
minSendInterval Specifies the minimum duration between
mouse position messages sent from the client
when the mouse button is pressed. Units is
milliseconds
use_client_timezone true (default) enables local time zone
redirection; false disables it

63
restrictHost Use this setting to create a list of addresses
that the AccessNow will be denied access to.
Enter a DNS address, IP address, or IP range
(e.g. 127.0.* covers 127.0.0.0 to
127.0.255.255)
reverseMouseWheel 0 - mouse wheel works as usual
1 (default) - mouse wheel direction is reversed
only on Mac
2 - mouse wheel direction is always reversed
mouseWheelSpeed 120 (default) – sets mouse wheel speed.
Higher value will result in faster scroll.
longPressRightButton Modifies mouse right click behavior:
0 (default) - long left-click does not generate
right-click
1 - long left-click generates right-click only on
Mac
2 - long left-click always generates right-click
Note that if mouse is moved while holding left
mouse button, this causes drag behavior, and
will not generate right-click.
fullscreenKeyMode 0 – always pass F11 to remote session
1 – for IE handle F11 locally (enter/exit full-
screen). For other browsers pass to remote
session
2 (default) – always handle F11 locally
(enter/exit full-screen).
disableToolbar true (default) – displays the toolbar upon login
false – disables the toolbar
reconnectOnDropped true (default) – automatically reconnect to
user’s session after a network outage is
rectified
false – disable automatic reconnect
reconnectMaxMinutes Duration of reconnect for dropped connection
disableToolbar false (default) – show the AccessNow Toolbar
true – disable the AccessNow Toolbar

64
enableAutoKeyboard true (default) – auto-sense when the mouse is
in a text entry field and automatically display
the virtual keyboard
false – disable the auto-sense and display
feature
touchPad
true (default) - Enable or disable touchpad
support for mobile devices.
reverseTouchScroll
false (default) - Reverse two-finger scrolling on
touch devices.
noEndDialog
Do not display session disconnect dialog
nameOnly
Display only the connection name in the title
fastLogoff
Enable fast logoff for published apps
(remoteapplicationmode must be true)
clipboardSeamlessCopy
true (default) - Enable seamless clipboard
redirection (this option only applies to
Chrome). With MS IE this is always enabled
and cannot be disabled.
MinWidth Sets the minimum horizontal resolution that
the AccessNow session may use (the
AccessNow session will never be sized below
this pixel value). Default value is 768 when
“auto” is used.
MinHeight Sets the minimum vertical resolution that the
AccessNow session may use (the AccessNow
session will never be sized below this pixel
value). Default value is 600 when “auto” is
used.
blockAltOrCtrlCombinations
false (default) - Block any key combination
that includes CTRL or ALT.
redirect
False (default) - Enable URL redirection on the
host server so that remote URL’s will be
launched using the local (default) browser.
defaultErrorMessage
Display the default error message when no
matching translation is found
fireFoxProgrammaticFullScreen
false (default) - use FullScreen API on Firefox,
will disable ESC key usage while in full screen.

65
printToNewTab
Opens printed files in a new tab. This allows
the user to print multiple files at once.
Requires "directprint" to be enabled. Functions
best with Chrome.
uploadSizeLimit
Sets the maximum file size that a user may
upload with AccessNow
notificationTimeOut
Sets the duration where notifications will be
displayed without user interaction (in ms)
rdpTouchEnabled
True (default) - Enable remote touch. On the
Server: enable the feature, create RDP dynamic virtual
channel, and send RDP client touch events. On the
Client – enable the feature, process the incoming
server touch messages.
rdpTouchActive
False (default) – Sets the default activation state
(ignored when not enabled.) On the Client this is the
initial state of the toolbar button. If active, send touch
events.
rdpTouchAction
0 (default) - Action to be taken if multi-touch is
enabled, but is not supported by the server or client
device. Action values:
1 - display an error message
2 - display an error message and disconnect
3 - ask for user confirmation to continue without
touch
true lossless type
0 (default) true lossless
1 = use jpeg 100
2 = use LZ4 (true lossless, no compression)
These settings only take effect after the user starts a new session.
NOTE In some cases the local browser must be closed and reopened before
changes take effect. The browser cache may also need to be cleared.
Embedding AccessNow in an iframe
To embed AccessNow within a third-party web page using the iframe
mechanism, simply place an iframe tag within the containing page, and have
the iframe’s SRC attribute reference the AccessNow URL.
For example:
<body>
<h1>Embedded AccessNow</h1>

66
<iframe src="http://127.0.0.1:8080/accessnow/start.html"
style="width:1024px; height:768px"></iframe>
</body>
When using iframes AccessNow may access the parent frame. Due of the
same-origin policy, make sure the protocol, host, and ports of the parent
frame and the iframe src (link to AccessNow) will match.
For example, if the page is accessed at
https://example.com:8021/index.html, the iframe src attribute must start
with https://example.com:8021.
(Tip: leave off the protocol, host and port and the browser will automatically
select the protocol and host, as in http:// or https://).
A known behavior when embedding AccessNow in an iframe is that automatic
session resize is not supported.
Post-Session Redirect
When the AccessNow session ends, it can be configured to send the browser
to a specified URL using the endURL setting.
Specifying a simple URL will redirect the iframe.
Prefix the URL with ^ to redirect the iframe’s parent (container).
Prefix the URL with $ to redirect the top-most container.
Specify # and the URL will close the browser tab.
Sample HTML - Passing Cookies into
AccessNow
<html>
<head>
<meta http-equiv="Content-Type" content="text/html; charset=utf-8">
<script>
<!--
function createCookie() {
var address = document.forms['cookieform'].address.value;
var fulladdress = document.forms['cookieform'].fulladdress.value;
var username = document.forms['cookieform'].username.value;
var password = document.forms['cookieform'].password.value;

67
var domain = document.forms['cookieform'].domain.value;
document.cookie = "EAN_autostart=true; expires=0; path=/";
document.cookie = "EAN_address="+address+"; expires=0; path=/";
document.cookie = "EAN_full_address="+fulladdress+"; expires=0; path=/";
document.cookie = "EAN_username="+username+"; expires=0; path=/";
document.cookie = "EAN_password="+password+"; expires=0; path=/";
document.cookie = "EAN_domain="+domain+"; expires=0; path=/";
}
function testCookie() {
document.cookie = "EAN_autostart=true; expires=0; path=/";
document.cookie = "EAN_address=Rdpdemo.ericom.com; expires=0;
path=/";
document.cookie = "EAN_full_address=Rdpdemo.ericom.com; expires=0;
path=/";
document.cookie = "EAN_username=demo; expires=0; path=/";
document.cookie = "EAN_password=demo; expires=0; path=/";
//document.cookie = "EAN_domain=; expires=0; path=/";
}
function readCookie(name) {
var nameEQ = name + "=";
var ca = document.cookie.split(';');
for(var i=0;i < ca.length;i++) {
var c = ca[i];
while (c.charAt(0)==' ') c = c.substring(1,c.length);
if (c.indexOf(nameEQ) == 0) {
alert( c.substring(nameEQ.length,c.length));
}
}
}
// -->
</script>
</head>

68
<body>
<form name="cookieform" action="#"><p>
address: <input name="address"><br/>
RDP Host: <input name="fulladdress"><br/>
Username: <input name="username"><br/>
Password: <input name="password"><br/>
Domain: <input name="domain"><br/>
</p></form>
<a href="javascript:createCookie()">Set Cookie</a><br/>
<br/>
---------------------------------------------------------------------------------------
-------------------------------------------<br/>
<a href="javascript:testCookie()">Test Data</a><br/>
<br/>
<!--
---------------------------------------------------------------------------------------
-------------------------------------------<br/>
<a href="javascript:readCookie('EAN_address')">Read address</a><br/>
<br/>
<a href="javascript:readCookie('EAN_full_address')">Read full
address</a><br/>
<br/>
<a href="javascript:readCookie('EAN_autostart')">Read autostart</a><br/>
<br/>
<a href="javascript:readCookie('EAN_username')">Read user</a><br/>
<br/>
<a href="javascript:readCookie('EAN_password')">Read pass</a><br/>
<br/>
<a href="javascript:readCookie('EAN_domain')">Read domain</a><br/>
<br/>
-->
---------------------------------------------------------------------------------------
-------------------------------------------<br/>

69
<br/>
<a href="/accessnow/start.html">Launch</a>
</body>
</html>
AccessNow File Transfer API
AccessNow includes a file transfer mechanism that can support advanced
functionality. The file transfer executable, ANFileTransfer.exe includes three
features to provide enhanced integration with third-party applications.
After enabling any of the three features explained in this section, users with
active sessions need to logoff and back on in order to use the feature.
Initiate a download of a file
Within an AccessNow session, launch: ANFileTransfer.exe file-path
ANFileTransfer.exe is located in the AccessNow installation folder, e.g.
C:\Program Files\Ericom Software\Ericom Access Server. This folder is added
to the system path during installation.
The complete path is also available in the registry under:
HKEY_LOCAL_MACHINE\SOFTWARE\Microsoft\Windows\CurrentVersion\App
Paths\ANFileTransfer.exe. This allows the executable to be launched directly
using ShellExecute.
Here is an example of a use case:
An application always creates an output file in c:\ named test.csv. Since the
file will always be in the same location, a shortcut may be created to simplify
the download process.
Launch “ANFileTransfer.exe c:\test.csv” and test.csv will be downloaded in one
step, rather than three (initiate download, select file, click OK). This operation
may also be called from a third-party application to automate the download
process of an output file.
NOTE The download destination cannot be configured ahead of time. The
downloaded file will be placed in a folder specified by the web browser.
Specify upload folder
Instead of displaying a dialog to the user, uploaded files will always be placed
directly into a pre-configured folder (files with the same name will be
overwritten with the latest version).

70
The folder path is specified using a registry setting. It will be read from either
HKEY_LOCAL_MACHINE or HKEY_CURRENT_USER with HKEY_CURRENT_USER
taking precedence. Before configuring the upload folder path, verify that users
have write access to the specified location. The Registry keys for the Upload
Folder setting are:
HKEY_LOCAL_MACHINE\SOFTWARE\Ericom Software\ANFileTransfer,
REG_SZ value UploadFolder
HKEY_CURRENT_USER\SOFTWARE\Ericom Software\ANFileTransfer,
REG_SZ value UploadFolder
On 64-bit systems running previous 32-bit versions of Access Server, and 32-
bit systems, the Registry keys are located here:
HKEY_LOCAL_MACHINE\SOFTWARE\Wow6432Node\Ericom
Software\ANFileTransfer, REG_SZ value UploadFolder
HKEY_CURRENT_USER\SOFTWARE\Wow6432Node\Ericom
Software\ANFileTransfer, REG_SZ value UploadFolder
NOTE These registry keys may not have been installed with the application. If
they are missing, simply add them to the Registry. Create a new Key with
the label ANFileTransfer and String Key UploadFolder.
Here is an example of a use case:
All uploaded files should go to the user’s home directory. Set UploadFolder to
the path or drive of the home directory (e.g. U:\). When users upload files
with AccessNow, they will not be prompted for the upload path and all files will
be placed in the specified location. It is best practice to hide and prevent
access to drives that contain critical system files (e.g. C:\).
Specify executable that is launched with every uploaded file
An executable can be defined to launch with every uploaded file, with the file
path as the command-line argument. Batch (.BAT) files are also supported.
The executable is specified using a registry setting. It will be read from either
HKEY_LOCAL_MACHINE or HKEY_CURRENT_USER with HKEY_CURRENT_USER
taking precedence. The Registry keys for the Upload Handler setting are:
HKEY_LOCAL_MACHINE\SOFTWARE\Ericom Software\ANFileTransfer,
REG_SZ value UploadHandler

71
HKEY_CURRENT_USER\SOFTWARE\Ericom Software\ANFileTransfer,
REG_SZ value UploadHandler
On 64-bit systems running previous 32-bit versions of Access Server, and 32-
bit systems, the Registry keys are located here:
HKEY_LOCAL_MACHINE\SOFTWARE\Wow6432Node\Ericom
Software\ANFileTransfer, REG_SZ value UploadHandler
HKEY_CURRENT_USER\SOFTWARE\Wow6432Node\Ericom
Software\ANFileTransfer, REG_SZ value UploadHandler
Example Use Case:
Only Microsoft Paint is published to the end user. Set the UploadHandler to
the path of the published application and this application will be automatically
launched each time a file is uploaded. The uploaded file will be used as the
parameter for the application so it will be opened automatically (if it is a valid
file for the specified application).
NOTE This feature specifies a single handler application and will not verify that
the application is able to properly open a file passed to it. If multiple file
types need to be supported, use this feature to execute a BAT file that
checks file types, and then launches the appropriate application for each
type.
Tip: a useful way of using UploadHander is to set it to explorer.exe. Now, when
a file is uploaded, the configured helper application on the system will
automatically open the file. For example, upload abc.pdf, and Adobe Acrobat
will automatically open the file if it is configured as the helper application on the
operating system.
Server initiated AccessNow file uploads
A program running on the AccessServer side can request the user to upload a
file. The command line arguments for ANFileTransfer.exe are:
-t [0,1 allowMultiple] [“.txt,.doc” fileTypes] [“…” Destination Folder] [120
timeout in seconds by default]
For example:
start /w "" "c:\Program Files\Ericom Software\Ericom Access
Server\ANFileTransfer.exe" -t 1 ".txt" c:\temp 120

72
Description of command line parameters
start /w "" - waits for the process to complete
1 - multiple uploads
.txt - for file types (csv without * as prefix, . for all)
c:\temp - for the destination directory
120 - seconds to wait for the upload (120 is the default), from the time that
the process is started until the upload is complete
After the operation completes you can look at the return code with
echo %errorlevel%
Description of return codes:
0 – Successful
1 - Error parsing command line
2 - Missing parameter
3 - Error Initializing COM
4 - Failed to connect to the COM server
5 - Missing query parameters (NOT for triggered upload)
6 - Error getting parameter value (NOT for triggered upload)
7- Missing parameter when trying to copy or move a file
8 - Copying to Download directory failed
9 - Failed to move a file
10 - Missing upload parameter (-u file)
11 - Missing upload parameter (-U folder)
12 - Failed to create a directory for an upload
13 - Failed during an upload to return to PtTsAgent that it completed
14 - Failed during a download to return to PtTsAgent that it completed
15 - Error while waiting for a triggered upload to complete
16 - User Cancelled upload
17 - Timeout during a triggered upload failed to complete
18 - Multiple uploads argument for triggered upload is invalid
19 - Timeout argument for triggered upload is invalid

73
20 - Too few arguments for a triggered upload
21 - Failed to create a directory for the destination of a triggered upload
22 - Upload response has too few parameters
Keyboard Locale Value Table
The following list displays all valid foreign keyboard locale values for the
Keyboard Locale setting. Use this table to pass the desired setting with the
EAN_keyboard_locale cookie.
For example, to set Japanese, use EAN_keyboard_locale=E0010411
<option value="00000809" data-lang="en-gb">STR_ENGLISH_UK</option>
<option value="040904090C09" data-lang="en-
au">STR_ENGLISH_AU</option>
<option value="0000041C" data-lang="sq">STR_ALBANIAN</option>
<option value="00000423" data-lang="be">STR_BELARUSIAN</option>
<option value="0000141A" data-lang="bs">STR_BOSNIAN</option>
<option value="00010405" data-lang="bg">STR_BULGARIAN</option>
<option value="00000804" data-lang="zh-
cn">STR_CHINESE_SIMPLIFIED</option>
<option value="00000404" data-lang="zh-
tw">STR_CHINESE_TRADITIONAL</option>
<option value="00000405" data-lang="cs">STR_CZECH</option>
<option value="00000406" data-lang="da">STR_DANISH</option>
<option value="00000413" data-lang="nl">STR_DUTCH</option>
<option value="00000425" data-lang="et">STR_ESTONIAN</option>
<option value="0000040B" data-lang="fi">STR_FINNISH</option>
<option value="0000040C" data-lang="fr">STR_FRENCH</option>
<option value="0000080C" data-lang="fr-
be">STR_FRENCH_BELGIUM</option>
<option value="00001009" data-lang="fr-
ca">STR_FRENCH_CANADA</option>
<option value="0000100C" data-lang="fr-
ch">STR_FRENCH_SWITZERLAND</option>
<option value="00000407" data-lang="de">STR_GERMAN</option>

74
<option value="080708070807" data-lang="de-
ch">STR_GERMAN_SWITZERLAND</option>
<option value="00000408" data-lang="el">STR_GREEK</option>
<option value="040DF03D040D" data-lang="he">STR_HEBREW</option>
<option value="0000040E" data-lang="hu">STR_HUNGARIAN</option>
<option value="0000040F" data-lang="is">STR_ICELANDIC</option>
<option value="00000410" data-lang="it">STR_ITALIAN</option>
<option value="E0010411" data-lang="ja-jp">STR_JAPANESE</option>
<option value="E0010412" data-lang="ko-kr">STR_KOREAN</option>
<option value="00000426" data-lang="lv">STR_LATVIAN</option>
<option value="00010427" data-lang="lt">STR_LITHUANIAN</option>
<option value="041404140414" data-lang="no">STR_NORWEGIAN</option>
<option value="00010415" data-lang="pl">STR_POLISH</option>
<option value="00000816" data-lang="pt">STR_PORTUGUESE</option>
<option value="00010416" data-lang="pt-
br">STR_PORTUGUESE_BRAZIL</option>
<option value="00000418" data-lang="ro">STR_ROMANIAN</option>
<option value="00000419" data-lang="ru">STR_RUSSIAN</option>
<option value="0000081A" data-lang="sr">STR_SERBIAN_LATIN</option>
<option value="00000C1A" data-
lang="sr">STR_SERBIAN_CYRILLIC</option>
<option value="0000041B" data-lang="sk">STR_SLOVAK</option>
<option value="00000424" data-lang="sl">STR_SLOVENIAN</option>
<option value="0000040A" data-lang="es">STR_SPANISH</option>
<option value="0001040A" data-lang="es-
ar">STR_SPANISH_SOUTH_AMERICA</option>
<option value="0000041D" data-lang="sv">STR_SWEDISH</option>
<option value="0000041F" data-lang="tr">STR_TURKISH</option>
<option value="00000422" data-lang="uk">STR_UKRAINIAN</option>
<option value="00000452" data-lang="cy">STR_WELSH_UK</option>

75
Auto Keyboard Locale Switching
Ericom AccessServer 7.6.1 added automatic keyboard input locale switching
(inside the session) based on incoming input. As characters are typed, Ericom
AccessServer checks to see if the character is associated with a specific
language. If it is, a message is sent to the RDP Session to change and set the
keyboard locale accordingly.
Unicode and scancode input are both supported. This feature works best with
languages that are significantly different from each other (e.g. English and
Hebrew as one is a left-to-right language and the other right-to-left language)
This feature is disabled by default and is configured using the blaze.txt file.
To enable this feature perform the following:
Open the file C:\Program Files\Ericom Software\Ericom Access
Server\WebServer\AccessNow\resources\Blaze.txt using a text
editor
Add the line (if it does not exist): keyboard detect languages:s:
The syntax is for this setting is as follows:
keyboard detect languages:s:keyboardId,start-end,start-end, ... ;
keyboardId,start-end,start-end
Anytime Unicode input is received in the range ‘start-end’, the corresponding
‘keyboardId’ should be set.
For Example:
keyboard detect languages:s:0x04090409,41-5A,61-
7A;0xf03d040d,5BE-5F4
Keyboard Id: 0x04090409 = English. US. 41-5A and the characters 'A-Z' and
61-7A are 'a-z'.
Keyboard Id: 0xf03d040d = Hebrew. 5BE-5F4 are the characters: Hebrew
Punctuation Maqaf - Hebrew Punctuation Gershayim. This includes all the
Hebrew characters (See Unicode and HTML for the Hebrew alphabet:
https://en.wikipedia.org/wiki/Unicode_and_HTML_for_the_Hebrew_alphabet
The character ranges are in hexidecimal and the values are unicode character
ranges.
If the keyboard is manually changed on the server side, it will be out-of-sync
until the language is changed again on the client.
For this feature to function properly, the exact keyboard language must be
installed for the current user in the RDP session. There may be multiple
variants of a language, such as English.

76
In the AccessServer installation directory, there is a program named
LangControl.exe. To see a list of all keyboards installed for the current user
run LangControl /list
When the language is switched, there is a small delay of 500 milliseconds for
the first character typed in the new language to be detected and processed.

77
8. SECURITY
Using a Trusted Certificate
The Access Server installation includes a self-signed certificate for secure SSL
connections. Some browsers, such as Google Chrome, allow self-signed
certificates for SSL-encrypted WebSocket connections.
Opera browsers will notify the user that the server certificate is not signed and
prompt the user to continue.
A trusted certificate is also required to establish secured WebSocket
connections (wss).
To import a trusted certificate into the Access Server, perform the following:
1. Import the trusted certificate to the Computer (Personal |
Certificates) store.
2. Mark it as exportable during the import:

78
3. Go to the Certificate’s Details tab and highlight the Thumbprint.
4. Copy the thumbprint (CTRL+c)
5. Open the Access Server Configuration console and go to the
Security tab.
6. Paste (CTRL+v) the thumbprint into the Certificate Thumbprint
field.
7. Click Apply and then restart the Access Server.
8. Start the Access Server service and it will be ready for use.
NOTE For VDI environments, it is possible to install a wildcard certificate on the
gold image and then clone the image with the trusted certificate and
Access Server pre-configured.

79
Benefit of using a Trusted Certificate
When using AccessNow in production, a trusted certificate is strongly
recommended (especially if the Secure Gateway is not being used.) Certain
browsers, such as Safari on Macs, may deny connections that do not use a
trusted certificate. Certain browsers may also require a trusted certificate
when connecting using an HTTPS enabled URL. Install a trusted certificate in
the Secure Gateway or Access Server to ensure safe and reliable connections
from a wide range of web browsers.
Secured connections via Ericom Secure Gateway
When using the Ericom Secure Gateway, the connection between the
AccessNow browser client and the Secure Gateway is always secured using
SSL. The Ericom Secure Gateway is installed with a self-signed certificate by
default, but supports trusted certificates as well. Please read the Ericom
Secure Gateway Administrator’s Manual for full instructions on how to install
and configure it for use with Ericom AccessNow and Blaze.

80
9. SSL VPN CONFIGURATION
Ericom AccessNow is compatible with an SSL VPN that supports HTML5
Websockets. SSL VPN’s that do not support Websockets will require the
Ericom Secure Gateway (ESG) for HTTPS access.
Configuring the AccessNow link
AccessNow links are published in the SSL VPN web interface as web
applications. To publish a new AccessNow connection, go to the SSL VPN
Admin page and do the following:
1) Go to Resource Profiles | Web | New Web Application Resource Profile
2) Enter the Name of the AccessNow connection that the users should see.
3) Enter the AccessNow URL in the Base URL field.
4) Click Save and Continue
5) At the Roles dialog add all roles that should have access to the AccessNow
link and click Save Changes.
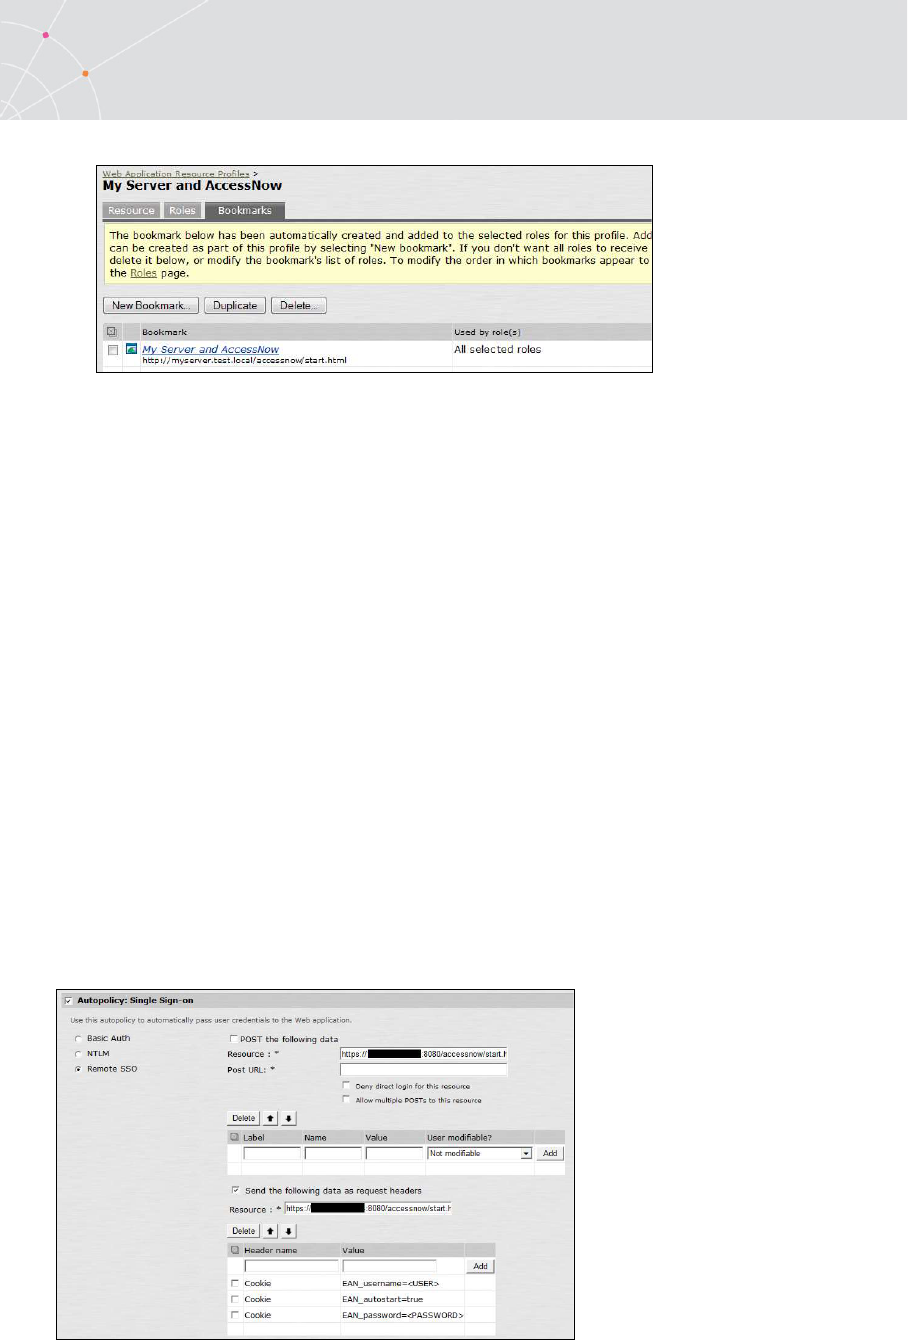
81
6) Enter the desired label for the connection in the Bookmarks tab
7) When the user logs into the SSL VPN - the AccessNow link will be
displayed under the Web bookmarks section (i.e. My Server and
AccessNow). Simply click on the link to connect to an application or
desktop published with AccessNow.
SSO Using Cookies
In the Single Sign-on Config, set “Remote SSO”
Set “Send the following data as request headers” to the AccessNow URL.
Set the desired cookies, for example:
EAN_username=<USER> (this passes the username)
EAN_password=<PASSWORD> (this passes the password)
EAN_autostart=true (this auto starts the connection, “bypassing”
the start page)
Other AccessNow parameters may also be passed as cookies.
NOTE: the environment variables <USER> and <PASSWORD> may vary for
SSL VPN’s, please refer to your device’s documentation for the user and
password variable syntax.

82
SSO Using POST
In the Single Sign-on Config, set “Remote SSO”
Set “POST the following data” to the AccessNow SSO URL (/AccessNow/sso).
Set the desired cookies, for example:
EAN_username=<USER> (this passes the username)
EAN_password=<PASSWORD> (this passes the password)
EAN_autostart=true (this auto starts the connection, “bypassing”
the start page)
Other AccessNow parameters may also be passed via POST.
NOTE: the environment variables <USER> and <PASSWORD> may vary for
SSL VPN’s, please refer to your device’s documentation for the user and
password variable syntax.
Support for multiple bookmarks in portal
The setting noSaved clears any saved setting before initiating the connection
(similar to clicking the Reset button).
Notes about this feauture:
• The default value for this setting is false
• This setting can be specified via config.js (settings.js), URL or
cookie
• The GUID (license) value is retained when this setting is used

83
10. HTTPS MODE
For environments where WebSockets support is not available, Ericom
AccessNow can work in HTTPS mode such that all communication will be sent
via HTTPS only. HTTPS mode will be used if WebSockets is not available.
WebSockets will be used when available as it will provide better performance.
HTTPS mode is required when using Microsoft Internet Explorer 9 or with
gateways that only proxy HTTPS traffic.
To enable this feature, the Ericom Secure Gateway is required. The
AccessNow web pages must be delivered using the web server built into the
Secure Gateway (files are located under the Webserver/AccessNow folder).
Perform the following to enable AccessNow for HTTPS support.
1) Install the Access Server on the desired RDP Hosts.
2) Install the Ericom Secure Gateway (this does not necessarily have to be
on the RDP Host or Access Server). The Ericom Secure Gateway must be
installed on a server that is accessible by the target end-user group(s).
3) To connect to the Access Server using HTTPS - enter the AccessNow URL
of the Secure Gateway (the Secure Gateway includes the AccessNow web
component) https://<securegatewayaddress>/accessnow/start.html
4) Enter the parameters for the target Access Server in the start.html page.
5) Upon connection, if HTTPS mode is active a ‘-‘ symbol will prefix the
address in the browser tab.
Forcing HTTPS Mode
AccessNow connections may be forced to use HTTPS mode for all connections.
To enable HTTPS-only mode, configure this in config.js file: onlyHTTPS: true,
In the default config.js file, this line is commented out; simply delete the
comments “//”, save the file, and all future AccessNow connections will use
this setting (the end-user’s browser’s cache may need to be cleared as well).
NOTE Forcing HTTPS will speed up the connection process in environments where
Websocket is never available. This is because AccessNow does not have to
attempt the connection using Websocket and wait for the attempt to fail.

84
11. TECHNICAL SUPPORT
Release Notes
Starting in Version 9.0, release notes will be listed here in addition to the
product download site. Release notes for versions prior to 9.0 can be found on
the product download site.
V10.0 (2022)
Validated on Windows 11, Windows 10 LTSC 2021, Windows 10 21H2,
and Server 2022
Access server generates self-signed certificate with Subject Alternative
Name
Printing stability fixes
This is the last planned version with support for 32bit Windows 8 and
10 operating systems.
V9.5 (2021)
AccessServer compatible with FIPS compliant systems
AccessServer JQuery components updated to latest version
AccessNow file uploads can be initiated from the Server side
V9.4
Clipboard can be configured to work in a single direction
block clipboard host to local:i:1 (0 to allow)
block clipboard local to host:i:1 (0 to allow)
Fix for resizing the screen when orientation is changed on mobile
devices (25889)
AccessServer can whitelist RDP host access (via registry key:
AllowedDestinationsInNonManagedMode)
Resolved unauthenticated-SSRF vulnerability
Deprecated three-finger swipe gesture (31204)
Fix for typing ‘@’ character with Japanese enabled (31839)
Improved support for Firefox on Ubuntu 16 (32121)
Ctrl key code support (25090)

85
Deprecate clipboardUseFlash since Flash is disabled in many browsers.
Deprecate settings: showDownload, remember, and blaze_acceleration
V9.2
New flag: physical keyboard presence:i: to configure the use of a local
keyboard (29939)
0 - auto detect physical keyboard
1 - physical keyboard connected
2 - no physical keyboard connected
Optional headers for web requests and security, under
CustomHttpHeaders:
X-Content-Type-Options: nosniff
X-Frame-Options: SAMEORIGIN
X-XSS-Protection: 1; mode=block
Use of touch redirection with hidden toolbar (29332)
New default behavior: no data is sent to the browser console (29771)
Enhanced security: reduce activity data displayed to user (32264)
AnFileTransfer logging (30286)
Create a string under HKEY_LOCAL_MACHINE\SOFTWARE\Ericom
Software\ANFileTransfer called logToFile with a path to a file that
should receive log messages
Setting to block scancodes (29865)
Whitelabeling feature (29875)
Disable dragging
Scroll bar control setting in config.js: scroll_bars_mode
0 - "auto": if the device has a touch screen then the scrollbars will not
be visible
1 - "always": the scrollbars will be visible at all times except for the
dynamic screen resolution under display settings (fit to browser
window and fit to screen)
2 - "never": the scrollbars are hidden at all times
Added General | DWORD report_thread_stack_sizes, set to 1 to create
the file "Access Server Thread Stack Sizes.txt" for troubleshooting.
V9.1
January 2019
Maintenance version – bug fixes and internal optimization (28123,
28820, 27271)

86
Lexmark Universal driver is used by default for printing (29098)
V9.0
November 2018
Windows 2019 support
Windows 10 SAC 1809 support
Version alignment to 9.0
ESG: TLS 1.0 disabled by default, can be enabled in the
configuration if needed.
Warning on using TS/RDS per-Device CAL with
AccessNow
Per-Device TS/RDS CALs are not recommended for use with Ericom
AccessNow. It is strongly recommended to use per-User TS/RDS CAL’s
with AccessNow. AccessNow will connect to Terminal Servers and Remote
Desktop Servers using per-Device CAL, however, it will consume another
license on top of any previous mstsc connection.
AccessNow operates within the browser. With each connection from a
different browser on the same machine, an additional per-Device TS/RDS CAL
will be consumed. For example, if a user connects to a Terminal Server first
with mstsc.exe, and then connects again with AccessNow on Google Chrome –
two per-Device CAL’s will be consumed. Furthermore, if the same user
connects using Firefox browser from the same machine, another per-Device
CAL will be consumed.
Browser Extension Conflicts
Browser extensions and toolbars may inject JavaScript code into web pages.
This can adversely impact the behavior of certain web pages. If AccessNow is
not working properly - try disabling or uninstalling any active browser
extensions or toolbars. Restart the web browser after uninstalling or disabling
an extension to ensure that it is no longer active.
AccessNow Printing with Foreign Languages
When using the AccessNow Printer with content containing foreign characters,
the resulting PDF file may show incorrect characters instead.
The fix for this issue is to add the entry ps2pdf mode:i:0 to blaze.txt.

87
The blaze.txt file is located under the resources folder of the AccessNow web
component. In an Access Server installation, this is located at Access Server |
WebServer | AccessNow | resources.
Examples Correct Incorrect
Korean
Russian
HTTPS and SSL Encryption
When the AccessNow page is delivered to the web browser using HTTPS - the
SSL encryption setting will be checked by default. Modern browsers usually
require that WebSocket connections to be encrypted when launched from
pages delivered using HTTPS.
Right Click on Mac
To perform a right-click on Mac OSX system: Command+left-click
Blocking Scan Codes
Starting in version 9.2, added registry settings to configure the blocking of
certain scan codes on input. This will not impact "unicode characters
In the registry set:
Access Server\SERVER Side
ScanCodesToIgnore REG_SZ
Value is a comma separated list of scan codes. The values are numeric in
either decimal or hex, for example: 0x14,17
0x1d hex code for control
0x38 hex code for ALT
0x3d hex code for F3 in us keyboard
PowerShell:
Set-ItemProperty -Path "HKLM:\SOFTWARE\Ericom Software\Access
Server\SERVER Side" -Name "ScanCodesToIgnore" -Value "0x1d,0x38"

88
Set-ItemProperty -Path "HKLM:\SOFTWARE\Ericom Software\Access
Server\SERVER Side" -Name "ScanCodesToIgnore" -Value "0x3d"
A list of scan code can be found here:
http://www.philipstorr.id.au/pcbook/book3/scancode.htm
Unicode characters can also be ignored with:
UnicodeCodesToIgnore REG_SZ
Value is a comma separated list of scan codes. The values are numeric in
either decimal or hex, for example:
0x2f is / and 0x60 is 0x27
Run: 'Set-ItemProperty -Path "HKLM:\SOFTWARE\Ericom Software\Access
Server\SERVER Side" -Name "UnicodesToIgnore" -Value "0x2f,0x27"`
If a DWORD is set to 1 for LogScancode or LogUnicode under
HKLM:\SOFTWARE\Ericom Software\Access Server\SERVER Side then the log
file will receive a log message for each character. This can help in determining
the scancode or unicode for a specific character.
Demo Site to Verify Connectivity
If a user is having trouble connecting to the AccessNow environment that has
been installed – ask the user to connect to the Ericom demo site on the
Internet using this URL: http://an.ericom.com/
If the demo any of the demo runs, then the browser is compatible with
AccessNow. This demo site communicates over port 443 using the Ericom
Secure Gateway and a trusted certificate. If it works for the user, verify the
following:
AccessNow port between the user’s browser and the AccessNow
environment is available. The default port is 8080.
A trusted certificate may be required for the Ericom Secure Gateway or
the Access Server.
Requesting Support
To request technical support from Ericom Software, email CA@ERICOM.COM
and provide the following information:

89
Which version of Ericom AccessNow are you using (see About)?
What type of system/operating system are you connecting to (host)?
Is it 32 or 64 bit? Is RDP enabled?
What type of system/operating system are you connecting from
(client)? Is it 32 or 64 bit?
Is port 8080 enabled on the host (is the firewall configured with an
exception)?
What error messages are being displayed?
How many people/machines/hosts are having this problem (one, all,
etc)?

90
ABOUT ERICOM
Ericom® Software is a leading global provider of Application Access, Virtualization
and RDP Acceleration Solutions. Since 1993, Ericom has been helping users access
enterprise mission-critical applications running on a broad range of Microsoft
Windows Terminal Servers, Virtual Desktops, legacy hosts and other systems.
Ericom has offices in the United States, United Kingdom and EMEA. Ericom also has
an extensive network of distributors and partners throughout North America,
Europe, Asia and the Far East. Our expanding customer base is more than 30
thousand strong, with over ten million installations.
For more information about Ericom and its products, please visit
http://www.ericom.com
North America UK & Western Europe International
Ericom Software Inc. Ericom Software (UK) Ltd. Ericom Software Ltd.
231 Herbert Avenue, Bldg. #4 11a Victoria Square 8 Hamarpeh Street
Closter, NJ 07624 USA Droitwich, Worcestershire Har Hotzvim Technology Park
Tel +1 (201) 767 2210 WR9 8DE United Kingdom Jerusalem 9777408 Israel
Fax +1 (201) 767 2205 Tel +44 (0)1905 777970 Tel +972 (2) 591 1700
Toll-free 1 (888) 769 7876 Fax +972 (2) 571 4737
Email info@ericom.com Email ukinfo@ericom.com Email info@ericom.com
