
Integrating VMware
Workspace ONE with Okta
Modified JAN 2022
AUG 2019
VMware Workspace ONE
You can find the most up-to-date technical documentation on the VMware website at:
https://docs.vmware.com/
VMware, Inc.
3401 Hillview Ave.
Palo Alto, CA 94304
www.vmware.com
Copyright
©
2018-2022 VMware, Inc. All rights reserved. Copyright and trademark information.
Integrating VMware Workspace ONE with Okta
VMware, Inc. 2
Contents
Integrating VMware Workspace ONE with Okta 5
1 Requirements for Workspace ONE-Okta Integration 7
2
Overview of Workspace ONE and Okta Integration 9
Main Use Cases 9
3 Configure Okta as an Identity Provider for Workspace ONE 13
Start Creating a New Identity Provider in Workspace ONE Access 13
Create a New SAML App in Okta 14
Complete Creating the New Identity Provider in Workspace ONE Access 16
Add Okta Authentication Method to Access Policies in Workspace ONE Access 18
Assign the App to Users in Okta 19
4
Configure
Workspace ONE Access as an Identity Provider in Okta 20
Get Workspace ONE Access SAML Metadata Information 20
Add Identity Provider in Okta 21
5 Configure Application Source in Workspace ONE Access 25
Configure Okta Application Source in Workspace ONE Access 25
Assign Okta Application Source to All Users 28
6 Configure Okta Applications in Workspace ONE Access 29
Add Okta Tenant Information in Workspace ONE Access 30
Obtain Okta API Token 30
Configure Okta Tenant Information in Workspace ONE Access 31
Managing Self Service Password Change Using Okta Password Policies 32
7
Configure Device Trust and Client Access Policies for iOS and Android Devices
34
Configure Identity Provider Routing Rules in Okta 35
Enable Device Trust Settings in Okta 38
Configure App Sign-on Policy Rules in Okta 39
Configure Default Access Policy in Workspace ONE Access 41
Recommendations for Configuring Native Android Apps 42
8 Configure Device Trust and Access Policies for Desktop Devices 44
Configure Identity Provider Routing Rules in Okta for Desktop Devices 44
VMware, Inc.
3
Integrating VMware Workspace ONE with
Okta
Integrating VMware Workspace ONE with Okta
provides information about integrating Okta
with the VMware Workspace ONE
®
platform. It describes specific use cases and provides
instructions on how to configure VMware Workspace ONE
®
Access
®
, the identity component of
the Workspace ONE platform which was formerly named VMware Identity Manager
™
, and Okta to
achieve those use cases.
Supported use cases include enabling Workspace ONE login using Okta authentication, adding
Okta applications to the Workspace ONE catalog, and enabling device trust and universal SSO
across native and web applications.
Recently Released Features
n Simplified administration of device trust for iOS and Android devices.
The new device trust solution streamlines the administration of conditional access policies for
iOS and Android devices. In previous releases, both an IDP discovery policy in Okta and an
authentication policy in Workspace ONE Access was required. Now, device trust and access
policies are configured only in the Okta Admin console for iOS and Android devices.
n Workspace ONE now has the capability to directly include Okta federated applications in the
Workspace ONE catalog without first importing them into Workspace ONE Access. This lets
you manage federated applications and user entitlements completely from the Okta Admin
console.
n When Okta apps are integrated in the Workspace ONE catalog, the password change
capability of the Workspace ONE Intelligent Hub app, Workspace ONE app, and web portal is
governed by Okta's password management framework and password policies defined in Okta.
n End users can now access their apps from the Workspace ONE Intelligent Hub app and
browser experience, in addition to the Workspace ONE app and portal.
For information on enabling the Intelligent Hub, see the Workspace ONE Hub Services
documentation.
Intended Audience
This information is written for experienced administrators who are familiar with the VMware
Workspace ONE platform, Workspace ONE Access, and Okta.
VMware, Inc.
5
Requirements for Workspace
ONE-Okta Integration
1
Ensure that you meet the requirements before you begin the Workspace ONE and Okta
integration. Requirements include installing components and setting up some integrations before
integrating Workspace ONE and Okta.
Components
The following components are required.
n A Workspace ONE Access tenant
Role required: System administrator
n An Okta tenant
Role required: Super or Org Administrator
n A Workspace ONE
®
UEM tenant
Workspace ONE UEM (formerly AirWatch) is required only if you want to configure mobile
SSO and device trust flows.
n Workspace ONE Access connector
n Okta AD Agent
n VMware AirWatch
®
Cloud Connector
™
(ACC)
ACC is required only if you use Workspace ONE UEM.
Workspace ONE UEM and Workspace ONE Access
Integration
Before integrating Workspace ONE and Okta, integrate your Workspace ONE UEM and
Workspace ONE Access tenants and configure the mobile SSO authentication methods that you
intend to use for device trust.
VMware, Inc.
7
Active Directory Integration
Before integrating Workspace ONE and Okta, integrate your Active Directory and sync users. You
must integrate Active Directory with:
n Workspace ONE Access using Workspace ONE Access connector
n Workspace ONE UEM using AirWatch Cloud Connector (ACC)
This is required only if you use Workspace ONE UEM.
n Your Okta org using the Okta AD Agent
Ensure that you sync the same users to all the environments.
Integrating VMware Workspace ONE with Okta
VMware, Inc. 8
Overview of Workspace ONE and
Okta Integration
2
VMware Workspace ONE
®
is a secure enterprise platform that delivers and manages applications
on iOS, Android, and Windows 10 and Mac OS devices. Identity, application, and enterprise
mobility management are integrated into the Workspace ONE platform.
VMware Workspace ONE
®
Access
™
(formerly named VMware Identity Manager) and VMware
Workspace ONE
®
UEM (formerly named AirWatch) are part of the Workspace ONE platform. As
part of Workspace ONE, Workspace ONE Access provides enterprise identity integration and web
and mobile single sign-on (SSO) services. Workspace ONE Access can be used as a standalone
federation Identity Provider (IDP). It can also complement an existing IDP and SSO solution like
Okta to provide additional services such as a unified app catalog portal and device posture-based
conditional access.
Workspace ONE Access can integrate with other SSO and IDP solutions like
Okta as a federated IDP or Service Provider (SP). This integration is generally based on SAML trust
connections.
This guide provides step-by-step instructions to configure and test use cases supported by the
Workspace ONE integration with Okta. To integrate Workspace ONE with Okta, you integrate
Workspace ONE Access, the identity component of Workspace ONE, with Okta.
This chapter includes the following topics:
n Main Use Cases
Main Use Cases
The main use cases supported by the Workspace ONE and Okta integration include enabling
Workspace ONE login using Okta authentication, adding Okta applications to the Workspace ONE
catalog, and enabling device trust and universal SSO across native and web applications.
Workspace ONE Login Using Okta
The Workspace ONE app, Workspace ONE Intelligent Hub app, and web portal can be configured
to use Okta as a trusted identity provider, allowing end users to log in using Okta authentication
policies. This use case also applies to VMware Horizon
®
customers who are using the Workspace
ONE catalog to launch Horizon apps and desktops, but have not yet deployed Workspace ONE
UEM to manage devices.
To implement this use case, configure the following:
VMware, Inc.
9

Chapter 3 Configure Okta as an Identity Provider for Workspace ONE
Unified Catalog
The Workspace ONE catalog can be configured to publish applications federated through Okta,
along with any other applications configured through Workspace ONE, such as Horizon and Citrix
applications and desktops, and native applications powered by Workspace ONE UEM. This allows
end users to go to a single app to discover, launch, or download their enterprise apps from any
device with a consistent user experience.
Note Okta SWA apps are not currently supported.
To implement this use case, configure the following:
1 Chapter 3 Configure Okta as an Identity Provider for Workspace ONE
2 Chapter 4 Configure Workspace ONE Access as an Identity Provider in Okta
3 Chapter 5 Configure Application Source in Workspace ONE Access
4 Chapter 6 Configure Okta Applications in Workspace ONE Access
Device Trust
Integrating Okta with Workspace ONE allows administrators to establish device trust by evaluating
device posture, such as whether the device is managed, before permitting end users to access
sensitive applications. For iOS and Android devices, device posture policies are configured in Okta
and evaluated anytime a user logs into a protected application.
For example, a device trust flow using the Salesforce application would follow this sequence for
iOS and Android devices:
Integrating VMware Workspace ONE with Okta
VMware, Inc. 10

1 End user attempts to access the Salesforce tenant.
2 Salesforce redirects to Okta as the configured identity provider.
3 Okta processes the incoming request and routes the client to the Workspace ONE identity
provider based on configured routing rules.
4 Workspace ONE challenges the user for authentication using Mobile SSO for iOS or Mobile
SSO for Android and redirects back to Okta with device trust status.
5 Okta completes evaluation of the device trust policy.
If the device is unmanaged, the user is prompted to enroll in Workspace ONE.
6 Okta issues the SAML assertion for Salesforce, if the device trust rule is satisfied based on the
SAML assertion response received from Workspace ONE.
The Device Trust use case requires end-to-end setup, covering all the procedures in this
document. To implement this use case, configure the following:
1 Chapter 3 Configure Okta as an Identity Provider for Workspace ONE
2 Chapter 4 Configure Workspace ONE Access as an Identity Provider in Okta
Establish SAML-based relationship with Workspace ONE for device trust check.
3 Chapter 5 Configure Application Source in Workspace ONE Access
4 Chapter 6 Configure Okta Applications in Workspace ONE Access
5 Configure identity provider routing rules and access policies.
n (iOS and Android devices) Chapter 7 Configure Device Trust and Client Access Policies for
iOS and Android Devices
Integrating VMware Workspace ONE with Okta
VMware, Inc. 11

Configure Okta as an Identity
Provider for Workspace ONE
3
This section describes the process of configuring Okta as the identity provider to Workspace ONE.
This configuration can be used to provide streamlined access to virtualized applications, provide
Okta's extensible Multi Factor Authentication to applications in Workspace ONE, and provide a
consistent and familiar login experience for users and administrators.
This configuration is done in VMware Workspace ONE Access, the identity component of
Workspace ONE.
This chapter includes the following topics:
n Start Creating a New Identity Provider in Workspace ONE Access
n Create a New SAML App in Okta
n Complete Creating the New Identity Provider in Workspace ONE Access
n Add Okta Authentication Method to Access Policies in Workspace ONE Access
n Assign the App to Users in Okta
Start Creating a New Identity Provider in Workspace ONE
Access
Create a new SAML identity provider in the Workspace ONE Access console and find the SAML
metadata information.
Procedure
1 Log in to the Workspace ONE Access console as the System administrator.
2 Click the Identity & Access Management tab, then click Identity Providers.
3 Click Add Identity Provider and select Create SAML IDP.
4 Scroll to the bottom of the page to the SAML Signing Certificate section.
VMware, Inc.
13

5 Click the Service Provider (SP) Metadata link and open it in a new tab.
6 In the SAML metadata file, find the values for the following:
n entityID
For example: https://tenant.vmwareidentity.com/SAAS/API/1.0/GET/metadata/sp.xml
n AssertionConsumerService Location for HTTP-POST binding
For example: https://tenant.vmwareidentity.com/SAAS/auth/saml/response
You will use these values in the next task.
Create a New SAML App in Okta
Create a new SAML app in the Okta Admin console.
Note If you are using the Okta developer dashboard, switch to the Classic UI first. If you see a <>
Developer prompt in the top left, click it and select Classic UI to switch to the Classic UI. Use the
Classic UI for all the tasks in this document.
Procedure
1 Log in to your Okta org and navigate to the Admin user interface.
2 Navigate to Applications > Applications.
3 Click Add Application.
4 Click Create New App.
5 Select Web as the Platform and SAML 2.0 as the Sign on method.
6 Click Create.
7 Enter a name for the app, for example, Workspace ONE SAML.
8 Click Next.
9 Enter the following information.
Option
Description
Single sign on URL Enter the AssertionConsumerService URL.
This is the URL retrieved from the Workspace ONE SAML metadata in Start
Creating a New Identity Provider in Workspace ONE Access. For example:
https://tenant.vmwareidentity.com/SAAS/auth/saml/response
Audience URI (SP Entity ID): Enter the entityID.
This is the entityID retrieved from the Workspace ONE SAML metadata
in Start Creating a New Identity Provider in Workspace ONE Access. For
example:
https://tenant.vmwareidentity.com/SAAS/API/1.0/GET/metadata/sp.xml
Integrating VMware Workspace ONE with Okta
VMware, Inc. 14

Option Description
Name ID format Select Unspecified.
Application username Select Okta username.
The application username mapping is defined in the next section. Okta
username maps to User Principal Name(UPN) in Workspace ONE.
10 Click Next.
11 Select I'm an Okta customer adding an internal app.
12 Check the This is an internal app that we have created box.
13 Click Finish.
Integrating VMware Workspace ONE with Okta
VMware, Inc. 15

14 From the Settings section of the Sign On menu for the new application, locate and copy the
URL for the Identity Provider metadata.
Complete Creating the New Identity Provider in Workspace
ONE Access
Return to the Workspace ONE Access console to complete creating the new SAML identity
provider.
Procedure
1 In the New Identity Provider page, enter the following information.
Option
Description
Identity Provider Name Enter a name for the new identity provider, such as Okta SAML IdP.
Binding Protocol Select HTTP Post.
Note This field appears after you enter the metadata URL in the SAML
Metadata section and click Process IdP Metadata.
Integrating VMware Workspace ONE with Okta
VMware, Inc. 16

Option Description
SAML Metadata a In the Identity Provider Metadata text box, enter the metadata URL
copied from Okta. For example:
https://yourOktaTenant/app/appId/sso/saml/metadata
b Click Process IdP Metadata.
c In the Identify User Using section, select NameID Element.
d In the Name ID format mapping from SAML Response section, click the
+ icon, then select the following values:
Name ID Format: urn:oasis:names:tc:SAML:1.1:nameid-
format:unspecified
Name ID Value: userPrincipalName
Note Select the User Attribute that the application username value
defined in Okta will match.
e In the Name ID Policy in SAML Request section, select the same value
that you selected for Name ID Format in the previous step:
urn:oasis:names:tc:SAML:1.1:nameid-format:unspecified
f Leave the Send Subject in SAML Request (when available) check box
unselected.
Users Select the directories you want to authenticate using this identity provider.
Network Select the networks that can access this identity provider.
Authentication Methods Enter the following:
Authentication Methods: Enter a name for the Okta authentication method,
such as Okta Auth Method.
SAML Context:
urn:oasis:names:tc:SAML:2.0:ac:classes:PasswordProtectedTrans
port
For example:
Integrating VMware Workspace ONE with Okta
VMware, Inc. 17

2 Click Add.
Add Okta Authentication Method to Access Policies in
Workspace ONE Access
After you set up Okta as a SAML identity provider in Workspace ONE Access, add the newly-
created Okta authentication method to access policies in Workspace ONE Access. Update the
default access policy, and other policies as needed.
You need to add the Okta authentication method to the default access policy so that Okta is used
as the sign in provider for the Workspace ONE catalog. The default access policy governs login to
the catalog, and any apps configured in Workspace ONE Access that do not have another policy
definition already.
Procedure
1 In the Workspace ONE Access console, click the Identity & Access Management tab, then
click Policies.
2 Click Edit Default Access Policy.
Integrating VMware Workspace ONE with Okta
VMware, Inc. 18

3 In the Edit Policy wizard, click Configuration.
4 Click the policy rule for Web browsers.
a Set Okta authentication as the authentication method.
If a user's network range is: ALL RANGES
and the user is accessing content from: Web Browser
Then perform this action: Authenticate using
then the user may authenticate using: Okta Auth Method
Note For
Okta Auth Method
, select the authentication method you created for the IDP in
Complete Creating the New Identity Provider in Workspace ONE Access.
b Click Save.
5 Edit other policies as needed to add the Okta authentication method.
Assign the App to Users in Okta
After you complete the setup, return to the Okta org and assign the newly-created Workspace
ONE application to users. Assign the application to a few users at first and test the integration.
Integrating VMware Workspace ONE with Okta
VMware, Inc. 19
Configure Workspace ONE
Access as an Identity Provider in
Okta
4
This section describes the process of configuring Workspace ONE Access as an identity provider
in Okta. This configuration is required to configure a unified catalog as well as mobile SSO and
device trust.
This chapter includes the following topics:
n Get Workspace ONE Access SAML Metadata Information
n Add Identity Provider in Okta
Get Workspace ONE Access SAML Metadata Information
Retrieve the SAML metadata information from Workspace ONE Access that is required to set up
an identity provider in Okta.
Procedure
1 Log in to the Workspace ONE Access console as the System administrator.
2 Select the Catalog > Web Apps tab.
3 Click Settings.
4 Click SAML Metadata in the left pane.
The Download Metadata tab is displayed.
5 Download the Signing Certificate.
a In the Signing Certificate section, click Download.
b Make a note of the location of the downloaded signingCertificate.cer file.
VMware, Inc.
20

6 Retrieve the SAML metadata.
a In the SAML Metadata section, right-click the Identity Provider (IdP) metadata link and
open it in a new tab or window.
b In the identity provider metadata file, find and make a note of the following values:
n entityID
For example: https://tenant.vmwareidentity.com/SAAS/API/1.0/GET/metadata/
idp.xml
n SingleSignOnService URL with
Binding="urn:oasis:names:tc:SAML:2.0:bindings:HTTP-POST"
For example: https://tenant.vmwareidentity.com/SAAS/auth/federation/sso
Add Identity Provider in Okta
Create the identity provider record in Okta.
For additional information about how Okta handles external identity providers, see the Okta
documentation on Identity Providers.
Procedure
1 Log in to the Okta Admin console with Administrator privileges or any role entitled to add an
Identity Provider.
2 Navigate to Security > Identity Providers.
3 Click Add Identity Provider.
Integrating VMware Workspace ONE with Okta
VMware, Inc. 21

4 Enter a name for the identity provider. For example, Workspace ONE.
5 Enter the following information:
Option Description
IdP Username idpuser.subjectNameId
If you plan to send the username in a custom SAML attribute, define
an appropriate expression. For information, see https://developer.okta.com/
reference/okta_expression_language.
Filter Uncheck the box.
Match against Okta Username
Adjust the selection as required for your environment and the values that you
plan to send.
If no match is found Redirect to Okta sign-in page
IdP Issuer URI Enter the entityID.
This is the value you obtained from the identity provider metadata file from
Workspace ONE. For example:
https://tenant.vmwareidentity.com/SAAS/API/1.0/GET/metadata/idp.xml
IdP Single Sign-On URL Enter the SingleSignOnService Location URL.
This is the value you obtained from the identity provider metadata file from
Workspace ONE. For example:
https://tenant.vmwareidentity.com/SAAS/auth/federation/sso
IdP Signature Certificate Browse and select the Signing Certificate file you downloaded from
Workspace ONE.
Tip You may need to change the file extension or default browser filter to
look for *.crt and *.pem files.
Integrating VMware Workspace ONE with Okta
VMware, Inc. 22

6 Click Show Advanced Settings, scroll to the Request Authentication Context option, and
select Device Trust.
This setting specifies the context of the authentication request.
7 Click Add Identity Provider.
8 Verify that the following information appears:
n SAML Metadata
n Assertion Consumer Service URL
n Audience URI
For example:
Integrating VMware Workspace ONE with Okta
VMware, Inc. 23

9 Download and save the metadata file.
a Click the Download Metadata link.
b Save the metadata file locally.
c Open the metadata file and copy its contents.
You will use this metadata when you configure the Okta Application Source in Workspace
ONE Access.
What to do next
Configure Okta Application Source in Workspace ONE Access. Configuring the Okta Application
Source is mandatory.
Integrating VMware Workspace ONE with Okta
VMware, Inc. 24
Configure Application Source in
Workspace ONE Access
5
After you configure Workspace ONE Access as an identity provider in Okta, configure the
Okta application source in Workspace ONE Access. Configuring the Okta application source in
Workspace ONE Access is a requirement for the unified catalog and device trust use cases.
This chapter includes the following topics:
n Configure Okta Application Source in Workspace ONE Access
n Assign Okta Application Source to All Users
Configure Okta Application Source in Workspace ONE
Access
Configure Okta as an application source in Workspace ONE Access.
This is a one-time, initial configuration task.
Prerequisites
You have configured Workspace ONE Access as an identity provider in Okta. See Chapter 4
Configure Workspace ONE Access as an Identity Provider in Okta.
Procedure
1 In the Workspace ONE Access console, select the Catalog > Web Apps tab.
2 Click Settings.
3 Click Application Sources in the left pane.
VMware, Inc.
25

4 Click OKTA.
5 In the OKTA Application Source wizard Definition page, enter a description if needed, then
click Next.
6 In the Configuration page:
a For Configuration, select URL/XML.
b In the URL/XML text box, copy and paste the SP metadata that you downloaded from Okta
in Add Identity Provider in Okta.
Integrating VMware Workspace ONE with Okta
VMware, Inc. 26

7 If you plan to configure device trust for iOS and Android mobile devices, click Advanced
Properties and set the following options to Yes:
Option Description
Device SSO Response Send device posture information in the SAML response to Okta after the user
is authenticated.
Enable Force Authn Request Enable Force Authn request. The service provider can send the
forceAuthn=true flag in the SAML request, which forces the user to be
reauthenticated.
Enable Authentication Failure
Notification
Receive SAML response error messages when authentication fails.
Note These properties are mandatory for the device trust solution for iOS and Android
devices.
8 Click Next.
9 In the Access Policies page, select the default access policy set.
Authentication requests from Okta applications will be authenticated using this policy set.
10 Click Next, review your selections, and click Save.
11 Click the OKTA Application Source again.
12 In the Configuration page, modify the Username Value to match the value that Okta is
matching against, such as Okta Username.
13 Save your changes.
What to do next
Assign Okta Application Source to All Users
Integrating VMware Workspace ONE with Okta
VMware, Inc. 27
Assign Okta Application Source to All Users
Assign the Okta application source that you configured to all users in Workspace ONE Access.
Prerequisites
You have configured the Okta application source in Workspace ONE Access as described in
Configure Okta Application Source in Workspace ONE Access.
Procedure
1 In the Workspace ONE Access console, click the Users & Groups > Groups tab.
2 Click the ALL USERS group.
3 Click the Apps tab, then click Add Entitlements.
4 Select the OKTA application and select Automatic as the Deployment type.
5 Click Save.
Integrating VMware Workspace ONE with Okta
VMware, Inc. 28
Configure Okta Applications in
Workspace ONE Access
6
You can provide Okta applications to your users in the Workspace ONE catalog so that they can
access all their apps conveniently from one location. Users can access their Okta apps, along with
their other apps, from the Workspace ONE Intelligent Hub app, Workspace ONE app, or web
portal.
To integrate Okta applications into the Workspace ONE catalog, you configure Okta as an
application source in Workspace ONE Access and enter your Okta tenant details in the Workspace
ONE Access console. You do not need to add individual Okta applications to the Workspace ONE
Access catalog.
When end users log into Workspace ONE, the Okta apps to which they are entitled appear
automatically in the catalog, along with their other apps.
Workspace ONE Access uses the Okta tenant information you configure to connect to the Okta
tenant and retrieve apps and user entitlements whenever a user logs into Workspace ONE. When
a user clicks an Okta app, Workspace ONE Access uses the application source configuration to
launch the app.
You manage apps and user entitlements in the Okta Admin console, not in the Workspace ONE
Access console. When you add or delete apps or entitlements in the Okta Admin console, the
changes are replicated in end users' catalogs directly. Okta apps do not appear in the Workspace
ONE Access administration console.
This integration supports the following types of Okta apps:
n SAML 2.0
n WS-Federation
n Bookmark
n OpenID Connect
Make sure that you have configured the Okta application source in Workspace ONE Access
before proceeding with the tasks in this section. See Chapter 5 Configure Application Source in
Workspace ONE Access.
This chapter includes the following topics:
n Add Okta Tenant Information in Workspace ONE Access
n Managing Self Service Password Change Using Okta Password Policies
VMware, Inc.
29

Add Okta Tenant Information in Workspace ONE Access
Add your Okta tenant information and API token in the Workspace ONE Access console to
enable Workspace ONE Access to connect to the Okta tenant to retrieve Okta apps and user
entitlements. This is a one-time, initial configuration task.
Before you configure the tenant information in Workspace ONE Access, obtain an API token from
the Okta Admin console.
Obtain Okta API Token
Obtain an Okta API token from the Okta Admin console. Workspace ONE Access requires the
Okta API token to connect with the Okta tenant and retrieve apps.
The token expires 30 days after it is last used. Each time the token is used, the expiry date is
extended by 30 days.
Procedure
1 In the Okta Admin console, click Security > API.
2 Click Create Token.
3 Enter a name for the token, then click Create Token.
4 Copy and save the token for use in the next task.
Note After you close the window, you cannot view the token again.
Integrating VMware Workspace ONE with Okta
VMware, Inc. 30

What to do next
Configure Okta tenant information in the Workspace ONE Access console.
Configure Okta Tenant Information in Workspace ONE Access
In the Workspace ONE Access console, enter your Okta tenant information, which is required for
Workspace ONE Access to connect to the Okta tenant and retrieve apps. You need to specify the
Okta Cloud URL, API token, and user search attribute.
Prerequisites
You have obtained an API token from the Okta Admin console.
Procedure
1 In the Workspace ONE Access console, click the Identity & Access Management tab, then
click Setup.
2 Click the Okta tab.
3 Enter the Okta tenant information.
Option Description
Okta Cloud URL Enter your Okta tenant URL. For example, https://mytenant.example.com.
Okta API Token Enter the Okta API Token you created in Obtain Okta API Token.
User Search Parameter Select the user attribute to be used to search for users in the Okta directory.
You can search by userName, email, or userPrincipalName.
For example:
4 Click Save.
Integrating VMware Workspace ONE with Okta
VMware, Inc. 31

Managing Self Service Password Change Using Okta
Password Policies
Integrating Okta applications with Workspace ONE Access automatically enables Okta password
management for Workspace ONE users. No configuration is required in the Workspace ONE
Access console.
In the Workspace ONE Intelligent Hub app, Workspace ONE app, and web portal, end users can
change their passwords by going to Settings and clicking the Change Password link. When Okta
applications are integrated with Workspace ONE Access, this password change is automatically
handled by Okta, not by Workspace ONE Access.
When users change their passwords, password policies configured in the Okta Admin console
are enforced. The password policy is not displayed by default on the Change Password page but
appears when users enter a password that does not match the policy.
For example:
Integrating VMware Workspace ONE with Okta
VMware, Inc. 32


Configure Device Trust and Client
Access Policies for iOS and
Android Devices
7
The Okta Device Trust feature simplifies the administration of conditional access policies for iOS
and Android devices in the Workspace ONE-Okta integration. Device trust and access policies for
apps need to be configured only in the Okta Admin console.
When iOS or Android device trust is configured in Okta, users on iOS or Android devices are
redirected to Workspace ONE Access for authentication using the Mobile SSO (iOS) or Mobile SSO
(Android) authentication method. Workspace ONE Access returns device posture information to
Okta in the SAML response.
The access policies you configure in Okta then determine whether the device must be trusted in
order to access the application. If the device is untrusted, a device enrollment page is displayed.
Configuring device trust for iOS and Android devices includes the following tasks.
1 Configure Okta identity provider routing rules for iOS and Android devices.
2 Enable Device Trust settings in Okta.
3 Configure app sign-on policy rules in Okta.
4 Configure the default access policy in Workspace ONE Access.
Make sure that you follow the preliminary procedures listed for the Device Trust use case in Main
Use Cases before proceeding with the tasks in this section. The Device Trust use case requires
end-to-end setup, covering all the procedures in this document.
Important Do not add the Device Compliance (with AirWatch) authentication method to policy
rules in Workspace ONE Access for apps that are configured with Device Trust in Okta. The Device
Compliance authentication method is not compatible with apps using Okta Device Trust.
Important Verify that the Device SSO Response, Enable Force Authn Request, and Enable
Authentication Failure Notification properties in the Okta application source configuration in
Workspace ONE Access are set to Yes. These properties are a requirement for the device trust
solution for iOS and Android devices. See Configure Okta Application Source in Workspace ONE
Access for information.
Note This section applies to iOS and Android devices only. To configure device trust and
access policies for desktop devices, see Chapter 8 Configure Device Trust and Access Policies
for Desktop Devices.
VMware, Inc.
34

This chapter includes the following topics:
n Configure Identity Provider Routing Rules in Okta
n Enable Device Trust Settings in Okta
n Configure App Sign-on Policy Rules in Okta
n Configure Default Access Policy in Workspace ONE Access
n Recommendations for Configuring Native Android Apps
Configure Identity Provider Routing Rules in Okta
Configure Okta Identity Provider routing rules for iOS and Android devices for the Workspace
ONE-Okta integration. These routing rules work with application sign on policies to redirect
authentication requests from iOS and Android devices to Workspace ONE.
Procedure
1 In the Okta Admin console, navigate to Security > Identity Providers.
2 Click the Routing Rules tab, then click Add Routing Rule.
3 Configure the routing rule.
Option
Description
Rule Name Enter a name for the rule you are creating.
IF User's IP is If appropriate for your implementation, you can specify network zones to
which the routing rule applies or does not apply. Network zones must be
defined already in Okta.
AND User's device platform is Select Any of these devices, then select iOS or Android, or both, based on
your requirements.
AND User is accessing Select Any of the following applications, then enter the applications that
you plan to configure with Device Trust app Sign On policy rules in the Okta
Admin console.
For more information, see Configure App Sign On policy rules in Okta.
Integrating VMware Workspace ONE with Okta
VMware, Inc. 35

Option Description
AND User matches Select the appropriate option.
n Anything
Specifies any user. This is the default option.
n Regex on login
Allows you to enter any valid regular expression based on the user login
to use for matching. This is useful when specifying the domain, or if a user
attribute is not sufficient for matching. For details, see Identity Provider
Discovery.
n Domain list on login
Specify a list of the domains to match. For example, example.com. Do not
add the @symbol to the domain name. You can add multiple domains.
Note that it is not necessary to escape any characters.
n User attribute
Select an attribute name in the left list, a type of comparison in the Starts
with list, and then enter a value that you want to match in the text field on
the right.
THEN Use this identity provider Select the Identity Provider you created in Okta for Workspace ONE Access,
as described in "Configure Workspace ONE Access as an Identity Provider in
Okta".
For example:
Integrating VMware Workspace ONE with Okta
VMware, Inc. 36


Enable Device Trust Settings in Okta
Configure device trust for iOS and Android devices in the Okta Admin console. Device trust
settings work together with the Okta identity provider routing rules to redirect authentication
requests from target applications on iOS and Android devices to Workspace ONE.
Important Do not deselect the Device Trust setting on the Security > Device Trust page in the
Okta Admin console if you have also configured an app sign on policy in the Applications >
app
> Sign On Policy page that allows trusted devices. Otherwise, your Device Trust configuration will
be in an inconsistent state. To deactivate Device Trust for your org, first remove any app sign on
policies that contain a Device Trust setting, then deselect Device Trust on the Security > Device
Trust page.
Procedure
1 In the Okta Admin Console, navigate to Security > Device Trust.
2 Click Edit in the iOS Device Trust or Android Device Trust section, as applicable.
3 Select Enable iOS Device Trust or Enable Android Device Trust, as applicable.
4 For Trust is established by, select VMware.
5 For Integration type, select SAML-based (Workspace ONE UEM + VIDM).
For example:
6 Click Next.
7 For Device Identity provider, select the identity provider you created in Okta for Workspace
ONE Access.
8 (Optional) In the Mobile device management provider text box, accept the default
Workspace ONE value or modify it if necessary.
Your entry identifies the MDM provider to end users during device enrollment.
Integrating VMware Workspace ONE with Okta
VMware, Inc. 38

9 In the Enrollment link text box, enter a web address where end users with unmanaged devices
will be redirected. For example, you may want to send these users to a page with enrollment
instructions, or to the Workspace ONE enrollment page.
For example:
10 Click Save.
What to do next
Configure App Sign-on Policy Rules in Okta
Configure App Sign-on Policy Rules in Okta
Configure app sign-on policy rules in the Okta Admin console.
To configure granular access to the app, selectively apply conditions as you create one or more
prioritized rules based on:
n Who users are and the groups to which they belong
n Whether they are on or off network or within a defined network zone
n The type of client running on their device (Office 365 apps only)
n The platform of their mobile or desktop device
n Whether or not their devices are trusted
To follow an allowlist approach to creating Sign On policy rules:
1 Create one or more permissive rules to support the scenarios that will allow access to the app,
then assign those rules the highest priority.
2 Create a Deny catch-all rule that will apply to users who do not match the permissive scenarios
you created in Step 1. Assign the Deny catchall rule the lowest priority, just above Okta's
Default Rule. In the allowlist approach described here, the Default rule is never reached
because it is effectively negated by the Deny catchall rule.
Integrating VMware Workspace ONE with Okta
VMware, Inc. 39

If you deactivate Device Trust, follow these guidelines:
n Do not deselect the Device Trust setting on the Security > Device Trust page if you have also
configured an app sign-on policy on the Applications > app > Sign On Policy page that allows
trusted devices. Otherwise, your Device Trust configuration will be in an inconsistent state.
To deactivate Device Trust for your org, first remove any app sign-on policies that contain a
Device Trust setting, then deselect Device Trust on the Security > Device Trust page.
n If you ask Okta to deactivate the Device Trust solution for your org (which is separate from the
Enable Device Trust setting that you enabled on the Security > Device Trust page), make sure
to first change the Device Trust setting in the app sign-on policy rules to Any. If you do not
make this change and then later have Okta re-enable the Device Trust solution for your org,
the Device Trust setting in app sign-on policy rules will take effect immediately, which you may
not have expected.
For additional information about creating sign-on policy rules, see https://help.okta.com/en/prod/
Content/Topics/Security/App_Based_Signon.htm.
Prerequisites
Log in to the Okta Admin console as an App, Org, or Super admin, as only these roles can
configure app sign-on policies.
Procedure
1 In the Okta Admin console, click the Applications tab, then click the SAML or WS-Fed-
enabled app that you want to protect with Device Trust.
2 Click the Sign On tab, scroll down to the Sign On Policy section, and click Add Rule.
3 Configure one or more rules using the example allowlist as a guide.
Note By default, all Client options in the App Sign On Rule dialog box are preselected.
You cannot select the Trusted and Not trusted options in the Device Trust section unless you
deselect the following options in the Client section:
n Exchange ActiveSync or Legacy Auth client
n Other mobile (e.g. BlackBerry)
n Other desktop (e.g. Linux)
Example: Sample Allowlist
Users with untrusted devices are guided through Workspace ONE enrollment or redirected to the
destination of the Enrollment link configured in Enable Device Trust Settings in Okta.
Example Rule 1: Web browser; Modern Auth; iOS and/or Android; Trusted; Allow access + MFA
Example Rule 2: Web browser; Modern Auth; All platforms except iOS and/or Android; Any Trust;
Allow access + MFA
Example Rule 3: Web browser; Modern Auth; iOS and/or Android; Not Trusted; Deny access
Integrating VMware Workspace ONE with Okta
VMware, Inc. 40

Rule 4: Default sign on rule – Any client, All platforms; Any Trust; Allow access
Note This allowlist example shows Device Trust rules for managing access to Office 365. For
other apps, note that the section If the user's client is any of these is not present.
Configure Default Access Policy in Workspace ONE Access
Update the default access policy in Workspace ONE Access to include policy rules for iOS
and Android devices. The default access policy governs login to the Workspace ONE catalog.
Configuring mobile SSO policy rules is mandatory as it is part of passing device trust information to
apps.
Create policy rules for iOS and Android with Mobile SSO as the authentication method and with
Okta authentication as the fallback method. Also configure the rules for Workspace ONE app and
Hub app, and Web browser. Make sure that the policy rules are in the correct order.
Important Do not add the Device Compliance (with AirWatch) authentication method to policy
rules in Workspace ONE Access for apps that are configured with Device Trust in Okta. The Device
Compliance authentication method is not compatible with apps using Okta Device Trust.
Procedure
1 In the Workspace ONE Access console, click the Identity & Access Management tab, then
click the Policies tab.
2 Click Edit Default Access Policy.
3 In the Edit Policy wizard, click Configuration.
4 Click Add Policy Rule and create a policy rule for iOS devices.
a Set Mobile SSO (iOS) as the first authentication method and Okta authentication as the
fallback authentication method.
If a user's network range is: ALL RANGES
and the user is accessing content from: iOS
Then perform this action: Authenticate using
then the user may authenticate using: Mobile SSO (iOS)
If the preceding method fails or is not applicable, then: Okta Auth Method
Note For
Okta Auth Method
, select the authentication method you created for the Okta
IDP in Complete Creating the New Identity Provider in Workspace ONE Access.
b Click Save.
Integrating VMware Workspace ONE with Okta
VMware, Inc. 41

5 Click Add Policy Rule and create a similar policy rule for Android devices.
a Set Mobile SSO (Android) as the first authentication method and Okta authentication as the
fallback authentication method.
If a user's network range is: ALL RANGES
and the user is accessing content from: Android
Then perform this action: Authenticate using
then the user may authenticate using: Mobile SSO (Android)
If the preceding method fails or is not applicable, then: Okta Auth Method
b Click Save.
6 Configure the policy rule for Workspace ONE app and Hub app.
a Click the policy rule for Workspace ONE app and Hub app to edit it.
b Configure the rule.
If a user's network range is: ALL RANGES
and the user is accessing content from: Workspace ONE App or Hub App
Then perform this action: Authenticate using
then the user may authenticate using: Mobile SSO (for iOS)
If the preceding method fails or is not applicable, then: Mobile SSO (for Android)
If the preceding method fails or is not applicable, then: Okta Auth Method
7 Verify that the policy rule for Web browsers that you configured earlier in the integration
process is configured correctly.
If a user's network range is: ALL RANGES
and the user is accessing content from: Web Browser
Then perform this action: Authenticate using
then the user may authenticate using: Okta Auth Method
8 Arrange the policy rules in the following order, listed from top to bottom.
a Workspace ONE App or Hub App
b iOS or Android
c iOS or Android
d Web browser
Recommendations for Configuring Native Android Apps
You can configure certain settings for the mobile SSO flow for Android to provide the best user
experience for users on Android devices.
Native Android apps require the VMware Tunnel to be downloaded and installed on users'
devices. As a best practice for a Workspace ONE-Okta integration environment, configure the
Auto deployment setting for each native Android app so that the app and tunnel are automatically
deployed on users' devices after they enroll. Also enable Managed Access for the apps.
Integrating VMware Workspace ONE with Okta
VMware, Inc. 42
You configure these settings in the VMware Workspace ONE UEM console.
Procedure
1 In the Workspace ONE UEM console, navigate to the Apps & Books > Applications > Native
page.
2 Click the app name.
3 Click Assign.
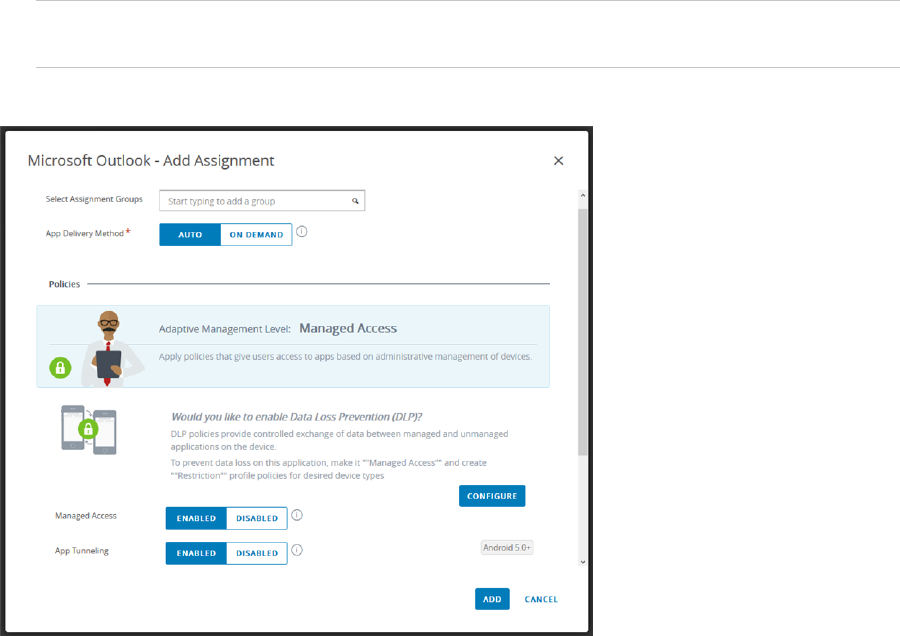
4 Click Add Assignment to add a new assignment or select the assignment to edit and click Edit.
5 Configure the assignment according to your needs and include the following selections as a
best practice.
n App Delivery Method: AUTO
n Managed Access: ENABLED
n App Tunneling: ENABLED
Note When you enable App Tunneling, you also need to select the VPN configuration
profile to use for the app.
For example:
6 Save the assignment.
Results
After users enroll their devices, the app appears in the catalog. The app icon indicates that the
tunnel is included. When users install the app, both the app and the tunnel are installed.
Integrating VMware Workspace ONE with Okta
VMware, Inc. 43

Configure Device Trust and
Access Policies for Desktop
Devices
8
To configure device trust and access policies for desktop devices, you configure identity provider
routing rules in Okta and conditional access policies in Workspace ONE Access. The new,
simplified Okta device trust solution that is available for iOS and Android devices is not yet
available for desktop devices. To configure device trust for desktop devices, you can use the
Certificate (Cloud Deployment) and Device Compliance authentication methods in Workspace
ONE Access policies.
Important Do not use the Device Compliance (with AirWatch) authentication method for apps
that are configured with Device Trust in Okta. The Device Compliance authentication method is
not compatible with apps using Okta Device Trust.
Make sure that you follow the preliminary procedures listed for the Device Trust use case in Main
Use Cases before proceeding with the tasks in this section.
This chapter includes the following topics:
n Configure Identity Provider Routing Rules in Okta for Desktop Devices
n Configure Conditional Access Policies in Workspace ONE Access for Desktop Devices
Configure Identity Provider Routing Rules in Okta for
Desktop Devices
Configure Okta Identity Provider routing rules for desktop devices for the Workspace ONE-Okta
integration. These routing rules work with application sign on policies to redirect authentication
requests from desktop devices to Workspace ONE.
Procedure
1 In the Okta Admin console, navigate to Security > Identity Providers.
2 Click the Routing Rules tab, then click Add Routing Rule.
VMware, Inc.
44

3 Configure the routing rule.
Option Description
Rule Name Enter a name for the rule you are creating.
IF User's IP is If appropriate for your implementation, you can specify network zones to
which the routing rule applies or does not apply. Network zones must be
defined already in Okta.
AND User's device platform is Select Any of these devices, then select Windows, macOS, and Other
desktop, or some of these options, based on your requirements.
AND User is accessing Select Any of the following applications, then enter the applications to which
you want to apply the routing rule.
AND User matches Select the appropriate option.
n Anything
Specifies any user. This is the default option.
n Regex on login
Allows you to enter any valid regular expression based on the user login
to use for matching. This is useful when specifying the domain, or if a user
attribute is not sufficient for matching. For details, see Identity Provider
Discovery.
n Domain list on login
Specify a list of the domains to match. For example, example.com. Do not
add the @symbol to the domain name. You can add multiple domains.
Note that it is not necessary to escape any characters.
n User attribute
Select an attribute name in the left list, a type of comparison in the Starts
with list, and then enter a value that you want to match in the text field on
the right.
THEN Use this identity provider Select the Identity Provider you created in Okta for Workspace ONE Access,
as described in "Configure Workspace ONE Access as an Identity Provider in
Okta".
For example:
Integrating VMware Workspace ONE with Okta
VMware, Inc. 45

4 Click Create Rule.
What to do next
Configure Conditional Access Policies in Workspace ONE Access for Desktop Devices
Configure Conditional Access Policies in Workspace ONE
Access for Desktop Devices
To provide SSO and device trust for desktop devices, additional access policy rules are required in
Workspace ONE Access.
Integrating VMware Workspace ONE with Okta
VMware, Inc. 46

Create the access policy for MacOS and Windows 10 with Certificate (Cloud Deployment) and
Device Compliance as the authentication methods.
Important Do not use the Device Compliance (with AirWatch) authentication method for apps
that are configured with Device Trust in Okta. The Device Compliance authentication method is
not compatible with apps using Okta Device Trust.
Procedure
1 In the Workspace ONE Access console, navigate to the Identity & Access Management
Policies page.
2 Click Add Policy.
3 In the Definition page of the wizard, enter the following information.
Option Description
Policy Name A name for the policy
Description A description for the policy
Applies to Select Okta.
This assigns the access policy set to the Okta Application Source. All requests
for Okta apps are evaluated with this policy rule set.
4 Click Next.
5 In the Configuration page, click Add Policy Rule and configure the policy rule for Windows 10.
a Select Windows 10 as the device type in the and user is accessing content from list.
b Set the authentication method as follows:
then perform this action: Authenticate using
then the user may authenticate using: Certificate (Cloud Deployment)
and: Device Compliance (with AirWatch)
Note If Okta Device Trust is configured, do not use the Device Compliance (with
AirWatch) authentication method. Instead, use Okta authentication as the fallback
authentication method:
then perform this action: Authenticate using
then the user may authenticate using: Certificate (Cloud Deployment)
If the preceding method fails or is not applicable, then: Okta Auth Method
c Click Save.
Integrating VMware Workspace ONE with Okta
VMware, Inc. 47

6 Click Add Policy Rule and configure the policy rule for MacOS.
a Select MacOS as the device type in the and user is accessing content from list.
b Set the authentication method as follows:
then perform this action: Authenticate using
then the user may authenticate using: Certificate (Cloud Deployment)
and: Device Compliance (with AirWatch)
Note If Okta Device Trust is configured, do not use the Device Compliance (with
AirWatch) authentication method. Instead, use Okta authentication as the fallback
authentication method:
then perform this action: Authenticate using
then the user may authenticate using: Certificate (Cloud Deployment)
If the preceding method fails or is not applicable, then: Okta Auth Method
c Click Save.
7 Because this new policy overrides the default access policy for Okta applications, also add
policy rules for iOS, Android, Workspace ONE App or Hub App, and Web browser to the new
policy, similar to the ones you previously added to the default access policy.
a Create a policy rule for iOS devices with Mobile SSO (iOS) as the first authentication
method and Okta authentication as the fallback authentication method.
If a user's network range is: ALL RANGES
and the user is accessing content from: iOS
then perform this action: Authenticate using
then the user may authenticate using: Mobile SSO (iOS)
If the preceding method fails or is not applicable, then: Okta Auth Method
b Create a policy rule for Android devices with Mobile SSO (iOS) as the first authentication
method and Okta authentication as the fallback authentication method.
If a user's network range is: ALL RANGES
and the user is accessing content from: Android
then perform this action: Authenticate using
then the user may authenticate using: Mobile SSO (Android)
If the preceding method fails or is not applicable, then: Okta Auth Method
Integrating VMware Workspace ONE with Okta
VMware, Inc. 48

c Create a policy rule for Workspace ONE app and Hub app.
If a user's network range is: ALL RANGES
and the user is accessing content from: Workspace ONE App or Hub App
then perform this action: Authenticate using
then the user may authenticate using: Mobile SSO (for iOS)
If the preceding method fails or is not applicable, then: Mobile SSO (for Android)
If the preceding method fails or is not applicable, then: Okta Auth Method
d Create a policy rule for Web browsers with Okta as the authentication method.
If a user's network range is: ALL RANGES
and the user is accessing content from: Web Browser
then perform this action: Authenticate using
then the user may authenticate using: Okta Auth Method
8 Arrange the policy rules in the following order, listed from top to bottom.
a Workspace ONEApp or Hub App
b Windows 10 or Mac OS
c Windows 10 or Mac OS
d iOS or Android
e iOS or Android
f Web browser
Integrating VMware Workspace ONE with Okta
VMware, Inc. 49
